
In the later half of last year I reviewed Eizo’s brand new, superb CG-318 4k Resolution Graphics Display for Photographers and Graphic Design Professionals and gave it my highest recommendation. The Eizo represents the state of the art in graphics display for working professionals but comes with a fairly significant price barrier to entry. So what are your options if you are in the market for a high quality Adobe RGB monitor on a more family friendly budget?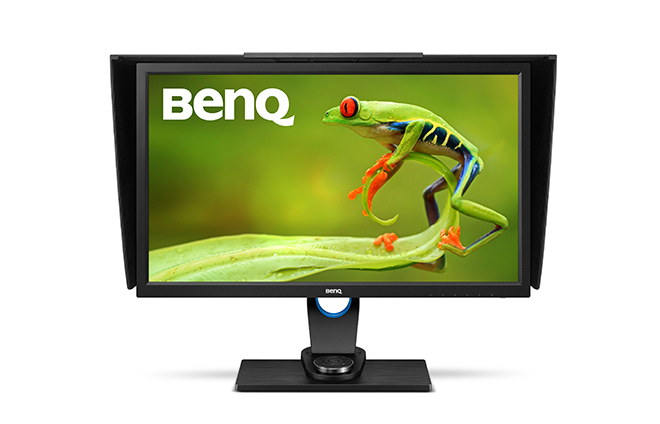 Enter, BenQ who now have a solution for photographers on more modest budgets in the form of the SW2700PT 27″ Adobe RGB Monitor. The monitor has an MSRP of just $690 USD (about $900 AUD in Australia if you shop around) which for the sake of a price only comparison is close to ten times cheaper than the Eizo CG-318. Realistically however, there is no direct comparison between these two displays – the Eizo is a bespoke Ferrari and by comparison the BenQ a modest family car. Any direct comparisons are therefore irrelevant outside of the exceptional performance of the Eizo and the exceptional value for money of the BenQ. I will however make a number of references to the differences throughout this review. Be aware however, that these are vastly different monitors at very different price points. I suspect the decision of which one to choose may well be heavily dependant on your budget and needs (probably in that order).
The BenQ SW2700PT is a 27″ monitor with a QHD native resolution of 2560 x 1440 pixels (that resolution in a 27″ monitor equates to 109 pixels per inch). It is a true 10 bit display producing more than one billion colors, with a 16:9 aspect ratio and covers an impressive 99% of the Adobe RGB Color Space. The benefits of a 10 bit display are often misunderstood, but in short a 10 bit display enables smooth shading and color transitions and very smooth tonal gradations.  Key Features
- 27”W 2560×1440 QHD Resolution
- 99% Adobe RGB with IPS technology
- Hardware Calibration with accuracy color
- Palette Master Element color calibration software
- Black-and-White photo mode
- Shading Hood / OSD controller
I have been working with the new BenQ SW2700PT over the last couple of weeks as the primary Graphics display for processing and printing my photographs. The BenQ monitor is supplied well packed and out of the box requires some assembly of the stand and connection of the display to the stand. Assembly is easy and only takes a few minutes (no tools required). The instructions are clear and easy to follow, although I do recommend you assemble the display on a flat clean table using a blanket or something soft to prevent any scratches. The back of the monitor also has a VESA standard mount with 100mm pattern, allowing the installation of a wall mount bracket if required. I was also pleased to see the addition of a carry handle for moving the monitor around. There is also some minimal cable management in the form of a hole to thread cable through the stand.
As well as the monitor and stand BenQ also provide an individual calibration certificate that shows how the display tested before it left the factory. This certificate is not as detailed as that supplied with the more expensive Eizo CG-318 (nor is it hand signed), but it has all of the information one is likely to want or need. Personally, I like to receive a certificate like this that my monitor has been personally checked by a real person and not just a machine. I was pleased to see the BenQ also includes a hood shade in the box. The hood shade requires assembly and is simply clipped together in a few moments. A nice addition is a small hatch in the hood to enable the calibration device cable to be fed through for easy calibration of the screen without having to remove the hood. The supplied display hood is a nice addition that helps keep stray light from falling on the screen. Whilst the screen itself exhibits quite low reflectance. Once assembled, the monitor is plug and play and requires no software for immediate use (you do need software to access the hardware calibration features). I plugged it into my 2013 MacBook Pro via the display port and was up and running in just a few minutes. A DVI-DL/miniDP to DP/USB 3.0(1.8m) cable is also included in the box.
The BenQ has a good range of connectivity options that should fit most users requirements. It is nice to see that USB3 is supported as well as HDMI. There is also an inbuilt SD Card reader. I personally don’t find much use for an inbuilt SD card reader, but your mileage may vary depending on your workflow. Likewise, the headphone jack seems a bit superfluous to me on a monitor designed for graphics professionals, but it could serve a purpose in open plan work areas.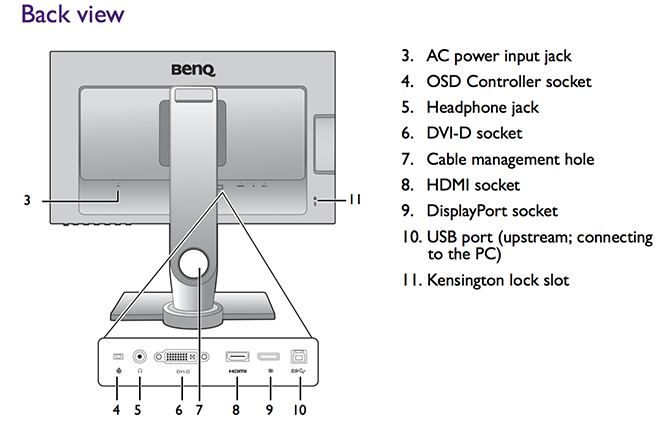 Like the Eizo, the BenQ SW2700PT is a hardware calibration equiped monitor. Hardware calibration allows you to adjust the monitor’s image processing chip without changing graphics card output data. Calibration keeps images consistent with originals without being affected by graphic card settings. Two monitor preset modes allow calibration results to be saved directly into the monitor. As discussed in the review on the Eizo CG-318, this is a significant advantage over software only calibration solutions and should be one of the primary considerations when purchasing a display for high end graphics applications.
Wide gamut displays such as the BenQ SW2700PT have the capability of displaying a much wider range of colour than the vast majority of computer displays. Most consumer displays will display colours close to that approximating the SRGB colour space. SRGB is a very small colour space and the default colour space of the internet. It is for all intent and purpose the lowest common denominator in the colour space world. Wide Gamut monitors have the capability of displaying a much wider range of colour (more saturated colours) and typically come close to approximating the Adobe RGB colour space. What this all means in real world terms is the reproduction of much deeper more saturated colours. This enables better rendition of colour tones and better gradation in colour. For image processing and printing this is a key advantage and for photographers is critical to achieving the best possible results. Here in my own studio my wide format Canon printers are capable of producing colours that greatly exceed the SRGB Colour Space (and in some areas even the Adobe RGB Colour Space). The BenQ is capable of rendering these colours on screen and thus I can ensure my images are optimally processed for final print without guess work or test prints.
The BenQ is equiped with a 14-bit 3D Look Up Table (LUT) which improves RGB color blending accuracy for color reproduction. It is also equiped with an “OSD Controller”. The OSD controller is a remote controller that comes with three preset buttons each set up with a customized display setting such as Adobe RGB, sRGB and Black and White mode. This enables easy switching between presets without going through complicated settings. The OSD Controller also comes with a button for quick OSD navigation and settings. My initial impressions of this OSD controller were a bit gimmicky. However, in practical use I actually found this quite useful for soft proofing images for the web in SRGB. Black and white photographers will likely also love this capability with the dedicated Black and White mode. With a simple click of a button, you can preview color photos in black-and-white before adding effects or having to do any post production work.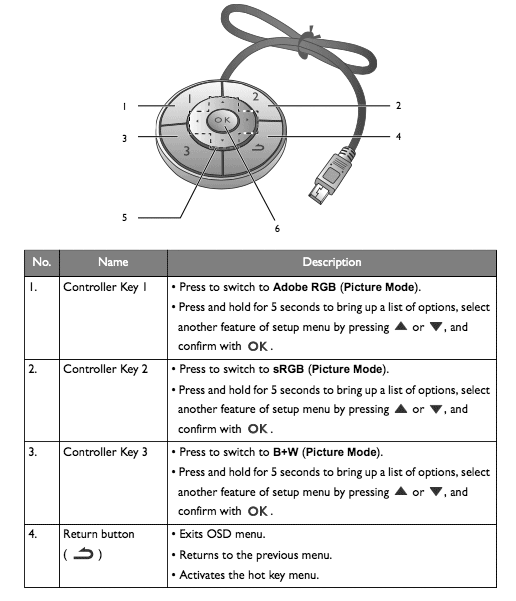 In terms of both sheer colour range and accuracy of colour reproduction, the BenQ’s performance is excellent. Testing shows superb SRGB performance and approximately 99% of the Adobe RGB gamut range is successfully displayed. The much larger Adobe RGB space is much harder to reproduce and most monitors don’t reach even 80% of it. At this price point the BenQ sets a new standard in my experience.
Being able to produce all of those colours is not very useful unless a monitor can do it accurately – and here the BenQ also offers very good performance. The measurement of accuracy is referred to as the ‘Delta-E’. In short, the bigger the number, the more inaccurate the monitor is. My own testing shows the BenQ’s average Delta-E to be a very respectable 0.75 and the maximum was 1.59. Whilst not as incredible as the Eizo CG-318 this is nonetheless excellent performance in a display at this price point and considerably better than many other consumer displays (including Apple’s iMacs).
The colour gamut advantage of displays such as the BenQ are the most commonly known advantage over more typical computer displays for graphics professionals. However, there is another key advantage worth mentioning; which is uniformity. Uniformity refers to the displays ability to maintain even brightness and contrast from one side of the panel to another. The more uniform the brightness the more ‘paper-like’ the appearance of the screen, the easier it is on the eyes and from a photography perspective the easier it is to judge tone and contrast in a given area of an image. Uniformity is extremely important in the reproduction of fine art prints since it ensures an even contrast ratio across the monitor.
Even uniformity is difficult to achieve in back-lit monitors and is often one of the first things you notice in a poor quality display. Monitors that are brightest in the middle and fall off in the corners are common place and are a very poor choice for creative professionals working with digital images. Uniformity can easily be measured and in my own tests I find just under a stop of difference across the face of the display from corner to corner when calibrated to 80 Candelas in my studio. Again, this is excellent performance in a monitor at this price point. It is worth noting that out of the box the default settings for the monitor are set to ‘retina burn-in mode’. I suggest calibrating the brightness setting to something more realistic for your environment.
PALETTE MASTER ELEMENT SOFTWARE
To really get the best from this monitor you need to take some time to properly calibrate and profile the display. The best way to do this is to use the supplied Palette Master Element software which can be download directly from BenQ’s website. A clear how to users guide is also available for download.
The supplied software offers options for both a basic and advanced calibration depending on your needs. Either option is quite intuitive and users should have no problem successfully calibrating their display by following the on screen prompts. Once calibrated and validated the software presents the user with a validation report on the calibration.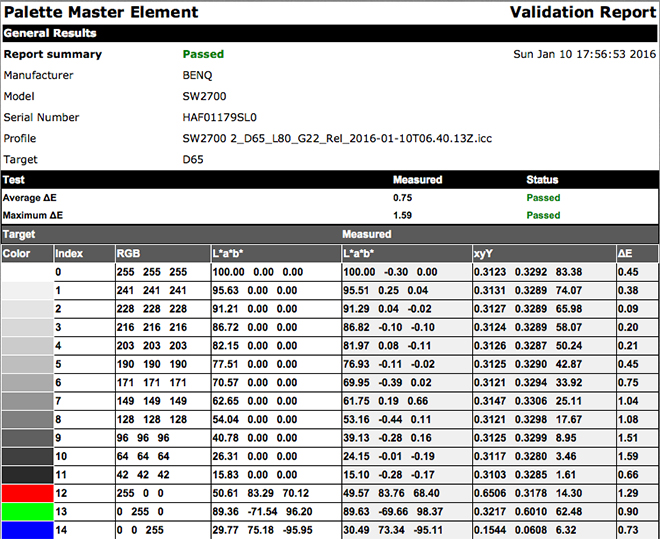
Unlike the Eizo CG318 the BenQ SW2700PT does not include an inbuilt calibration device and requires an external instrument to calibrate the display. For the purpose of this review I used the X-Rite i1 Display colorimeter to calibrate the display (although the Spyder model 5 colorimeters are also supported). A colorimeter is an additional piece of equipment at additional cost, but really is necessary if you are going to get this display to perform at its best. To be honest, I am somewhat spoilt these days with the inbuilt calibration of the Eizo and I find it a bit of a hassle to dig out the colorimeter on a regular basis.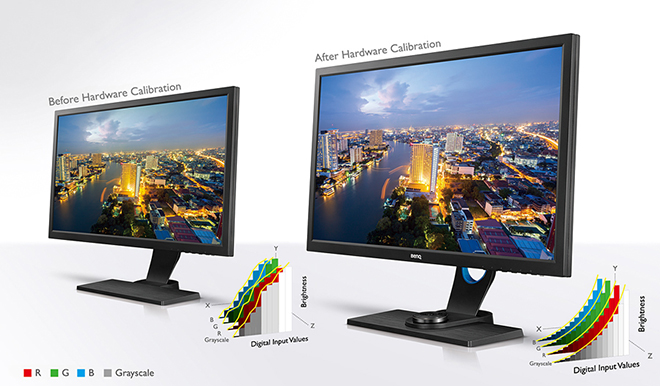 REAL WORLD USE
In my review of the Eizo I wrote about the incredible resolution of a true 4K DCI compliant display and those conclusions still hold for me in my studio. Whilst the BenQ SW2700PT cannot compete in the resolution stakes with the CG-318 it does offer text of a more legible size which will I feel appeal to a great many photographers who will likely also use this monitor for email and web browsing as well as image processing. The BenQ also looks a little soft by comparison to the Eizo in side by side comparisons and clearly suffers from its lower resolution in this regard. A fairer comparison would be to compare the BenQ to my previous NEC monitor of the same resolution and in this instance the BenQ offers superb performance.
My daily use for a monitor such as the BenQ involves the editing, post production and printing of digital files in Adobe Lightroom and Adobe Photoshop Creative Cloud. I also use applications such as in-Design, Premiere Pro and other image related programs and plug ins. On the whole most of my time is in the majority spent in Lightroom and Photoshop and thus this is the area that my comments are most related.
Images in Lightroom (and Photoshop) are well rendered on the BenQ. Clarity and resolution are truly excellent in a monitor of this price point. The colour rendition is excellent and when combined with the very good uniformity the BenQ offers it is extremely easy to judge tone and contrast when processing RAW files. For soft proofing images for print the BenQ again offers excellent performance at this price point.
BenQ’s Palette Master Element Software is easy to set up, install and use and is strongly recommended to get the very best from this display.
CONCLUSION
The BenQ is a well built, high quality display that is easy to assemble, install and use via its display connectivity options. The quality of the image is excellent with very good uniformity and color accuracy that falls short of the much more expensive Eizo CG318; but far exceeds the average display. It needs to be said that the performance offered by the BenQ at this price point is nothing short of exceptional and that you are unlikely to notice the color accuracy and uniformity differences between these displays in all but the most demanding of workflows. Like the Eizo, I would have preferred the HDMI connection on the BenQ to be V.2 rather than 1.4 for future connectivity, but I suspect most users will opt for the display port in any case so this is a minor nit pick.
At an MSRP of $690 USD the BenQ should be number one on your list if you are after a high quality AdobeRGB monitor on a budget. The monitor offers exceptional performance for its price and all will likely meet your needs for a high resolution Adobe RGB display. The monitor comes with a limited three year warranty. Highly Recommended.

Hi
Thanks for the detailed review of the monitor. I have been doing research on monitors and looking for affordable unit as my focus is serving photographers. Im still new and learning and this article cane at the right time. Photographers always ask which colour space i use and hope to give them what the want as they kinda hesitate when i tell them i use sRGB.
Do you have experience using HP Z3200 designjet with colour space adobe RGB?
Thanks
LikeLike
Hi Victor, I would not recommend you tell photographers to use SRGB unless their output is only for the WEB. Use Adobr RGB as a minimum and I recommend Pro Photo for the largest possible space. Im sorry, I have no experience with he Z3200.
LikeLike
I am currently researching monitors to replace my aging NEC P221W and recently came across your review on Luminous-Landscape. I’m almost convinced to buy one, but see that Benq has stepped up their game once again with the PV270. While seemingly targeted to video, it has 99% AdobeRGB and seems higher spec all around. Do you had any experience with the PV series, and do you see it as a worthwhile step up from the SW2700? Currently the PV270 is additional $300 over the SW2700, but still within my budget.
LikeLike
Hi Keith
Unfortunately I have no direct experience with the PV270. I guess if you are into video the extra cost might be worthwhile.. but for a stills photographer the SW2700 really ticks all the boxes in my experience and does so at a very competitive price point. You might want too ee if you can demo the two of them side by side… Cheers
LikeLike
Hi Joshua,
With interest I read your review of the BenQ SW320 on Luminous Landscape.
My question is which DataColor Spyder5 model is most appropriate. The Elite, Pro or the Express model.
Thanks, Gerlof (The Netherlands)
LikeLike
Hi Gerlof, Any of the Data Color models should be equally effective.
Cheers
LikeLike
Did u get the chance to try LG Digital Cinema 31MU97-B 31?
They say:” By supporting Adobe RGB over 99.5% on the IPS Display, the 31MU97 minimizes color difference and color loss with the wide color gamut and color temperature that covers both the sRGB and CMYK color ranges. This is crucial as materials are converted to CMYK before printing”.
Does the wide colorr gamut and color temperature of the BenQ SW320 covers both the sRGB and CMYK color ranges ?
LikeLike
Hi Antoine, I am sorry I had not tried the LG.
LikeLike
Does the BenQ SW320 wide color gamut and color temperature covers CMYK color ranges?
LikeLike
Antoine, your question is sort of a bit sideways. CMYK uses subtractive color mixing and is used in the printing process, because it describes what kind of inks need to be applied so the light reflected from the substrate and through the inks produces a given color. One starts with a white substrate (canvas, page, etc.), and uses ink to subtract color from white to create an image. CMYK stores ink values for cyan, magenta, yellow and black. There are many CMYK color spaces for different sets of inks, substrates, and press characteristics (which change the dot gain or transfer function for each ink and thus change the appearance). So you don’t describe a display as covering the CMYK color ranges.
LikeLike
Hi, I purchased this monitor as my first serious photographer screen.
You may be able to enlighten me on SRGB and AdobeRGB calibration and profiling with the i1 display pro.
1) Is it necessary, in the first place to stay on SRGB mode?
I am gaming, watching videos, doing text based work and surfing the net on this SRGB mode.
I spend most of my days using the SRGB mode.
AdobeRGB comes into play when I start to fiddle with photos processing. And still, yet, only for those I intend to print on my Canon 100S inkjet printer. (I haven’t sent any picture to pro printer, but then, yes I’ll use AdobeRGB, as well, then)
2) i1 Display Pro doesn’t allow me to swap/load calibrations I did for the 2 modes. Do you know a way to do that on the fly?
Thank you by advance!
LikeLike
Hi, when calibrating the display you should not be in SRGB mode. Not unless you specifically want to calibrate for this color space. You should be able to swap between different profiles using the hot key puck supplied with the display.
LikeLike
Hello,
I have much less chance to use color master palette in calibration for Adobe RGB. It is always failed.
I see by default the brightness level is set to 9/10 and the black level is zero. It seems to be too extreme! Do you have any suggestion for a reasonable default setting of color, black level, and brightness before calibration?
You advice is greatly appreciated.
LikeLike
Henry, im not sure what those numbers you quote refer to – but if you are having failures with the palette master software I would suggest starting there and re-installing the software as there should be no issues with it. Brightness is best referred to as candelas and typically needs to be set according to your ambient room brightness for optimum results. If you are printing (as I do) then something around 120 candelas can be a good start.
LikeLike