
At some stage in their photographic career many professional wildlife photographers will opt to try a camera trap to help them capture better photographs of their chosen subject. Camera traps are nothing new and have been used by professional wildlife photographers for decades. In fact, some of National Geographics most famous wildlife images have been captured with traps (Nick Nichols first used them on the National Geographic Ndoki project back in the film days).
Camera traps are ideally suited for rare and elusive animal species that are difficult to find or are otherwise extremely wary of humans. They have been used to photograph Snow Leopards, Tigers, and many other species around the world. They can also be used to help capture wide angle images of more dangerous animals or animals that it would otherwise be difficult to approach. Used ethically and responsibly they can be a wonderful tool to help photographers capture images of wildlife that would be otherwise all but impossible.
I have been pondering how to capture some really close up wide angle images for the Arctic Fox project I have been working on for the last few years and came to the realisation not long ago that a camera trap was probably going to be the best solution. The problem was that camera traps have historically been the domain of DIY handymen. Truth be told, I am not very handy with electronics, circuit boards and soldering irons so quickly ruled out a DIY solution and began my search for a suitable off the shelf solution. In my case, I actually needed more than just a way to automatically trigger the camera remotely (thats easily accomplished with Pocket Wizards). I needed a protective housing for the camera and lens in inclement weather and a method of automatically remotely triggering the camera when wildlife was detected. And, I needed it to work in sub zero temperatures in snow and ice.
There really haven’t been any professional off the shelf solutions available that photographers could take into the field and use reliably in hostile environments. There are products from Trigger Trap and various other Smart Phone and wireless trigger devices on the market; but pretty much all of these are unsuitable for remote field work in difficult environments. Trigger Trap is an interesting product; but you don’t want to leave your expensive smart phone out in the rain in the hopes of capturing wildlife images. You need something a lot more robust and dedicated to the task if you are going to leave it out in inclement weather. There are numerous trail master type camera systems on the market – but all of these incorporate a camera inside the detector and are of dubious image quality at best (they are really designed for game trail monitoring and not photography). In order to get really high quality imagery I needed a system I could use with a DSLR. I also wanted something that was capable of being left out in the field for several days without intervention in freezing weather. Quite honestly I was not sure such a commercial product even existed. However, after a pretty exhaustive search I came across a solution from a small company in England called ‘Camtraptions‘. I know….The name conjures up some pretty geeky imagery, but bear with me as the product is pretty clever.
This small English company have a number of different camera trap products; some which seemed to tick the boxes for my project needs. However, it was their camera housing that really piqued my curiosity and had me placing an order for their complete trap system. The trap system is actually extremely simple consisting of an optional camera housing, a customised PIR motion Detector and a trigger cable. Thats it – nothing more complicated than a PIR sensor and a cable.
THE CAMERA HOUSING
From the Camtraptions Website:
The Camtraptions Camera Housing is a strong metal enclosure for a DSLR camera. It is ideal for protecting your DSLR camera trap or stationary remote-control camera. It can be quickly disassembled and flat-packed for easy transportation and storage.
Key features:
- Access the camera via a convenient lockable hatch at the back.
- Shade the lens from sun and rain with the sliding peak.
- A window is included and can be secured in front of the lens for added protection if required.
- Housing can be mounted on a tripod.
- Includes a quick release plate.
- Cutouts allow cables to run out from the back of the housing.
- Fits cameras up to the size of a Canon 1D X or Nikon D4, with enough room for an off-camera flash cord mounted on top.
The construction of the Camtraptions camera housing is excellent. Made from sheet metal the housing can be disassembled (flat packed) for travel and then easily reassembled on location. No tools are required and construction is accomplished in just a few minutes via wing nuts that can easily be hand tightened. The housing comes with an optional clear perspex front window that can easily be removed if you are setting up the trap where there is no danger of moisture or other foreign matter entering the camera housing. The perspex window is ideal for working in areas where there is a chance of foreign matter ending up on the front element of the lens. My own testing shows it is important to place the camera lens as close as possible to the perspex window to avoid any potential reflections. To this end the housing has adjustable mounting points and I found I was able to tweak the camera location until the lens butted hard up against the perspex window. There is an adjustable camera mount point included as well as a mounting plate for the camera. I would have preferred an Arca Swiss style mounting system but the included mount accomplishes the task and such a preference is really nit picking. I do recommend treating the outside of the perspex window with Rain X to help keep it clean out in the field. In terms of size the housing will accomodate a full size professional DSLR such as a Canon 1DX or Nikon D5 with a wide angle zoom lens attached. It would be worth checking the dimensions of the lens you plan to use before you place your order to make sure it will fit. In my case I intend to use this with a 16-35mm F4L IS zoom lens which is easily accommodated inside the housing. I think most wide angle and mid range zooms will fit inside the housing and testing shows you can even accomodate a Canon 24-70mm F2.8L MKII lens.
I really like the attention to detail of making the housing lockable and of including a sliding sun visor (which can work equally well at keeping rain and snow off the front perspex window). The only real problem I have with the housing itself is the weight. Because of its all metal construction the housing weight comes in at just under four kilograms and thats quite a lot to schlep to a remote location or pack in luggage. In an ideal world it would be better to have the housing made of perspex or some other light weight material. However, this would be nowhere near as strong and far less secure so the weight trade off is acceptable. In my case, I intend to ship the housing to my destination before I leave so it will be on location when I arrive.
The nice thing about using a housing such as this in really freezing weather is the ability include a number of chemical hand warmers around the camera and inside the housing to help prevent battery drain when the camera is left for extended periods. If you are handy with metal work I guess you could probably construct your own housing (possibly even adapt a letterbox!), but the Camtraptions housing has been well designed, well built, packs flat for travel and postage, and is relatively cost effective. Whilst the housing itself is not completely waterproof (you cant submerge it) I would have no hesitation in leaving a camera in the housing out in the field in pouring rain for days at a time. Once correctly set up (placed above the ground) I doubt you would experience ingress of water in even the heaviest down pours.
The camera housing is supplied in an olive dark green suitable for use in a forest or wooded area. In my case I just took to it with some white and light grey enamel spray paint to make it more suitable for use in snow and ice conditions. Because the unit disassembles you could easily have it powder coated if you prefer.
THE MOTION SENSOR
The Camtraptions sensor is pretty much like any other off the shelf PIR with the addition of a small built in controller to trigger the camera shutter to fire when the sensor detects movement. The trigger command is sent via a trigger cable that is supplied with the sensor (you just specify what camera you intend to use the sensor with at time of order). What I like about the sensor Camtraptions have chosen is it uses passive infra red motion technology. In my case, laser triggers were out of the question as they result in too many false positives with falling snow. Infra read beams are also less than ideal as they are more complex to set up and can be easily avoided by a wiley fox that might choose to cross the cameras path from a different direction to the beam. PIR motion sensors cover a wide angle so provide plenty of coverage for an approaching animal. Whilst this also means there is an increased likelihood of false positives, memory cards are relatively cheap and now available in huge sizes. One needs to expect a large number of throw away files from a camera trap and I think its better to have an increased chance of capturing the decisive moment and having to delete a few extra files, rather than missing the shot.
From the Camtraptions website:
Taking high-quality camera trap images with your DSLR camera is now easier than ever with the Camtraptions PIR Motion Sensor.
Simply point the device towards your target area and when an animal moves into the sensor’s field of view, your camera will be triggered.
Watch this video to see the motion sensor in action: How to set up a DSLR camera trap
Key features:
- Durable and weather-proof enclosure
- Simple to use and reliable
- 6 x AA batteries provide around 4 weeks of standby time
- Option to mount the device on a tripod or strap it to a post
- Adjustable sensitivity
- Adjustable ambient light threshold enables operation at all times of day or just when it is dark
- Use the sensor to monitor a wide subject area or attach ‘blinkers’ to narrow the field of view for more precise control over the trigger zone
This device is a reliable passive infrared (PIR) detector designed for wildlife photography. All objects emit heat energy in the form of invisible infrared radiation. Different objects emit varying levels of radiation depending on their temperature and surface characteristics. A PIR motion sensor detects changes in the amount of infrared radiation landing on it. This allows it to sense when an animal passes in front of a static background.
The Camtraptions PIR sensor is quite small, very light and weatherproof with the addition of an o-ring rubber seal (included). There are three different adjustments available inside the PIR. From the Camtraptions user manual:
On time Adj – This is how long the contact closure is active after a detection. The default is set to short, (fully clockwise). If set longer, the shutter release is effectively held down for longer. A longer press allows you to take more shots at a time if your camera is set to continuous drive mode or wait longer between shots if your camera is set to single shot mode.
2. Mov Sens – Movement sensitivity – This relates to how much movement the device needs to detect before it sends a ‘shoot’ command to the camera. The factory default is in the mid position. Turning the dial clockwise reduces the sensitivity. I recommend using a low sensitivity in order to reduce the chances of false detections. You only need to turn the sensitivity up in the following circumstances:
• When photographing very small subjects
• When the subject is far from the detector
• When the ambient temperature is hot, as there will be less contrast between the subject and the background
3. Light Sens – Light sensitivity – This determines whether the device works all the time or just in darkness. When set fully to the ’N’ position (i.e. turned fully anticlockwise), the unit will only fire the camera in darkness (Night). In the D/N position, the camera will fire in light and dark conditions (Day and Night). The control is variable between the two positions so setting it to mid point will activate the unit at approximately dusk, and deactivate it at dawn. Setting the device to only work at night can be useful for avoiding false detections (particularly if daytime temperatures get very hot) and for avoiding using up your flash batteries on unwanted diurnal animals.
Note: after adjusting the controls, you will need to restart the device and/or wait 30 seconds for the new setting to take effect.
Overall the PIR sensor works very well in my initial testing. Although, set up of the three adjustments is a bit fiddly and I had to experiment to get the best overall settings (You need a small jewellers flat head screw driver to make adjustments – not included). The adjustments are quite sensitive and I found during testing that even a small turn yielded a dramatic difference. During the set up process I corresponded with the owner of the business (Will Burrard) and he provided me with a clear picture showing the settings they recommend. As it turned out these were the exact settings I landed on after a few hours of my own experimentation. There are instructions included on how to set up the PIR and they are clear and easy to follow. Either way, I recommend you set up, tweak and test the unit before setting it up in the field. I think it is fair to say that some tweaking will be required even in the field to ensure the sensor is optimally tuned for your subject.
The design of the camera trap circuit is such that if there are lots of small or ‘noisy’ detections, the device will not necessarily send a ‘shoot’ signal to the camera. In effect, the circuit smoothes out detections to minimise potential false shots without compromising its overall sensitivity. This is pretty clever.
The detection sensitivity and daylight sensitivity can be adjusted to suit your requirements. The system works by detecting heat energy emitted in the form of invisible infrared radiation. Different objects emit varying levels of radiation depending on their temperature and surface characteristics. A PIR motion sensor detects changes in the amount of infrared radiation landing on it. This allows it to sense when an animal passes in front of a static background. This is in effect the same technology used in most house alarm sensors.
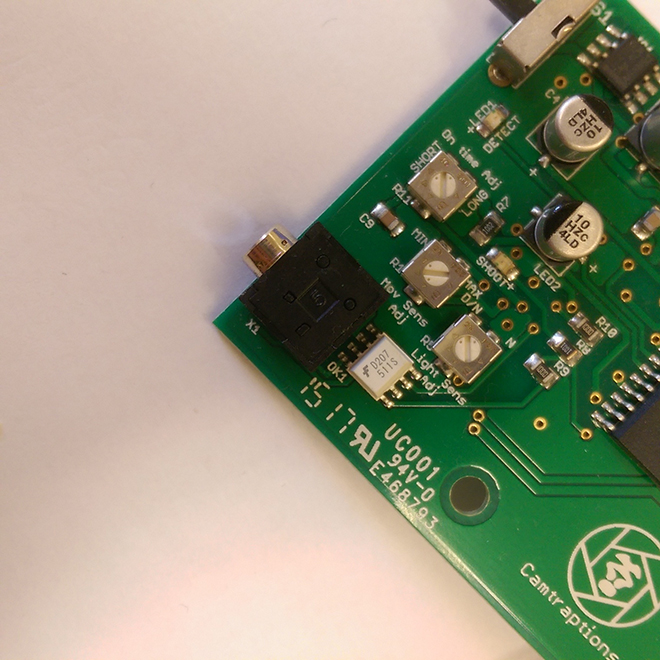 There is a nice inclusion of two small LED lights on the back of the sensor board, one marked ‘detect’, and the other marked ‘shoot’. These LED’s are green and red respectively and are helpful in tweaking the individual parameters. The green LED will light when movement is detected, however the device will not necessarily ‘shoot’ if the ambient light or amount of movement are below the thresholds you have set. When the ‘shoot’ LED illuminates, a shoot signal is also sent to the camera.
It may be necessary to limit the detection area in order to have more control over the position of your subject relative to the camera. In order to achieve this, you could attach ‘blinkers’ to the detector. For example, you could stick a toilet roll tube around the detector to limit its field of view to a narrow cone of space. This would effectively create a detection area similar to a beam-break detector.
Lastly, the PIR sensor takes 6 AAA batteries (0r a single 9V battery) which should provide plenty of standby time for most applications. 9V batteries are easier to travel with and I suspect will be the preferred choice for most users.
I also opted for the Camtraptions mighty pod as a mounting system for the PIR sensor. However, you could use just about any tripod or mounting method for the sensor and its probably best to choose something appropriate to your chosen subject. In my case I wanted the sensor very close to the ground so the mighty pod is an ideal solution. Its well constructed, light and easy to set up and use.
CAMERA CONTROLLER
Camtraptions also have a new product called a Camera Controller that provides the ability to customize how many photographs are taken and how often per ‘trigger event’. With the camera controller you can set the minimum time between bursts to be 10s, 20s, 30s or 60s. If the animal stays in front of the sensor then another burst will fire automatically after the desired time period has passed.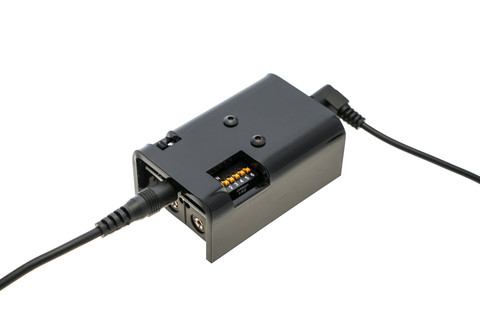 From the Camtraptions website:
The Camera Controller plugs in between your motion sensor and camera in order to add new functionality to your DSLR camera trap.
It can be used to define the time interval between consecutive photographs and limit the number of images taken per trigger event. It can also be used to record video instead of stills on Canon DSLRs running Magic Lantern firmware.
Find out how this controller can be used to control your camera in this introductory video: Adding a Camera Controller
Find out how this controller can be used to set up a video camera trap in this video: DSLR Video Camera Trap for Filming Wildlife
The camera controller is powered by 2 x AA batteries. One pair of batteries will power the controller for up to 6 months (exact time depends on number of triggers). The controller is not weatherproof; it is designed to sit next to your camera and should be protected by the camera housing. The camera controller is supplied with a 1 meter cable.
MODES
There are 4 modes each with 16 different programs for a total of 64 possible firing combinations. Mode 1, 2 and 3 are for stills photography while Mode 4 is for controlling a video camera trap.
Mode 1: Interval Mode This is a simple looping mode that can be used to space out shots. This could be used to give your flashes time to charge between shots or to avoid your memory card filling up too quickly.
Mode 2: 3 Shot Mode This mode sends a set of 3 shoot commands to the camera in quick succession, followed by a gap. The time between each shot and between each set can be changed.
Mode 3: 5 Shot Mode This mode sends a set of 5 shoot commands to the camera in quick succession, followed by a gap. The time between each shot and between each set can be changed.
VIDEO MODE
Mode 4: Video Mode This mode can be used to start and stop video recording on a Canon DSLR with the Magic Lantern Firmware installed. You can select the length of the video clip and the minimum length of time between video clips. Please watch this video for more information.
You can download Magic Lantern at http://magiclantern.fm/. Note: Camtraptions provides no support for Magic Lantern and you use it on your camera at your own risk.
CUSTOM PROGRAMMING
We are able supply controllers with custom programming. If your needs are not met by the standard modes, please get in touch to discuss your requirements.
CONCLUSION
By way of full disclosure: The testing I have done to date with the Camtraptions camera trap system has been fairly rudimentary and involved testing the system outdoors here in Australia with my cat (there is a shortage of Arctic Foxes and snow here!) I won’t know for sure exactly how this system will respond with Arctic Foxes until I finish in Antarctica and head back to the Arctic to hopefully complete the project. The good news is a domestic house cat is not much such smaller than an Arctic Fox and in this regard made a suitable test subject. The testing I have done shows the PIR is very effective at triggering the camera and the system is capable of capturing some pretty remarkable images. I have found I prefer to use the cameras motor drive as opposed to single shot and control the number of shots taken with the camera controller. This seems to provide the most effective solution in testing to date. Your mileage may vary and I would again encourage you to experiment to find the set up that most suits your subject.
I have also tested the camera housing in very heavy rain and it has proved very resilient so I have no qualms about using this in the Arctic. My feeling is the solution should work very well and I will try and do a follow up report on my findings once I get back in mid April.
A camera trap system isn’t for everyone. However, if you are a wildlife photographer and you are chasing images of a difficult subject that you simply cannot achieve any other way then a Camtraptions camera trap system may well be your answer.

Any updates on longevity of the sensor? Interested in selling to another Aussie?
LikeLike
No issues at all William. It has been working perfectly. Cheers
LikeLike
Thanks for the review. How do you think the camera housing would stand up to larger animals and perhaps a bit of a mauling?
LikeLike
The housing is steel construction. Id have no hesitation in using it with large predators; even a Polar Bear
LikeLike
Thanks – that’s reassuring. I’m based in East Africa – plenty go big animals!
LikeLike
*of
LikeLike