Birds of the World – Key Wording in Adobe Photoshop Lightroom

One of the key functions of Adobe Photoshop Lightroom (hereafter referred to as just Lightroom) is its database and the capability for users to store and manage tens of thousands of photographs. Key-wording is an integral and core component of the database management. For those who might be unfamiliar with the concept of key-wording: Key-wording enables you to very quickly find a specific photograph or a specific series of images that have been tagged with one or more keywords. I know a great many photographers who use key-wording to various degrees in their work-flows. Personally, I keyword extensively on import so that I can effectively manage the more than one hundred thousand images in my Lightroom Library.

When it comes to wildlife I like to keyword with with the species type (Mammal, Crustacean, Reptile etc.) and then break this down by individual animal in each category. Its a hierarchical keyword structure that works well for me in my work-flow.  Once set up in Lightroom its very quick for me to keyword my wildlife images on import. But what about key-wording for Birds?

Birds can be problematic to keyword for several reasons. Firstly, there are more than ten thousand different species across the globe which can make identification difficult, and secondly its massively time consuming to create keywords for them as you import your photographs (especially if you want to add Latin names and appropriate synonyms). I ran into this problem head-on on my recent Falkland Islands workshop where I spent a concentrated week photographing many different species of birds. I shot over 5000 photographs of birds that week and subsequently nearly gave up trying to identify them all, let alone create keywords for them all (and forget synonyms).  Thankfully, there is now a solution to at least the second part of this problem….

Good friend and expedition partner Ole Jorgen has recently completed the herculean effort of creating a complete hierarchical list for Lightroom of all of the birds of the world (yes – all  ten thousand four hundred plus of them). Not only has he put them all into a suitable structure for Lightroom and made it available for photographers to purchase, but he has also offered a number of different versions depending on your needs. You can check them out in his Web Shop or by clicking on the image below.birdsoftheworldOver the last few days I have been extensively testing the Birds of the Word UK Latin Edition and have found it absolutely invaluable in key-wording the many thousands of bird photographs in my Lightroom library. Integrating the list into your existing keyword structure is as simple as importing the list in the Meta-Data drop down menu of Lightroom. The lists are built in a hierarchical structure which makes them easy to manage as well as easy to understand. The UK Latin Edition I have been testing also contains synonyms for added granularity and detail. One of the added benefits of using a complete species list such as these is to actually see how many of a given type of bird you have photographed as well as what other types might be similar. Wether you are a keen bird photographer, or want to save time with your key wording of birds (as well as increase your accuracy and add finer granularity), or just wanting to increase your knowledge of birds I believe you will find these keyword lists to be extremely useful in your work-flow.

Anyone up for creating a complete list of the Mammals…?

South Georgia Island Expedition Report November 2015

In November 2015 I co-lead an extended 15 day expedition to South Georgia Island with my good friends and partners Ole Jorgen and Roy Mangersnes. As is customary for me I like to write up a trip report on our experiences; both, so that there is a record of the trip for the photographers aboard, but also so I can share the experience with a wider audience.

I have lead expeditions to South Georgia Island in past years, but this was the first time I had spent an extended period of time at the Island. Our plan for a 15 day expedition took a fair amount of logistical planning and permitting, but the end result was a fantastic amount of time for photography in what is in all likelihood the best location in the world for wildlife photography. As it so happens South Georgia is also home to some incredible landscapes with soaring Himalaya style peaks that provide the perfect back-drop.

At the conclusion of the South Georgia Island expedition I lead a week long extension in the Falkland Islands for a small group of photographers. During this expedition we flew to both Saunders and Sea Lion Islands where we spent a number of days exploring the area and photographing the bird life. I will have a seperate report on this trip in the coming days.

Photography guide and co-leader for the South Georgia trip Roy Mangersnes has actually beaten me to the trip report writing on this occasion so I am going to share  his report from our expedition as it provides a really nice day by day insight into the expedition. I have added in my own thoughts and comments where appropriate.

South Georgia Expedition 2015 Trip Report Notes by Roy Mangersnes

Day 1-2 – 7-8.11.2015 We had very favourable winds and not much swell so the majority of people on board enjoyed the crossing eastwards. Unfortunately the lack of wind resulted in fewer seabirds following the ship, but some Wandering, Southern Royal, Black-browed and Light-mantled Sooty Albatross were photographed. Also different petrels were sighted and documented including the Diving Petrel.SouthGeorgia2015-0578Day 3 – 9.11.2015 In the morning of day three we passed Shag Rock (which was hidden in fog) and soon after we spotted Bird Island and the north western point of South Georgia. After lunch we headed to shore in Right Whale Bay for our first landing of the trip. On the beach we were welcomed by a good number of Fur Seals, Elephant Seals and King Penguins. With some snow still on the ground several of us took the opportunity to photograph the Kings against a white backdrop. During the afternoon it started to snow lightly and the clouds covered the dramatic mountains. The last Zodiac left just as it was getting dark. A Great start.SouthGeorgia2015-8365-EditAddendum: This was in my opinion our best landing during the expedition. The opportunity to photograph King Penguins in snow was something I and many others aboard had really been hoping for. I personally spent my entire landing with the King penguins in the snow and made several photographs that I am extremely happy with.SouthGeorgia2015-8462-EditDay 4 – 10.11.2015

Strong winds and a bit of rain made landing at Salisbury Plains at dusk difficult and we waited until after breakfast before heading to shore. As we landed the wind died of and the clouds scattered, leaving us with beautiful weather. As photography in these conditions rarely is rewarding several of us took the opportunity to enjoy the extreme wildlife density at Salisbury by talking walks in the area. In addition to the King penguins and the seals on the beach there was also a good number of the endemic South Georgia Pipit and South Georgia Pintail. Both seem to do well, as the final rat culling has been very successful.

Addendum: I was extremely pleased to note the significant increase in the South Georgia Pipit as a result of the rat cull. Just twelve months prior on my previous South Georgia voyage I spotted very few of these small birds. Now, with the rats gone their population seems to be rebounding.

In the evening we were lucky to get access to Prion Island. Here we would follow the boardwalk to the top of the hill. The view over Bay of Isles is amazing up here, but the target was the breeding Wandering Albatross. Everyone was treated with a couple of large chicks on the nest near the trail, being very photogenic. The size of this bird is difficult to grasp until you stand next to it. With a wingspan of 3,5 meters it has the widest reach of any bird in the world.

Day 5 – 11.11.2015

After breakfast we headed for the old Norwegian whaling station at Grytviken to register with the authorities. During the few hours we spent ashore several of us enjoyed shooting the local wildlife that has taken the bay back after the whalers left it in the late 60’s. Pintails and Antarctic Terns were numerous, and also seals and penguins were found among the rusty buildings and stranded ships. Some also took the opportunity to update themselves on the dark history of whaling in the southern ocean at the local museum.

The evening was spent in the small bay of Godthul. Some took the opportunity to hike up to the Gentoo rookery and got some really nice sunset colours up there. Others shot birds and seals from the zodiac while others spent all the time on the beach with Gentoos and seals. The last boat returned to the ship long after sunset.

Addendum: Personally I hiked to the top of the cliff to photograph backlit Gentoo Penguins at sunset with several other photographers. This was a fabulous shooting session that resulted in some really interesting images. Back light is something I look for more and more in my wildlife images. Used effectively it can make for some really dramatic images. It was back light that lit the Polar Bear on the sea ice in Svalbard in winter that helped me win the 2015 Global Arctic photographer of the Year award.SouthGeorgia2015-2022Day 6 – 12.11.2015 St. Andrews Bay is possibly the best wildlife destination in the world and after detailed planning and a bit of luck with the weather we were able to land everyone on the beach long before sunrise. The operation started before 2am and by 3 o’clock everyone was ready to shoot. 15 minutes later, when the sun washed over the beach, thousands and thousands of King penguins and seals were covered in golden light. The photography was out of this world and we were only back for breakfast 5 hours later.

Addendum: I would agree with Roy that St. Andrews Bay is quite possibly the best wildlife location in the world. The opportunities at this incredible Bay for both wildlife and landscape photography are breath taking.SouthGeorgia2015-9593-EditAfter a well deserved rest mid day we landed on Moltke Harbour after lunch. This small beach is a peaceful place compared to St. Andrews, but the many Elephant seals kept everyone busy until the night.

Day 7 – 13.11.2015 The weather was good and the team was on a roll, and already the next morning we did another sunrise landing. This time we had moved to another hotspot – Gold Harbour. A bit of drizzle in the early morning didn’t stop us, and as the sun broke through we were even rewarded with rainbow in front of the classic glacier backdrop. The King penguins were lined up along the river and displayed eagerly as the sun sent warm light through the colony. People spent the time onshore well and went for hikes to discover their own little paradise. Gold Harbour has many of them.SouthGeorgia2015-0816
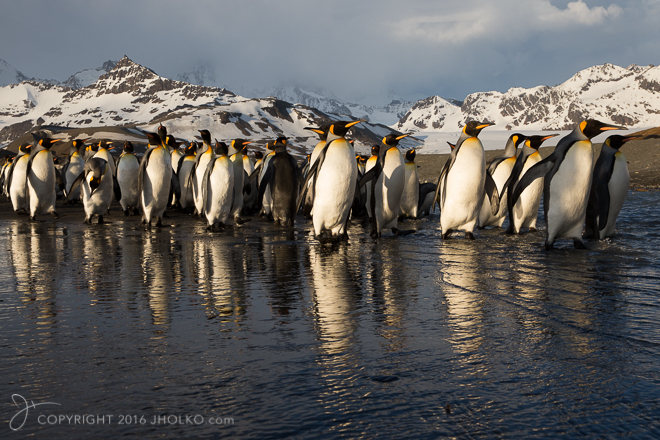
Mid day we arrived in Cooper Bay. The area is exposed to the weather and since the conditions were favourable we went for a mid day landing at the Macaroni penguin rookery. This is one of the easiest places to see this flamboyant bird at the nesting place. A short climb over snow and tussock grass we found ourselves pretty much in the colony. Heading out some of us were also treated with a Chinstrap penguin on the nearby rocks.

As expected the wind picked up as we headed for the Drygalski fjord in the evening. All around we saw large icebergs coming up from the Antarctic Penninsula, and they made perfect subjects for photography in the rough conditions. We decided to spend time with the icebergs and not go into the dark fjord. As the evening came to an end we were lucky to spot a small group of Chinstrap penguins on a beautiful iceberg, and we all enjoyed some great photography in the last hour of the day.

Day 8 – 14.11.2015 As the conditions seemed to improve during the night we went for another sunrise morning at St. Andrews Bay. As the sun was painting the mountains in the background everyone was scattered around the beach and enjoying their own little paradise. It was incredible to think that many travel down here without being able to land on St. Andrews due to heavy swell and strong wind, and we were able to land twice before sunrise.

As a slight contrast from St. Andrews we landed late in the evening at Ocean Harbour. The wind had picked up, but this bay was nice and sheltered. Here we photographed seals and cormorants, as well as some nice landscapes from the zodiacs.SouthGeorgia2015-2056-EditDay 9 – 15.11.2015 We did try for our fourth sunrise landing, but the weather was grey and wet when we got up. Therefore we waited until after breakfast before landing at Salisbury Plains. Its was still wet, but after a couple of hours the clouds lifted and we had some very nice moods as the mist and clouds covered the nearby mountains. Just as we packed up and started bringing clients back, the katabatic winds came falling from the mountains and within minutes we had 60 knot winds offshore. It did make our departure difficult, but with a sturdy expedition leader everyone was relaxed on the beach.

The evening was rather windy and we cruised with the ship in the Bay of Isles, shooting petrels following the ship in beautiful evening light.

Day 10 – 16.11.2015  The morning was rather brutal with a landing at a very dense Fur Seal colony. When we made it through the first ranks of territorial seals, the valley was perfect for a scenic hike or for shooting seals and Giant Storm petrels.

Being able to spend this much time on South Georgian beaches is quit unique and we wanted to make the most of it. Therefore we went for one more landing at Salisbury Plains in the afternoon on our last day. The light was very nice, but some clouds deprived us from the sunset we were hoping for.

Addendum: The opportunity to spend so much time in South Georgia was a very special experience that provided us multiple opportunities for different landings. We were able to choose based on location, weather and light when really maximised our time in the area.

Day 11-14 – 17-21.11.2015

The forecast for our crossing back to the Falklands was not very good, with strong winds straight ahead. We decided to start one day early to make sure we reached the only flight that leaves the Falklands per week, but as we started our crossing the storm died of as we were looking. It turned out to be just another normal crossing with a bit of rock and roll, but nothing big. We think most people were happy for this.

South Georgia can be a quit challenging destination due to exposure to heavy weather systems. This is one of the reasons we wanted to spend more days here, and make sure we could land on all the prime locations. In the end we were extremely lucky and spent a total of 60 hours on the beaches and did 14 landings in just over 8 days. This must be some kind of record!

Addendum: To those of you who have already enquired about the possibility of a future expedition to South Georgia Island. I will be leading an expedition this November to both South Georgia Island and Antarctica – Photographers First Light. The expedition will run from the 19th of November until the 6th of December. I will have details on my website (which is about to be updated) in the workshops section within the next week. If you are interested in joining this expedition you can also email me for further information.
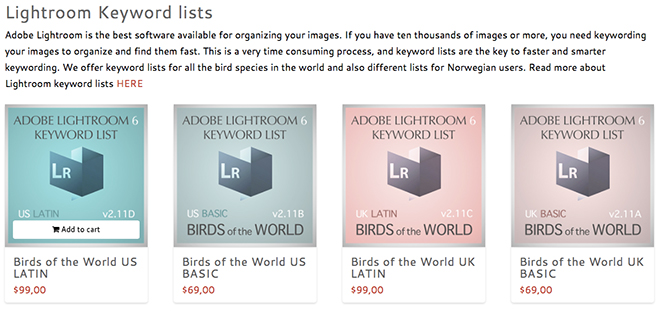
2015 Global Arctic Photographer of the Year Winner

This morning I awoke to the very exciting news that I have won the grand prize of the 2015 Global Arctic Photographer of the Year award. Winning the Global Arctic Photographer of the Year award is a huge thrill and honour for me; the incredibly high standard of photographic work being produced in Europe is very intimidating and I am deeply humbled to have had my work chosen from a pool of such amazing photographs and amazing photographers. In total I took out five medals across the different categories including Gold, Silver and the FLAP Special award in two categories as well as the overall Grand Prize of 2015 Global Arctic Photographer of the Year. As an added bonus, I am told that I am the first photographer outside of Norway to win this award. From the Arctic Photographer of the Year website:

The purpose of the Global Arctic Awards – 2015 contest is to show the magnificence of the diverse North and Arctic world through photography. The contestants works represent the beautiful variety of northern nature and wildlife, depict the peculiarities of the “icy” world of the Arctic, and narrate unforgettable photo stories about the culture, life and centuries-old customs of the Northern minorities . Through the prism of photographic lenses the coldest, deeply frozen Earth regions, covered with ice and snow, will appear in a new perspective.GlobalArcticAwardsSvalbard-9725-Edit

Photographers – Do you Collect Music?

Over the last twelve to eighteen months I have made a concerted effort when speaking with other photographers to ask them the seemingly obvious question: “Do you collect other photographer’s work?”

The responses have been very interesting to say the least, with the vast majority saying, “Yes. I have quite a lot of photography books.”  To this end, I don’t think I know a photographer worth his or her salt who does not own even a modest collection of books on photography.

At this point I have to clarify myself by adding: “What I mean is, do you collect or own any Fine Art Prints from other photographers?”

I am often greeted with either a blank stare or a confused look, sometimes with a “No” and only occasionally with a “Yes”.

When I ask them why they do not own any other photographer’s work, on the whole they can’t give me a reasonable response. Many of them clumsily stumble over their words before regrettably admitting they have no good reason for not owning any other photographer’s work. This response has been almost universal.

As a result, it seems to me there is somewhat of a strange “disconnect” between photographers who produce fine art prints and those who actually collect or own any outside of their own work. I want to use an analogy to try and put this into perspective.

Musicians are also by definition artists. And yet, all musicians collect the music of other musicians without exception. They collect what they appreciate and enjoy. They also want to see what their peers are producing.dazed_confused_musicWhy should it be any different for photographers?

I would certainly be keen to hear from other photographers who have had a different experience. It seems reasonable to me that if you produce art, you should share in the ownership of the art of others. It is one thing to peruse it in a book, quite another to live with it in your home. I would argue it is when we live with a piece of art that we truly learn to, not only appreciate it, but also potentially fully understand it. Viewing a print in a gallery is also a very different experience to passing that print in your home a dozen or more times a day.

I do not believe for a second that any of the photographers I have spoken with appreciate only their own art. If this was the case they would not own or purchase so many photography books or they would not enjoy viewing the work of other photographers at galleries, or online.

No; there is something else at work here that is responsible for the “disconnect”. Before I try and dissect what is going on I just want to make a quick comment on photography books at this point.  I love and own many books by many different photographers. I regularly enjoy perusing them and enjoy the photographs immensely. However, they are all, without exception poor facsimiles of the original fine art prints. Offset printing cannot yet match the colors, tonalities and subtleties of an original fine art print. Offset printing is getting better all the time, but realistically it still has a long way to go before it can encapsulate the fine art print.

You are probably thinking to yourself at this point, Do I own any fine art prints from other photographers?

The answer is yes; I do, though my collection still excludes many photographers whose work I greatly admire. However, I am proud to count several well known photographers amongst my art collection and quite a few others whose names are far less well known. These are actual hand signed (sometimes limited edition) fine art photographic prints. My collection also includes fine art prints from photographers I have swapped work with over the years, either through mutual respect and admiration for our work, or because we have visited the same locations and wanted to see each other’s interpretations in a finished print. Indeed, this is one of the great pleasures of making prints for me.

There is no better yardstick to gauge the quality and standard of your own prints than to be able to compare your work with that of other photographers whose work you respect and admire.

So I encourage you – if you like art, and in particular photographic art, then do yourself and the art world a favor – buy a fine art print from a photographer whose work you admire and respect. It doesn’t have to be one of mine and this piece is not in any way intended to promote my own fine art prints. Just find a piece of photographic art you like and start your own collection. Your life will be far richer for the experience.

Addendum:

I have subsequently shown this piece to a good photographer friend of mine whose opinion in these matters I highly value. He has made the following comments which I feel are worthy of inclusion as both a potential explanation and as one experienced individual’s conclusions.

I, too, am “guilty” of not collecting the prints of other photographers. In fact, the ONLY print I have EVER purchased made by another photographer was the one by Brooks Jensen, and I have never hung it on a wall. The truth is I believe it is beautiful art, but the real reason I bought it was that it was inexpensive. And yet, around the same time, I purchased a print (reproduction) of one of  Vettriano’s paintings for around $250, which was proudly hung on the wall in a central position where nobody entering my lounge could miss it. I once said to you that I wished I could take photographs the way he paints. It is the people in his paintings and their actions that holds one’s eye.

So, your article  has forced me to ask myself the same question you have raised. I think it has something to do with the fact that there can be only one painting, but there can be many photographic prints. And yet, that also isn’t quite right, because Vettriamo’s painting in my lounge is just a print, the original having been sold at auction for around $500,0000! You will recall that I also have around 8 of my own photographs on the walls, framed and proudly presented. I know this is also true of you.

I think there are a couple of things happening here:

Firstly, I doubt there are many painters who collect the paintings of other painters, so I don’t believe photographers are unique in this regard. Frankly, I believe all artists, whether they be photographers, painters, or sculptors want to surround themselves with their own work, because it’s their “stuff” and that’s what they want to display to others.


I find your analogy of musicians may not be an accurate one. Of course, musicians collect the works of others  – this is so they can exercise their art by playing the music of others, either to go on exercising their playing skills on their various instruments or simply to listen to music they like and learn from it. This is an auditory thing, involving literally thousands of tunes, whilst our problem is optical, and there is only so much wall space available..At the same time, I bet that if you asked a musician to play you a tune on, say, his piano, he would either play one that he had composed himself (presuming he was a composer and not just a player, a distinction you may want too make in your article). This raises an interesting question in itself –  is a musician an artist who can play well on,say, a piano, or does he have to be a composer? In my humble opinion both are artists, but the composer is the supremo/maestro.

So, when you get behind the lens you are definitely playing at being the maestro – or are you? Because the composition is already there before you and when does the transition take place from your just being a good player to being an actual composer?

The REAL question that has haunted me since I began serious photography in 1984 is why, especially in Australia, photography prints do not seem to be considered as high-end art? I think it has a lot to do with how simply I can go out and buy an excellent print of a  $500,000 painting very well framed for only $250. Given this situation, why should anybody buy a photograph whose value is unknown at, say $600 or a more reasonable $6000, even if they are originals?

In my modest opinion, the real market is the general public (1% are photographers, 99% want something nice to hang on the wall). I just haven’t been able to find a way to convince Australians to consider photographic images as serious, high-end art that they should buy to decorate their walls….

What do you think?

BenQ SW2700PT 27 inch Adobe RGB Monitor Review

In the later half of last year I reviewed Eizo’s brand new, superb CG-318 4k Resolution Graphics Display for Photographers and Graphic Design Professionals and gave it my highest recommendation. The Eizo represents the state of the art in graphics display for working professionals but comes with a fairly significant price barrier to entry. So what are your options if you are in the market for a high quality Adobe RGB monitor on a more family friendly budget?BenQ2Enter, BenQ who now have a solution for photographers on more modest budgets in the form of the SW2700PT 27″ Adobe RGB Monitor. The monitor has an MSRP of just $690 USD (about $900 AUD in Australia if you shop around) which for the sake of a price only comparison is close to ten times cheaper than the Eizo CG-318. Realistically however, there is no direct comparison between these two displays – the Eizo is a bespoke Ferrari and by comparison the BenQ a modest family car. Any direct comparisons are therefore irrelevant outside of the exceptional performance of the Eizo and the exceptional value for money of the BenQ. I will  however make a number of references to the differences throughout this review. Be aware however, that these are vastly different monitors at very different price points. I suspect the decision of which one to choose may well be heavily dependant on your budget and needs (probably in that order).

The BenQ SW2700PT is a 27″ monitor with a QHD native resolution of 2560 x 1440 pixels (that resolution in a 27″ monitor equates to 109 pixels per inch). It is a true 10 bit display producing more than one billion colors, with a 16:9 aspect ratio and covers an impressive 99% of the Adobe RGB Color Space. The benefits of a 10 bit display are often misunderstood, but in short a 10 bit display enables smooth shading and color transitions and very smooth tonal gradations. photographer page 2Key Features

  • 27”W 2560×1440 QHD Resolution
  • 99% Adobe RGB with IPS technology
  • Hardware Calibration with accuracy color
  • Palette Master Element color calibration software
  • Black-and-White photo mode
  • Shading Hood / OSD controller

I have been working with the new BenQ SW2700PT over the last couple of weeks as the primary Graphics display for processing and printing my photographs. The BenQ monitor is supplied well packed and out of the box requires some assembly of the stand and connection of the display to the stand. Assembly is easy and only takes a few minutes (no tools required). The instructions are clear and easy to follow, although I do recommend you assemble the display on a flat clean table using a blanket or something soft to prevent any scratches. The back of the monitor also has a VESA standard mount with 100mm pattern, allowing the installation of a wall mount bracket if required. I was also pleased to see the addition of a carry handle for moving the monitor around. There is also some minimal cable management in the form of a hole to thread cable through the stand.

As well as the monitor and stand BenQ also provide an individual calibration certificate that shows how the display tested before it left the factory. This certificate is not as detailed as that supplied with the more expensive Eizo CG-318 (nor is it hand signed), but it has all of the information one is likely to want or need. Personally, I like to receive a certificate like this that my monitor has been personally checked by a real person and not just a machine. I was pleased to see the BenQ also includes a hood shade in the box. The hood shade requires assembly and is simply clipped together in a few moments. A nice addition is a small hatch in the hood to enable the calibration device cable to be fed through for easy calibration of the screen without having to remove the hood. The supplied display hood is a nice addition that helps keep stray light from falling on the screen. Whilst the screen itself exhibits quite low reflectance. Once assembled, the monitor is plug and play and requires no software for immediate use (you do need software to access the hardware calibration features). I plugged it into my 2013 MacBook Pro via the display port and was up and running in just a few minutes. A DVI-DL/miniDP to DP/USB 3.0(1.8m) cable is also included in the box.

The BenQ has a good range of connectivity options that should fit most users requirements. It is nice to see that USB3 is supported as well as HDMI. There is also an inbuilt SD Card reader. I personally don’t find much use for an inbuilt SD card reader, but your mileage may vary depending on your workflow. Likewise, the headphone jack seems a bit superfluous to me on a monitor designed for graphics professionals, but it could serve a purpose in open plan work areas.BenQBack
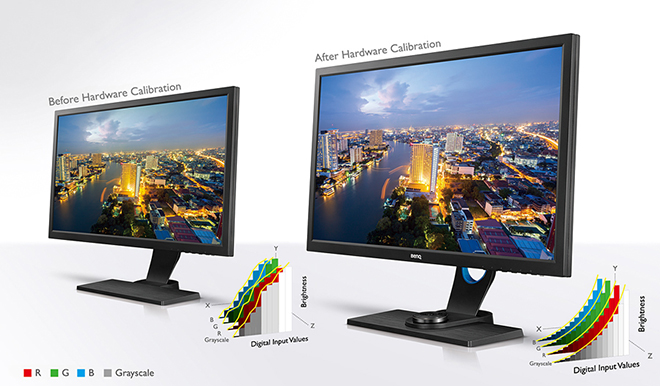
Like the Eizo, the BenQ SW2700PT is a hardware calibration equiped monitor. Hardware calibration allows you to adjust the monitor’s image processing chip without changing graphics card output data. Calibration keeps images consistent with originals without being affected by graphic card settings. Two monitor preset modes allow calibration results to be saved directly into the monitor. As discussed in the review on the Eizo CG-318, this is a significant advantage over software only calibration solutions and should be one of the primary considerations when purchasing a display for high end graphics applications.

Wide gamut displays such as the BenQ SW2700PT have the capability of displaying a much wider range of colour than the vast majority of computer displays. Most consumer displays will display colours close to that approximating the SRGB colour space. SRGB is a very small colour space and the default colour space of the internet. It is for all intent and purpose the lowest common denominator in the colour space world. Wide Gamut monitors have the capability of displaying a much wider range of colour (more saturated colours) and typically come close to approximating the Adobe RGB colour space. What this all means in real world terms is the reproduction of much deeper more saturated colours. This enables better rendition of colour tones and better gradation in colour. For image processing and printing this is a key advantage and for photographers is critical to achieving the best possible results. Here in my own studio my wide format Canon printers are capable of producing colours that greatly exceed the SRGB Colour Space (and in some areas even the Adobe RGB Colour Space). The BenQ is capable of rendering these colours on screen and thus I can ensure my images are optimally processed for final print without guess work or test prints.

The BenQ is equiped with a 14-bit 3D Look Up Table (LUT) which improves RGB color blending accuracy for color reproduction. It is also equiped with an “OSD Controller”. The OSD controller is a remote controller that comes with three preset buttons each set up with a customized display setting such as Adobe RGB, sRGB and Black and White mode. This enables easy switching between presets without going through complicated settings. The OSD Controller also comes with a button for quick OSD navigation and settings. My initial impressions of this OSD controller were a bit gimmicky. However, in practical use I actually found this quite useful for soft proofing images for the web in SRGB. Black and white photographers will likely also love this capability with the dedicated Black and White mode. With a simple click of a button, you can preview color photos in black-and-white before adding effects or having to do any post production work.osd-info
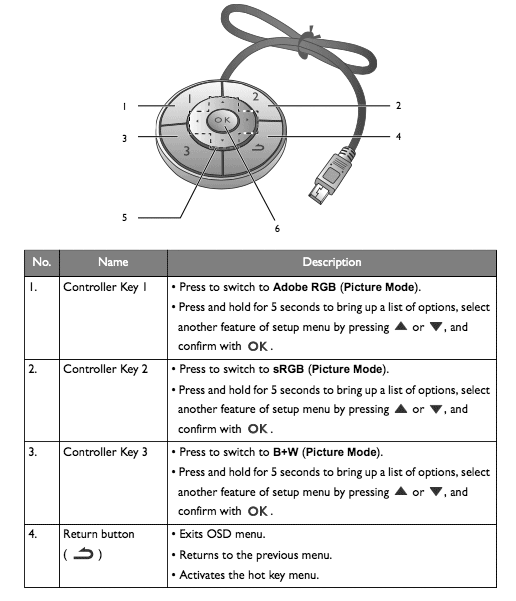
In terms of both sheer colour range and accuracy of colour reproduction, the BenQ’s performance is excellent. Testing shows superb SRGB performance and approximately 99% of the Adobe RGB gamut range is successfully displayed. The much larger Adobe RGB space is much harder to reproduce and most monitors don’t reach even 80% of it. At this price point the BenQ sets a new standard in my experience.
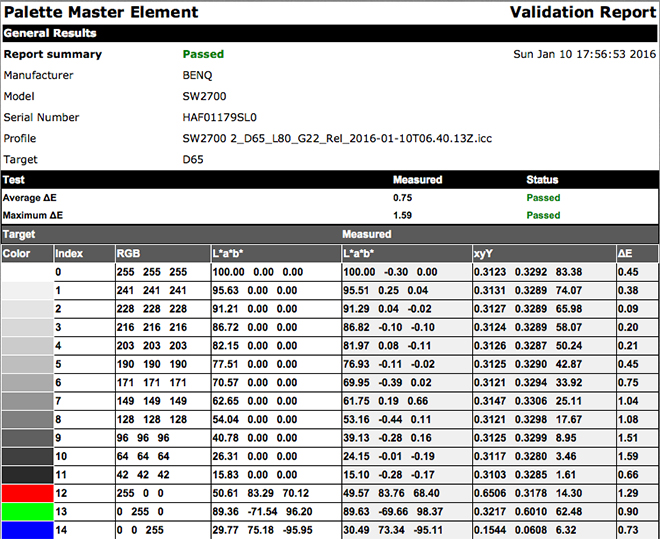
Being able to produce all of those colours is not very useful unless a monitor can do it accurately – and here the BenQ also offers very good performance. The measurement of accuracy is referred to as the ‘Delta-E’. In short, the bigger the number, the more inaccurate the monitor is. My own testing shows the BenQ’s average Delta-E to be a very respectable 0.75  and the maximum was 1.59. Whilst not as incredible as the Eizo CG-318 this is nonetheless excellent performance in a display at this price point and considerably better than many other consumer displays (including Apple’s iMacs).

The colour gamut advantage of displays such as the BenQ are the most commonly known advantage over more typical computer displays for graphics professionals. However, there is another key advantage worth mentioning; which is uniformity. Uniformity refers to the displays ability to maintain even brightness and contrast from one side of the panel to another. The more uniform the brightness the more ‘paper-like’ the appearance of the screen, the easier it is on the eyes and from a photography perspective the easier it is to judge tone and contrast in a given area of an image. Uniformity is extremely important in the reproduction of fine art prints since it ensures an even contrast ratio across the monitor.

Even uniformity is difficult to achieve in back-lit monitors and is often one of the first things you notice in a poor quality display. Monitors that are brightest in the middle and fall off in the corners are common place and are a very poor choice for creative professionals working with digital images. Uniformity can easily be measured and in my own tests I find just under a stop of difference across the face of the display from corner to corner when calibrated to 80 Candelas in my studio. Again, this is excellent performance in a monitor at this price point. It is worth noting that out of the box the default settings for the monitor are set to ‘retina burn-in mode’. I suggest calibrating the brightness setting to something more realistic for your environment.

PALETTE MASTER ELEMENT SOFTWARE

To really get the best from this monitor you need to take some time to properly calibrate and profile the display. The best way to do this is to use the supplied Palette Master Element software which can be download directly from BenQ’s website. A clear how to users guide is also available for download.

The supplied software offers options for both a basic and advanced calibration depending on your needs. Either option is quite intuitive and users should have no problem successfully calibrating their display by following the on screen prompts. Once calibrated and validated the software presents the user with a validation report on the calibration.PaletteMasterReport

Unlike the Eizo CG318 the BenQ SW2700PT does not include an inbuilt calibration device and requires an external instrument to calibrate the display. For the purpose of this review I used the X-Rite i1 Display colorimeter to calibrate the display (although the Spyder model 5 colorimeters are also supported). A colorimeter is an additional piece of equipment at additional cost, but really is necessary if you are going to get this display to perform at its best. To be honest, I am somewhat spoilt these days with the inbuilt calibration of the Eizo and I find it a bit of a hassle to dig out the colorimeter on a regular basis.photographer page 2REAL WORLD USE

In my review of the Eizo I wrote about the incredible resolution of a true 4K DCI compliant display and those conclusions still hold for me in my studio. Whilst the BenQ SW2700PT cannot compete in the resolution stakes with the CG-318 it does offer text of a more legible size which will I feel appeal to a great many photographers who will likely also use this monitor for email and web browsing as well as image processing. The BenQ also looks a little soft by comparison to the Eizo in side by side comparisons and clearly suffers from its lower resolution in this regard. A fairer comparison would be to compare the BenQ to my previous NEC monitor of the same resolution and in this instance the BenQ offers superb performance.

My daily use for a monitor such as the BenQ involves the editing, post production and printing of digital files in Adobe Lightroom and Adobe Photoshop Creative Cloud. I also use applications such as in-Design, Premiere Pro and other image related programs and plug ins. On the whole most of my time is in the majority spent in Lightroom and Photoshop and thus this is the area that my comments are most related.

Images in Lightroom (and Photoshop) are well rendered on the BenQ. Clarity and resolution are truly excellent in a monitor of this price point.  The colour rendition is excellent and when combined with the very good uniformity the BenQ offers it is extremely easy to judge tone and contrast when processing RAW files.  For soft proofing images for print the BenQ again offers excellent performance at this price point.

BenQ’s Palette Master Element Software is easy to set up, install and use and is strongly recommended to get the very best from this display.

CONCLUSION

The BenQ is a well built, high quality display that is easy to assemble, install and use via its display connectivity options. The quality of the image is excellent with very good uniformity and color accuracy that falls short of the much more expensive Eizo CG318; but far exceeds the average display. It needs to be said that the performance offered by the BenQ at this price point is nothing short of exceptional and that you are unlikely to notice the color accuracy and uniformity differences between these displays in all but the most demanding of workflows. Like the Eizo, I would have preferred the HDMI connection on the BenQ to be V.2 rather than 1.4 for future connectivity, but I suspect most users will opt for the display port in any case so this is a minor nit pick.

At an MSRP of $690 USD the BenQ should be number one on your list if you are after a high quality AdobeRGB monitor on a budget. The monitor offers exceptional performance for its price and all will likely meet your needs for a high resolution Adobe RGB display. The monitor comes with a limited three year warranty. Highly Recommended.