Unless you live under a rock (a big one), you will already be aware that Canon has finally announced the EOS R3 camera. Not much needs to be said about this camera. There are already many YouTube videos on pre-production samples that cover everything from the specifications to initial impressions, so I will not regurgitate the same information yet again. I think it’s important to note that all opinions are strictly those of the YouTubers, and virtually all of them need a copious dose of salt applied. These days, YouTube is little more than a vehicle for ‘hits .’ As such, these ‘tubers’ seem willing to spin just about anything in pursuit of followers and subscribers. Not to stray too far, but if I watch one more video that starts with ‘please subscribe’ or ‘smash that bell notification,’ I may lose it for a bit….
Dealing with the facts, production versions of the camera will not start shipping until some time in November this year. This means I will not be able to get my hands on a final production version until I return from Finland (somewhere around mid-November). I have placed a deposit for the R3, and I am very much looking forward to putting it through its paces later this year. I expect it to outperform the 1DX MK3 in some areas (that is just a natural evolution of technology). What remains to be seen is how well the camera performs in extreme cold. I won’t know the answer until Mongolia in winter (December) or Iceland in Winter in early 2022. Until such time, the 1DX MK3 remains king for cold-weather wildlife work.
I have just published Episode #20 of my Wild Nature Photography Podcast. In this podcast episode, we talk more about the current state of the never-ending COVID pandemic here in Australia and discuss camera bags and flying internationally, packing for Finland, and the announcement today of the new Canon EOS R3 Camera.
Dates have now now been confirmed for my Svalbard Spring Light expedition in 2023. The expedition will run April 8th – April 16th 2023. The primary focus of this expedition will be photography of Polar Bears, although we will also search for other wildlife and take advantage of the incredible landscape in beautiful Spring light.
In March and April the light conditions in Svalbard are magical. Usually winter trips to Svalbard are limited to day trips on snow mobiles quite close to the town of Longyearbyen. With our expedition ship we will explore a much bigger area including the western and northern areas of Spitzbergen.
This exclusive expedition is for a strictly limited number of just 12 participants plus leader and is dedicated to winter photography in Svalbard.
We will be using the ice hardened expedition ship M.S Freya that will enable us to skirt the edge of the pack ice searching for and photographing landscapes and wildlife. M.S Freyais widely regarded as the best ship in the Arctic for Photography. Our expedition ship is also equipped with sufficient zodiacs (2 x Zodiac MKV models) and crew for all photographers to be shooting simultaneously with plenty of room to spare for camera equipment – So bring what you need!
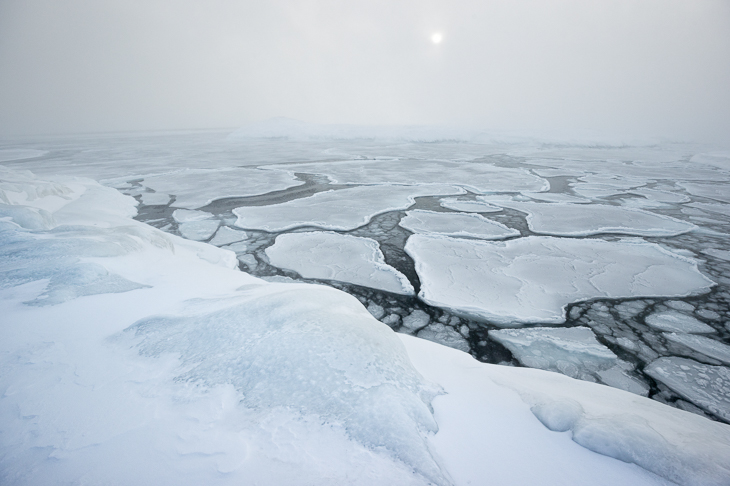
September 2021 comes from my 2020 expedition to Greenland in Winter to find and photograph Polar Bears. As we searched for Polar Bears, we would make frequent stops to take advantage of the landscape. Winter is my absolute favorite time of the year for landscape photography in the Arctic. The combination of freezing ocean, lifting fog, and soft light works exceptionally well.
In my recent blog post on preparing for Finland, I hinted at a new way to travel with camera gear. Before I dive into the details, it is worth taking a few moments to examine the problem and the available solutions for flying with camera gear. I have been flying with camera gear internationally for decades, and over the years, have learned a few things about what works and what doesn’t work so well. Some history is in order to put all of this in context, and as such, this will be a bit of a long post, so bear with me as there is a lot to cover and discuss. If you have struggled with international travel and camera gear then I hope this will be of interest.
Anyone who travels internationally (or domestically) with camera gear knows that one of the big problems is packing all your equipment safely for travel and being ready to go when you reach your destination. It is a thorny problem, and there has never been a great solution. There are countless YouTube videos on this issue. To date, none of them, to my mind, solve the problem in an elegant fashion that provides the user with an optimal travel and destination solution. The problem is you have to compromise on either the airport travel segment or the destination – it is almost impossible to pack for both in one bag.
Camera BackPacks: The problem with backpacks as a travel solution is they are heavy when laden with camera gear, and schlepping them through airports becomes a real chore. Especially when you are running late and have to run to the gate. If you fly once a year, this might not be too much of an issue for you, but if you are a regular traveler and travel with long lenses, you will already appreciate that backpacks are not ideal for navigating airports. Anything large enough to accomodate all the equipment is usually too big for carry on (and too heavy). I long ago abandoned backpacks as a method for transporting camera gear through airports. They might be fine if you carry a lightweight mirrorless system with a few wide-angle lenses, but they are a real pain with big telephoto lenses. They are also a real annoyance every time you need to use a bathroom (there is never anywhere to put them off the floor) or go through security. In hot airports, they become simply uncomfortable on the long walk to the gate. I love backpacks on location, as they are without doubt the best way to move equipment around in the field, but just not for destination transiting.
I own around half a dozen different camera backpacks that include the original Gura Gear Kiboko and several different models of the Gura Gear Bataflae. I also own a few different sized F-stop camera backpacks and a Lowe Pro Trekker for my 600mm. Each of them serves a different need and purpose; depending on where I am traveling and what I need to take with me, I vary the bag I take. For safari-style workshops, where you need something with easy access that you can store on the seat of the game vehicle, the Gura Gear bags are hands down the best thing since sliced bread. Their design means you can easily accommodate a lot of equipment on the seat of the safari vehicle next to you, and you don’t even lose any space because of their genius side-opening flaps. The bags are super light (made of super-strong lightweight sailcloth), and outside of the price tag, there isn’t much to dislike. They are quite simply the best thing on the market for their intended purpose.
For hiking, the inbuilt frame of the F-Stop backpacks makes them the ideal choice. They are comfortable for extended periods of walking or hiking and have the best harness system I have yet tried in a dedicated camera backpack. They also have an innovative access system that allows you to access all of your gear without having to dive into the top of the bag and pull everything out to get to something at the bottom. There are numerous sizes to choose from and several different brands on the market; that ultimately all do the same thing in one form or another. Again, outside of their ridiculous price, there isn’t much to dislike. Speaking of which, why is it that the moment a bag is labelled a camera bag its price seems to triple? Some of F-Stops backpacks are now closing in on $700 USD. That is just ludicrous for a backpack.
The other problem with all backpacks is that they are soft, and cameras and lenses can be easily damaged inside them as you move around airports and planes. If you have ever watched someone shoehorn their carry-on suitcase into the overhead and crush your camera bag in the process, then you know exactly what I mean. I’ve watched airline staff stuff so much into an overhead that everything gets crushed. I am always acutely aware of and always try and pack the overhead in such a way to protect my bag. It is one of those travel stresses I could do without. Soft backpacks are fine on location when you need to move around, but they are sub-optimal at best in airports.
RollerBags: Roller bags are probably the best way to transport camera gear through airports and have been my go-to solution for many years now. With wheels and the ability to roll, the bag, weight becomes far less of a concern. The problem with roller-bags is that they are typically quite heavy, even when empty, and of course, they are not very practical when you are on location and ready to shoot. My solution has always been to pack a backpack as part of my checked luggage and then re-pack the gear from the roller into the backpack at the other end. It’s not a very elegant solution, as it almost always necessitates two checked bags (one to accommodate the camera backpack). Provided you are willing to travel with two checked bags, it’s a reasonable solution, and it has served me well for many years. Although I admit, I am tired of manhandling two large checked duffel bags through international airports. So much so that I went looking for a new solution. I will come to this shortly.
I own around half a dozen different roller bags and have a love/hate relationship with them. Probably the best of them is the Lightroom F-Stop Roller. It is a combination hard/soft roller with a hard bottom and sides and soft top. It has a place for a laptop, and it holds a tone of gear for its size. It is also the lightest roller for its size by a good margin. However, it has been discontinued for many years now, and there is no replacement. My Lightroom Roller has been around the world more times than I can count, and it is very close to being on its last legs. The bearings in one of the wheels are kaput, and the handle is starting to come apart. It has served me well and will very shortly be put out to pasture and retired. F-Stop messed up when they discontinued this bag, in my opinion. I know several people who own them who, like me, really lament this bag being no longer available. F-stop, are you listening?
I also own several other roller bags, including the expensive and somewhat flawed, Think Tank Airport V.3. This is quite honestly the purchase I regret the most. For a soft sided roller, this bag is heavy (around 5kg), even when empty, and takes a paltry amount of equipment because of its flawed interior design. Within ten minutes of trying to pack this bag, I recognized that I had made an error in judgment with its purchase. The only trip it ever did with me was on its way home from the New York photo expo, and I cursed it the entire way home. Since then, it has gathered dust in the cupboard and serves as a reminder to me to think twice before purchase. While its features sound good on paper, they do not translate well for travel. I wish Think Tank had consulted with photographers who travel extensively before they designed this bag.
The other problem with roller bags is that most of them are soft, and the equipment inside is subject to damage just like if it were inside a backpack. The hard-sided roller bags on the market go some way to alleviating this problem but usually do so at the expense of added weight. Most hard-sided rollers are also traditionally made of cheap plastics that tend to crack and split very quickly. I have tried several non-photography hard sided rollers and they never last more than 12 months before they either crack, split or otherwise fall apart. The F-stop Lightroom roller was a hybrid bag with a really tough hard bottom and sides and it worked well. It doesn’t offer the same level of protection as a Pelican, but it was a reasonable compromise. To date, I am not aware of a dedicated camera roller bag that has hard sides all around outside of those from the likes of Pelican and SKB. And those fall into a very different category of camera bag.
Pelican Cases: Pelican cases are without doubt the safest way to travel with your camera gear (provided you can carry it onto the plane). They are indestructible, waterproof, and can be configured in any number of different ways. The problem with Pelican cases is that if you check them (and your gear), you are effectively issuing a challenge to the baggage handlers to do their utmost (and they will try) to destroy it. Baggage handlers seem to believe that Pelican cases are designed to be thrown and mishandled because the contents are so well protected. While they are unlikely to do anything but cosmetic damage to the outside, they will cause a lot of shock to the internal cameras and lenses. Lenses with Image Stabilisation, such as big telephoto lenses, are particularly susceptible to shock damage because of their floating elements, and as such, I would never recommend checking a Pelican full of big lenses. Checking the case also opens you up to the possibility of lost luggage and theft.
Pelican does make a light carry-on version, called the Pelican AIR 1535, which is a roller and can hold quite a bit of equipment with their TrekPack system. However, it still leaves the problem of needing to re-pack at the destination if shooting out of a Pelican isn’t possible for your trip. Shooting out of a Pelican case might be fine for a studio photographer, but if you are working out in the landscape or from a ship it is not usually ideal. The other problem with the Pelican AIR1535 is that it is just a fraction too small inside for a 600mm f4L IS Lens because of the design of the interior lid foam. Even with their TrekPack system, it’s a very tight fit (uncomfortably so, in my view). The problem is the foam inside the lid costs you roughly an inch of height and has to be severely compressed to accommodate a 600mm lens. When I test packed this case, I realised I was just too uncomfortable with how much of a squeeze it was to accomodate the 600mm lens and I ended up returning it. It is an exceptionally well designed case, is light for what it is and had it been half an inch more accomodating in depth would probably be my current solution.
The New Solution: Recently, I became aware that Think Tank (makers of the awful Airport V.3 roller) had partnered with an American company called SKB cases to try and solve the problem of flying with camera gear both in the airport and on location. Their answer is the i-Series of cases (yes, they really should have come up with a more imaginative name). If like me, you have never heard of SKB, then you are not alone. Long story short, they make hard, tough cases just like Pelican and like Pelican, SKB are also manufactured in the United States. The net result of this partnership between Think Tank and SKB is a pretty cool solution that goes some way to solving the airport and field dilemma.
In brief, SKB has manufactured a tough pelican style roller case that meets airline carry-on restrictions in conjunction with Think Tank who provide a dedicated insert for it that can be lifted out and used as a backpack or carry bag on location. When you order the case, you stipulate how you want the interior configured – either as a backpack, a carry case, or a case with a lid organizer. The genius of this design is you don’t need another backpack or bag at the other end (unless you are going to be doing a lot of hiking). Once you arrive at your destination, you open the case, lift out the insert, and away you go—simple, elegant, and relatively efficient.
I was somewhat dubious at first, but after a little online research, a couple of coffees, and some YouTube reviews, it became obvious that SKB’s cases are at least as good as Pelican and, in some ways, appear more carefully thought out and better engineered. Having directly compared the SKB to the Pelican Air 1535 I would say they are more alike than different. I would give the slight edge to the SKB for its improved clasps. I was somewhat dubious given my experience with the Think Tank Airport V3, so I carefully measured my gear against the quoted internal dimensions and found it would all fit. So, I took a punt and ordered the Roller Case and carry insert option. I was going to make a short video on this, but Think Tank and SKB have done a decent enough job of it for you to get the idea.
I opted for the carry insert option and not the backpack or lid organizer option as the carry bag offers just a bit more depth; which is required to house a 600mm f4 lens securely. If you don’t own a 600mm lens, you could use the backpack option. The SKB 3i-2011-7DZ (who comes up with these model numbers!) is an airline carry-on approved size, watertight and dustproof rolling hard case with a removable zippered divider interior designed by Think Tank.
Although the SKB roller is more or less identical to Pelican’s AIR1535 it has more internal depth because it does away with the thick foam in the lid. Instead, the top section is padded by the inserts soft lid. If you are familiar with F-Stops ICU system, this is a very similar approach. It works better than Pelicans TrekPack system as you gain nearly an inch in height. Although the TrekPack system is modular, it is a bit like pluck foam in that once you set it up, you are more or less stuck with the same configuration. I personally prefer velcro style foam dividers as these can easily be reconfigured to suit changing gear.
It is important to be clear that the SKB/Think Tank solution isn’t perfect. For starters, it doesn’t provide sufficient room to leave a camera mounted to the 600mm lens once on location. If you need to be able to leave a camera mounted to the 600mm lens then you really have no option but to gate check another backpack (like a Lowe Pro Trekker). 600mm lenses provide unique travel challenges that are hard to overcome and one has to make compromises. Additionally, because of the hard and rigid sides there is no room for ‘bulge’ and as such the bag doesn’t hold quite as much as an F-Stop Lightroom Roller. But these things are a compromise and something has to give. In the end, I think it’s better to trade a little space for the security of a rigid Pelican style case.
Another alternative that I am experimenting with is ditching the internal dividers inside the lift out carry bag and opting instead for cameras and lenses in camera and lens pouches. This option provides a lot more space than the internal soft carry case and dividers, but requires a bit more care when packing. Of course, it adds cost as well as its necessary to purchase soft camera and lens cases from the likes of Lens Coat. It also kind of removes some of the elegance of the lift out solution. Swings and roundabouts….
One aspect of the SKB/Think Tank solution I like is the ability to quickly remove the padded insert from the case when it’s full of equipment. Suppose you are ever challenged at the airport to check the case because it has wheels or because the airline staff member seemingly dislikes you. In this situation, you can quickly lift out the padded insert, sling it over your shoulder with the included strap, check the empty hard case, and walk onto the plane with all your equipment. You can do this with F-stop backpacks as well, but it’s a bit more fiddly to get the internal insert out, in my experience, when it’s packed with gear.
This solution appears on the surface, quite suitable for airport travel as it offers a hard shell roller case that maximises protection of the camera gear and lenses. It then provides a backpack or carry case once on location. How does it work in practice? It remains to be seen, but I have high hopes for this approach and will be testing it in a few weeks time when I leave for Finland. My feeling is it should work extremely well through airports and be efficient in the field on pretty much any trip that doesn’t involve long walks or hiking. In the later case, its either schlep a backpack through the airport or pack a 2nd piece of checked luggage with a backpack inside it. Personally, I will always opt for the later.
Full Disclosure: I am in no way affiliated with Think Tank, SKB or F-Stop camera bags. I used my own hard earned cash to purchase the SKB / Think tank solution as well as all the F-Stop camera bags. I have been and remain an unpaid ambassador for Gura Gear camera bags and have several bags I have been supplied by them for review over the years. The original Kiboko I paid for with my own money. I am actually not interested in free camera bags and have turned down several offers to be an ambassador for different brand in recent years.