
Back in 2017 I wrote a blog piece on how to get the best from Snow and Ice with Canon’s Highlight Tone Priority. This piece still holds true today; but I have wanted to better explain what is actually happening when you engage this feature in your Canon camera and why you should use it for Snow and Ice photographs (and for anything with a lot of highlight detail). There is a lot of misinformation out there on the web about this feature and wether it applies if you shoot RAW. Put as simply as possible; it does apply and if you shoot RAW you can significantly benefit from using this feature in certain situations.
In short: Highlight Tone Priority (HTP) is a Canon-developed camera feature which aims to capture more of the detail in the lightest areas of an image whilst avoiding ‘blown’ highlights. It’s a feature that was first introduced with the EOS-1D Mark III camera in 2007 and is a feature I have continued to use in every single Canon camera I have owned since.
Accoridng to Canon “This new feature extends the dynamic range of highlights by about one stop and improves gradation within highlight areas. By expanding the range from the correct exposure level (18% grey) to the maximum allowable highlight level, the gradation from greys to the highlights becomes smoother and loss in highlight detail is minimised. Depending on shooting conditions, noise in the shadow areas may increase slightly.”
The first thing to note is that the Highlight Tone Priority feature is disabled by default, and should only be enabled in appropriate scenarios (see below). This is because it affects other camera settings and can also negatively affect shadow details. Originally the feature had two settings – off and enabled (D+) – but recently an ‘Enhanced’ setting has been added (D+2).
HTP is usually found in the Shoot menu. However, on earlier cameras it’s available as a Custom Function.
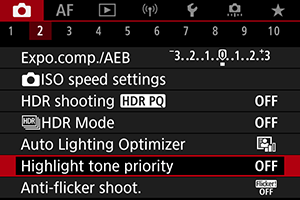

What settings does HTP change?
When Highlight Tone Priority is enabled, the following changes are made:
- Lowest available ISO setting is 200
- D+ (or D+2) appears by the ISO value on rear screen/in viewfinder
- (on much older cameras, the zeroes in the ISO value display as lower case ‘o’s (for example ‘2oo’))
- Auto Lighting Optimizer is disabled
So, if you are wondering why ISO 200 is the lowest you can set and why there’s a D+ showing on-screen, then check your Highlight Tone Priority setting in the Shoot menu.
When should you use HTP?
This feature is particularly useful when you have very bright areas in a scene (such as when working with Snow and Ice) – if you’re photographing a white animal like an Arctic Fox, for example, or an iceberg in fog or have lots of snow in a landscape. It may also work well if you’re capturing a bride on her own, but if photographed alongside the groom HTP ‘may’ detrimentally affect the darker tones of the groom’s suit. Personally, I have never experienced any shadows issues in the many years I have been using HTP in my Canon cameras.
How does it work?
HTP is a Canon processing algorithm which works by halving the numerical values of the RAW file and then by applying a special curves adjustment.
Since it affects the values of the RAW file itself, it also changes JPEG images. This is very important to understand – Not because I advoate you shoot jpeg (I dont), but because HTP DOES affect the RAW file. But it does not affect it as you might think. What HTP does is to ‘tag’ the file as having been shot in HTP mode. The Canon DPP software then subsequently reads that tag and renders the on screen image accordingly. The question is does it matter if you use Adobe Lightroom?
The answer is YES. Lightroom does read the HTP tag. You can easily test this for yourself by shooting the same high key image (three images all at the same exposure values) with HTP turned off, with HTP enabled and then with HTP + enabled. Looking at the three images side by side in Lightroom and comparing them its very easy to see the histogram move and get more underexposed as you cycle through the images. The difference is subtle, but its clearly there. So Lightroom is clearly respecting the HTP tag and rendering the RAW file accordingly. to further confirm this, I reached out a close friend and engineer at Adobe who is responsible for much of the RAW processing code in Lightroom Here is what he had to say:
In short, ACR and Lightroom are aware of the HTP setting and will apply the appropriate exposure compensation by default when rendering the raw file. If we did not, then the images would appear darker by 1 stop, as if you set Exposure in the Basic panel to -1. In my view, the main advantage of HTP is that you are less likely to blow highlights in the field at capture time; the tradeoff is that shadows are more likely to have noise. The analogy in the film days is recording with a slower film and then pushing 1 stop in post. Of course, these days with sensors being as good as they are, shadow noise is less of an issue and usually easily treated; the greater sin is blowing highlights and having detail-less whites.
Put as plainly as possible: Shooting in HTP will give you better highlight detail in your RAW file in Adobe Lightroom or ACR; provided you expose correctly in the field.
To understand what is happening with HTP, it’s important to understand what the ISO setting does. It is commonly taught that the combination of shutter speed, aperture and ISO (often referred to as the ‘exposure triangle’) determines the exposure. Although this is true for a film camera, it isn’t accurate for a digital camera. The total accumulation of light on the sensor (the exposure value or EV) is determined solely by the aperture and the shutter speed – What most people don’t know or realise is that the ISO part happens after the exposure has been made.
Instead of the ISO being analogous to film sensitivity, it’s more accurate to think of it as a ‘volume control’ on an amplifier. A digital sensor has a fixed sensitivity, but different degrees of amplification can be applied to the signal. This translates simply as the ability to boost the brightness of the image that is read from the sensor.
When HTP is turned on, the camera’s metering system works out the exposure needed based on the currently selected ISO value, but when it reads the signal from the sensor it sets the amplifier gain corresponding to the ISO setting one stop below it. It then tags the image in the metadata to indicate it was shot with HTP enabled.
By way of example, if you photographed a scene without HTP at ISO 400, the camera’s metering system might suggest 1/400 second at f8. When the signal is read from the sensor, the amplifier (ISO) will be set to ‘400’ and the resulting signal will be converted to brightness values corresponding to the full range of tones in the original scene (assuming the metering in the camera was correct).
When you enable HTP, the camera will still meter the scene at ISO 400 and still select the same shutter speed and aperture as before. Exactly the same signal will be recorded on the sensor. The difference is that this time the amplifier will be set one stop ‘lower’ (so ISO 200 instead of ISO 400). This means that the RAW file that’s generated will have numerical values that are half of the corresponding values that would have been produced without HTP enabled. If you could view the image at this stage, you would see it as being one stop underexposed (hopefully without any blown-out highlights).
However, the camera tags the file as being taken using HTP and applies a tone curve that brightens shadows and mid-tones, but which holds back the highlights. It is this modified adjustment that you see on the back of the camera – the RAW file is converted to JPEG and processed in-camera based on the settings used (this is regardless of image quality settings). Since the file is tagged as being taken with HTP enabled, the same adjustment is applied if you open the RAW file in Canon’s Digital Photo Professional or in Adobe Lightroom or ACR.
