2015 – Packing for Yellowstone, Iceland and an Arctic Winter

It really is hard to believe that Christmas and New Year have come and gone and that in a few days time we will already be in February. In less than two weeks time I will be flying out of Australia on my first two workshops of the year – Yellowstone Winter Wonderland Experience and Iceland in Winter. I will also be spending time on a new scouting trip to the Arctic in Winter as well as my Arctic Fox project. It is going to be an exciting couple of months.

It has been nearly ten years since I was last in the United States and I am very much looking forward to returning and photographing in a Yellowstone Winter with a small group of great friends and passionate photographers. The Yellowstone workshop is about both wildlife and landscape opportunities and I am really excited about what we may encounter during our time in the park and surrounding areas. We are also visiting the Grand Tetons and National Elk Refuge at the end of our workshop.

After I finish in Yellowstone I am flying directly to Iceland to co-lead my annual 2015 Winter Aurora workshop with Daniel Bergmann. As I have written before Winter is wonderful in Iceland with snow covered landscapes, partially frozen waterfalls and with a little luck we will see and photograph the Aurora Borealis. We are focusing our efforts during this workshop on the landscapes of Southern Iceland and will be visiting many fantastic locations for photography in these areas including ice caves. The 2016 Winter workshop will focus on the Northern landscapes of Iceland. I opened the 2016 workshop for bookings a couple of days ago and there are now only a few places left before we will be sold out.Ice CaveAt the conclusion of the Winter Iceland workshop I am going to travel to Svalbard for a week long scouting expedition to photograph Polar Bears and Reindeer in winter light. This is a very exciting opportunity and I will have more to say about this expedition in a few weeks time.

After completing the Svalbard trip I will fly back to Iceland and spend a week and a half in the extreme northeast of the country photographing Arctic Foxes for my Arctic Fox Project. I will then fly back to Australia at the end of March.Arctic FoxAs is customary I like to do a packing list of what I am planning to take with me on these workshops and for my time away – it helps me make sure I have not forgotten anything. Unlike my 2014 Iceland Winter Workshop I am not heading to Namibia in Africa directly afterward and so can pack only cold weather clothing, leaving the shorts and sandals at home. In fact, given I am spending time in Yellowstone and the Arctic in Winter I will be packing all of my best cold weather clothing. I am expecting temperatures of -20º celsius and below in Yellowstone and Svalbard – Iceland should be a warm bath by comparison. My Sorell Caribou winter boots are currently in storage in Iceland so I intend to purchase a new pair of winter boots in Bozeman before we start our Yellowstone workshop.

In terms of camera gear I am packing the usual gear for this trip including two long lenses for wildlife. As much as I would also like to take my TSE lenses the reality is I simply do not have enough space and already have considerable weight to manage. On top of the below I am also packing the new Lens Coat 600mm F4 Camera backpack which I can use to store the 600mm when not in use. This clever new bag packs flat and takes up almost no room in my luggage.

– 2 x Canon 1DX bodies
– 1 x Canon 16-35mm F4L IS
– 1 x Canon 24-70mm F2.8L IS MK II
– 1 x Canon 70-200mm F2.8L IS MK II
– 1 x Canon 200-400mm F4L IS Lens with inbuilt 1.4X Teleconverter
– 1 x Canon 600mm F4L IS MKII
– 1 x Canon 1.4X MK III Teleconverter
– 1 x LEE Foundation Kit
– 1 x LEE Foundation Kit and Polariser
– 1 x LEE 3 Filter Lens Wrap
– 1 x LEE 3-Stop Soft Graduated ND Filter
– 1 x LEE 3-Stop Hard Graduated Filter
– 1 x LEE 6-Stop Little Stopper Neutral Density Filter
– LEE Adapter Rings for 77mm and 82mm
– 1 x Canon Drop-in Circular Polariser
– 1 x Leica Ultra-vid 10×42 HD Binoculars
 .
Gura Gear Chobe (Carry on Luggage)
– 1 x Apple MacBook Pro 15″ Retina
– 1 x Apple laptop charger
– 1 x Thunderbolt 1 TB external portable hard drive
– 1 x  USB CF card reader
– 1 x Sunglasses and sunglasses case
– 1 x Astell & Kern Hi-Rez Portable Audio Player
– 1 x Astell & Kern Charging Cable
– 1 x Inner Ear Stage Two Driver Headphones
.
Etcetera Case #1 (Inside Chobe)
– 1 x Canon 1-Series camera charger
– 2 x Power Adapters
– 2 x Canon1DX spare Batteries
 .
North Face Rolling Thunder Duffle (Checked Luggage)
– 1 x Lens Coat 600mm Backpack
– 1 x Arćteryx Atom LT Hoody
– 1 x Arćteryx Atom LT Vest
– 1 x Arćteryx Cerres 850 Down Filled Jacket
– 1 x Arćteryx Kappa Pants
– 1 x Arćteryx Alpha SV Goretex Pro Bibs
– 1 x Arćteryx Alpha SV Goretex Jacket (Because at some point it will rain in Iceland)
– 1 x Arćteryx Gamma Pants
– 1 x Norona Svalbard Pants
– 1 x Devold Expedition Thermal Long Johns
– 2 x Devold Expedition Thermal Tops
– 1 x Scarpa Hiking Boots
– 1 x Shirt
– 2 x T-Shirts
– 1 x Jobu Deluxe Gimbal Head with Dovetail Base
– 1 x Petzl Headlamp
– 1 x Heat Company Heat 3 Cold Weather Gloves
– 1 x Really Right Stuff TVC24L Carbon Fibre Tripod with RRS Levelling Base
– 1 x Really Right Stuff Set Tripod Spikes and fitting Alan-key
– Personal Items
 .
Etcetera Case #2 (Inside North Face Duffle)
– 1 x Arctic Butterfly Sensor Cleaner
– 1 x Filter Wrench
– 1 x Zeiss Cleaning Fluid and Lens Cleaning Tissue
– 1 x Micro Fibre Lens Cloth
– 1 x Rocket Blower with Hepa-Filter
.
If you are considering purchasing any of the above camera equipment for your own photography please consider doing so by clicking through this B&H Photo Link. This affiliate link helps me pay for some of the the costs of running this website.

South Georgia Island and Antarctica Expedition Packing List 2014

In just under a week I will be making the long trek from Australia to Ushuaia in South America where I will be co-leading both a twenty one day photographic expedition to South Georgia Island and Antarctica with my friend Andy Biggs, as well as a second Antarctic Peninsula expedition just before Christmas. In between the two expeditions I am taking some personal time for photography at Mount Fitzroy in Patagonia with a few friends for ten days hiking, camping and photography in the Patagonian back-country. This will be my second visit to Patagonia in as many years, but my first to the Argentinian side. Last year on the Chile side we encountered horrendous winds that made photography impossible for six out of the seven days we were in the park. I have hopes for better conditions this year.

With a love of the Polar regions I really lucked out being born in Australia when it comes to travel time. With recent changes to airlines routes from Australia it is now necessary for me to fly Melbourne to Sydney, Sydney to Auckland, Auckland to Santiago, Santiago to Buenos Aires and finally Buenos Aires to Ushuaia. And thats before we even board ship for sailing time to South Georgia and Antarctica. I have not counted the number of hours that is going to mean sitting around in airports and on aeroplanes as I quite honestly I don’t really want to know. The reality is for me that I would endure just about any amount of travel pain to visit and photograph in Antarctica. The pain of international travel is quickly forgotten when that first call of iceberg ahead! is made on the Drake Passage. Antarctica is a miraculous location and with each visit my respect and love for this continent grows in leaps and bounds. One of the most fantastic things about these expeditions is the camaraderie with all on board and the shared passion for photography. Asa  result I am looking forward very much to sharing the experience with all aboard.

As has become traditional I like to do a packing list post before I depart on an expedition. The purpose of this list is to both help me make sure I have not forgotten anything, but also to share what it is I take with me for those either travelling with me on these trips or considering their own future trip. Packing for both two Antarctic expeditions as well as a hiking and camping expedition in Patagonia presents some rather unique challenges and I have spent a good deal of time weighing up all my options for both camera gear as well as clothing. Thankfully I do not have to transport all of my camping gear to South America as we will be hiring what we need on location. You might note that my choice of camera bodies for this time away is not ideally suited to hiking. As much as I love the Canon EOS1DX (I just recently purchased a second one) it is not exactly what I would consider a light weight hiking friendly camera. I will instead loan a 5DMKIII from one of my good friends for the hiking component of our Patagonia trip and leave my 1DX cameras in storage.antarctica-gear

In addition to the usual camera gear I am also carrying an Aquatech Delphin 1D underwater sport housing, dome port and ancillary accessories for one of my Canon EOS 1DX cameras. I have long wanted to pursue some underwater and split photography options (half above the surface / half below the surface) in Antarctica and I am very excited about the opportunity on these two expeditions thanks to a new sponsorship arrangement with Aquatech. I hope to post some still images and video of the housing in use in both Antarctica and South Georgia Island as well my thoughts and experience on this type of photography in the polar regions.

– 2 x Canon EOS 1DX bodies (I recently purchased a second 1DX and finally retired my 1DS MK3)
– 1 x Sigma 15mm Fish Eye Lens
– 1 x Canon 16-35mm F4L IS
– 1 x Canon 24-70mm F2.8L IS MK II
– 1 x Canon 70-200mm F2.8L IS MK II
– 1 x Canon 200-400mm F4L IS w/ inbuilt 1.4 TC
– 1 x LEE Foundation Kit
– 1 x LEE Foundation Kit and Polariser
– 1 x LEE 3 Filter Lens Wrap
– 1 x LEE 3-Stop Soft Graduated ND Filter
– 1 x LEE 3-Stop Hard Graduated Filter
– 1 x LEE Big Stopper Ten Stop Neutral Density Filter
– LEE Adapter Rings for 77mm and 82mm
– 1 x Canon Drop-in Circular Polariser

Gura Gear Chobe (Carry on Luggage)
– 1 x Apple MacBook Pro 15″ Retina
– 1 x Apple laptop charger
– 1 x Thunderbolt 1 TB external portable hard drive
– 1 x  USB CF card reader
– 1 x Sunglasses and sunglasses case
– 1 x Astell & Kern Hi-Rez Portable Audio Player
– 1 x Astell & Kern Charging Cable
– 1 x Inner Ear Stage Two Driver Headphones
– 1 x Leica Ultra-vid 10×42 HD Binoculars

Etcetera Case #1 (Inside Chobe)
– 1 x Canon 1-Series camera charger
– 2 x Power Adapters for on board ship
– 2 x Canon1DX spare Batteries

North Face Rolling Thunder Duffle
– 1 x Arćteryx Atom LT Hoody
– 1 x Arćteryx Kappa Jacket
– 1 x Arćteryx Kappa Pants
– 1 x Arćteryx Alpha SV Goretex Pro Bibs
– 1 x Arćteryx Alpha SV Goretex Jacket (For Patagonia)
– 1 x Arćteryx Gamma Pants
– 1 x Norona Svalbard Pants
– 1 x Devold Expedition Thermal Long Johns
– 2 x Devold Expedition Thermal Tops
– 1 x Scarpa Hiking Boots (For Patagonia)
– 1 x Skins Hiking Lycra (For Patagonia)
– Other regular Clothing
– 1 x Sleeping Bag Liner (For Patagonia)
– 1 x Jobu Deluxe Gimbal Head with Dovetail Base
– 1 x Petzl Headlamp
– 1 x Heat Company Heat 3 Cold Weather Gloves
– 1 x Sandles (For footwear inside ship)
– Personal Items
– 1 x Aquatech Delphin 1D Underwater Sport Housing
– 1 x Aquatech P-70 Extension Ring
– 1 x Aquatech PD-85 Dome Port (For Canon 16-35mm F4L IS)
– 1 x Aquatech Pole Shutter Kit
– 1 x Pair Aquatech Sensory Cold Weather Gloves
– 2 x Aquatech Sport Shields for 70-200mm and 200-400mm lenses

Etcetera Case #2 (Inside North Face Duffle)
– 1 x Arctic Butterfly Sensor Cleaner
– 1 x Filter Wrench
– 1 x Zeiss Cleaning Fluid and Lens Cleaning Tissue
– 1 x Micro Fibre Lens Cloth
– 1 x Rocket Blower with Hepa-Filter

Ortlieb 120 Litre Dry Duffle Bag
– 1 x Really Right Stuff TVC24L Carbon Fibre Tripod with RRS Levelling Base
– 1 x Really Right Stuff Set Tripod Spikes and fitting Alan-key
– 1 x Arctic Sport Muck Boots

There is one other important piece of documentation I will be taking with me on this expedition and that is an Australian Customs Declaration form. If you are travelling internationally from Australia you can read about the benefit arming yourself with this documentation HERE.

What Camera Gear is being left at home?

I always find myself in a bit of quandary when it comes to deciding what to leave at home when packing for a workshop or expedition. Despite my intentions, I often find a lens I planned to leave at home sneaks its way into my bag at the last minute as the fear of wanting it outweighs the thought of the extra weight in the camera bag. On this occasion however, I feel quite confident in my lens selection. I have all the major focal lengths covered and although some of my favourite glass is staying at home (The Canon 17mm F4L TSE and Canon 24mm F3.5L MKII TSE) I do have these focal lengths covered in the new 16-35mm F4L IS and 24-70mm F2.8L MKII. As much as I would like to also take the Canon 600mm F4L IS MKII the sheer weight and bulk of this lens in combination with everything else really preclude it as a viable option so in this instance it is staying at home.

The Bitter Sweet

It is always somewhat bitter sweet for me to be heading overseas on a photography expedition. On the one hand I love spending time in the outdoor polar regions with other photographers who are passionate about their craft. I am fortunate to meet and travel with some fabulous people who are not only talented photographers in their own right but also a source of continual inspiration. Many of these participants have become friends and I just want to take a moment to acknowledge their photography and thank them for their participation and input. The bitter for me is that I am leaving my two young kids for an extended period of time. Thank goodness for technology and Skype.

Purchasing Equipment

If you are considering purchasing any of the items listed in this packing list for your own photography please consider doing so by clicking on the links on this page. It helps me keep this blog running and pay for the hosting fees with a small commission on affiliate sales when you purchase through this site.

ATA Carnet – A Passort for your Camera Equipment

There has been quite a lot of chatter and confusion recently on some of the forums and social media platforms here in Australia about ATA Carnet’s for international travel with photography equipment.

Let me say right at the start that I have never used an ATA Carnet (or even a Customs Declaration form) in all of my travels and not once to date have I ever been pulled up by customs and immigration in relation to the extent of my photography equipment. This could easily change though and it is worth taking a bit of time to discuss both Carnet’s and Customs declaration forms to both correct some of the misinformation out there, but also to ensure you are covering yourself in a suitable manner should you find yourself in a situation where you are asked if you are holding one of these documents or being asked to pay duty on equipment.

Lets start at the beginning with what is a Carnet?

Carnet or ATA Carnet (pronounced kar-nay) is an international customs and temporary export-import document. It is used to clear customs in 84 countries and territories without paying duties and import taxes on merchandise that will be re-exported within 12 months.  Carnets are also known as Merchandise Passports or Passports for Goods. See “What is a Carnet?” Video. In effect, a Carnet is a passport for your photography equipment that protects you from having to pay duty on equipment you export and re-import. Carnets facilitate temporary imports into foreign countries and re-importation into your home country. There are 84 countries and territories that accept carnets. See a complete list of Carnet countries here.

A Carnet effectively consists of two parts, the first of which is an export document that is presented to customs when you are leaving your country of origin. It includes a list of your equipment as well as your intended use for that equipment and is stamped by customs to show you are taking the equipment out of the country and that the equipment is not subject to import duty when you return. The second part of the Carnet is presented to customs on your arrival into a foreign country that is part of the Carnet system. This document also lists your equipment and protects you from being charged import duty by the foreign country on both entry and exit from the country. It must be shown at the time of entry into the country and at the time of exit. If you fail to exit the country with the equipment you imported you will be charged duty (which will be taken form your Carnet security deposit). See below about the Carnet security deposit and how this duty is charged. See also International Chamber of Commerce.

Here in Australia it presently costs $451 AUD to have documentation prepared for a Carnet by VECCI and you need to apply for a Carnet not less than three business days before you depart (and they recommend two weeks). There are processing fees over and above the $451 dependant on wether you take out a Carnet for three, six or twelve months. A Carnet must list all of the countries you plan to take the equipment that are part of the 84 countries in the Carnet system as well as your intended use for the equipment. There is also a bond that is taken by VECCI to secure your equipment against possible duty charges. This bond is equal to 50% of the commercial value of the goods you plan to travel with. So if you are travelling with $50,000 AUD worth of camera gear you are required to leave a deposit here in Australia with VECCI of $25,000 AUD. VECCI justify this ridiculous security bond because they are covering themselves for the variance in customs duties per country. If you know the specific duty that the country you will be visiting charges you can have this 50% bond amended by VECCI to the same as the country charges. For example: If you are visiting ‘X’ country and ‘X’ country charges 10% duty then VECCI can amend the bond to be 10% in this instance.

The reality of the situation is that a 50% security bond deposit is well above any potential customs duty you may be charged should you find yourself in the unfortunate position of being charged import duty on equipment you are carrying internationally. The positive of the ATA Carnet is that you protect yourself from being charged duty and that you will receive back 100% of your bond on return to your home country with all of your equipment. You just have to be prepared to tie up 50% of the commercial value of your goods in a security bond. VECCI do not consider a credit card number a suitable security bond – you have to leave them the actual money.

It is important to note that there is no dollar value minimum or maximum on a Carnet. You do not suddenly need one because the value of your goods has reached a certain amount – there is no minimum threshold and no maximum. A Carnet can be requested for something as small as $100 trade show samples or as large as multi-million dollar private jet. Now, if you are importing a multi-million dollar yacht for an international yachting race, or you are Peter Jackson filming Lord of the Rings and you need to import a few million dollars of equipment for clear commercial purposes then an ATA Carnet is pretty much a mandatory document. But if you are an amateur or professional still photographer like myself who travels extensively with a reasonable amount of camera gear this document is optional. It is worth noting VECCI recommend you do take a Carnet with you, but they also note it is not mandatory and that there is an alternative you can use at least in Australia. You should also note that different countries enforce Carnet’s differently. Presently both New Zealand and the USA are noted by VECCI as rigorous enforcers of Carnet’s.

The alternative to an ATA Carnet is an Australian Customs Declaration Form. An Australian customs declaration form is designed to protect you from having to pay duties on equipment you leave Australia with and then bring back into Australia on your return. Unlike an ATA Carnet, an Australian customs declaration form is free, requires no bond and you can complete this document yourself without a third party. You present this document to Australian customs when leaving the country and have it stamped and your equipment inspected. You then present this document on your return to Australia if you are challenged to pay duty on your equipment on re-entry.

There is a very clear difference between an ATA Carnet and a Customs Declaration Form. The former is designed to protect you from paying duty in both your home country as well as the participating Carnet country you will be visiting – it is in effect a passport for your equipment. A Customs Declaration Form is designed to protect you only in Australia; although you could certainly present this document internationally if you are challenged to pay duty in a foreign country as proof you intend to take all of the equipment home. It is important to note that the foreign country is not in any way obligated to accept an Australian Customs Declaration form and could still legally charge you the full duty amount. Only you can decide if you need a Carnet or an Australian Customs Declaration form. You can download the Australian customs declaration form HERE.

All of this red tape could be a real headache if you are unfortunate to be pulled up by a grumpy customs official who decides to exercise his overt powers and charge you import duty on photography equipment you intend to take home with you. So at the very least you should know how the Carnet system works, what it is and why you should consider if you need one.

It is also important to note that individual countries have their own policies for import duty, their own documents and procedures. You should do your own research on the country you plan to visit and find out what their requirements are for bringing in camera equipment and what can happen if you are challenged and are not able to produce documentation to protect yourself from duties. You should also research the specific laws in your own home country for export and re-import of photographic equipment – even just for personal use abroad.

Personally, I intend to take Customs Declaration forms with me from now on to at least protect myself from duty in  my home country. The ATA Carnet system would me by preferred approach but frankly the cost of doing so is ridiculous and I have no desire to tie up large amounts of cash in security bond deposits with VECCI.

Aquatech Imaging Solutions Sponsorship for South Georgia Island and Antarctica

I am very excited to share the news that I have recently signed a new sponsorship agreement with Aquatech Imaging Solutions here in Australia. For the last fourteen years AquaTech has been designing and manufacturing professional photographic accessories for photographers who work in wet weather conditions.  They first began manufacturing their Sport Housings for professional photographers and cinematographers and mainly focused their products towards surfing and ocean sports.  Today their Sport Housings are used in several different genres of photography such as advertising, surfing, sailing, documentary, fashion, fishing, Olympic water sports, and more.Rain ShieldI am looking forward to adding Polar photography to the list of genres for Aquatech and will be taking one of their Delphin 1D underwater sport housings along with dome port and ancillary accessories with me to Antarctica and South Georgia Island in a little under two weeks time. I have long wanted to pursue some underwater and split (half above water / half below water) photography in Antarctica and am very excited about this new opportunity.Delphin 1D front
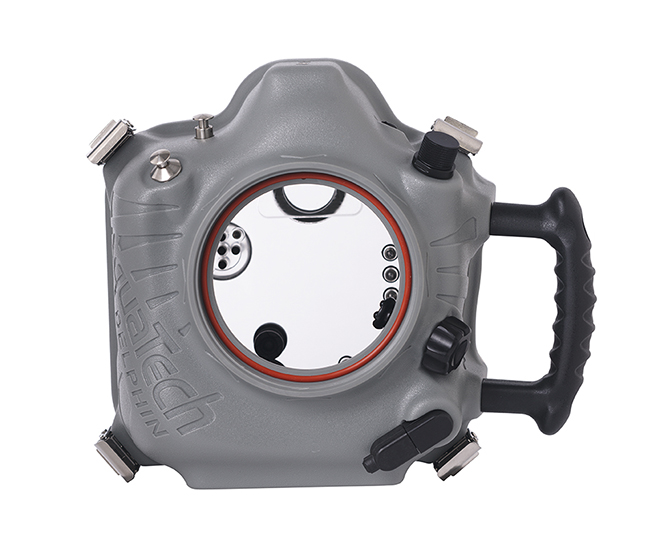
For those of you travelling to South Georgia Island and Antarctica with me this year who are interested in learning more about underwater photography and the use of housings, the equipment will be available to see, use and try for the duration of the expedition. I will also have several of the Aquatech Sport Shields and Sensory Gloves on hand for all to try. The best and fastest way to get up to speed with the Delphin underwater housing and accessories is to check out the Aquatech online videos on their website HERE.

Apple Thunderbolt Upgrade with Legacy Firewire Computers

I ran into quite a nasty little ‘gotcha’ experience with the upgrade path from Firewire to Thunderbolt last night that I think is worth sharing for anyone who might be considering purchasing a new Thunderbolt device and owns and uses legacy Mac computers with Firewire800 ports.

In my studio I am currently running an 8-core 2010 ‘Big Iron’ Mac Pro Server as my main photography editing and printing machine. It has 64 Gigabytes of RAM and is loaded up with a super quick OWC SSD Card as well as four internal hard drives in a RAID10 Array. Its a very quick machine and not really in need of an upgrade any time soon. I had also been running an external Drobo Pro with 8 x 1TB drives in it connected via Firewire800. The sole purpose of the Drobo was a daily back-up of the internal Mac Pro RAID10 Array. Its the old belt suspenders and a piece of string and this set-up has worked well now for years.

In preparation for a new Thunderbolt Mac Pro next year (which has no firewire800 ports) I purchased one of the new Promise Pegasus2 R4 Thunderbolt2 Disk Attached Storage (DAS) Chassis and loaded it up with 4 Western Digital Red Hard Drives in a RAID10.  I also purchased a Thunderbolt to Firewire 800 adapter from Apple to enable me to connect the new Promise DAS directly to the Mac Pro’s Firewire800 port. And that is where I hit a major roadblock.

As it turns out the Apple Thunderbolt to Firewire800 adapter is a one way adapter only. That is, you can connect it to the Thunderbolt port of a new Thunderbolt equipped Apple Mac and use it to connect to a legacy Firewire800 device (like a hard drive). However, you cannot connect a Thunderbolt device (such as the Promise Pegasus2 R4) to a Firewire800 Apple Mac with this adapter. It will not work. The reason it will not work is the adapter is designed to create a Thunderbolt port for a non-Thunderbolt equipped Firewire device. It cannot create a Firewire port for a Thunderbolt device and thats a very important distinction.

According to the description on Apple’s website:ThunderboltNow it does say ‘Connect your Thunderbolt equipped Mac to a Firewire device’. I just assumed (incorrectly) that you could therefore connect a Thunderbolt device to a Firewire equipped Mac; which is not the case. It is a fairly easy assumption to make as the text does not say it cannot be done and adapters usually work both ways.

This left me in some what of a quandary as I really did not want to shell out more than six thousand dollars for the new Mac Pro just yet. I simply wanted to bed in the new Thunderbolt storage array so that when I did upgrade to the new Mac Pro at some stage next year I was ready to go with Thunderbolt storage that was tested and bedded down. What to do?

The good news is that there is a solution; although it is not very elegant and does require you to own some sort of Thunderbolt equipped Mac in addition to your Firewire equipped Mac. Thankfully I have a new MacBook Pro that has several Thunderbolt ports that I use when travelling. Step one is to connect the Thunderbolt storage device (in my case the Promise Pegasus2 R4) to the Thunderbolt equipped Mac with a standard Thunderbolt cable. Step two is to connect the Thunderbolt equipped Mac to the Firewire equipped Mac and start the Firewire equipped Mac in ‘Target Disk Mode’. In order to do this you will need a Firewire 800 cable and a Firewire to Thunderbolt Adapter available from the Apple store. Once started in Target Disk Mode the Firewire800 equipped Mac Pro will then show up as a mounted disk on the Thunderbolt equipped Mac Pro and you can then copy the files from the Firewire equipped Mac Pro to the Thunderbolt Pegasus2 DAS. It is not the cleanest solution, but it works and it is quite fast (Firewire800 speed is the limitation).