
Yesterday I was politely asked if I would consider producing a set of capture sharpening pre-sets in addition to the ISO specific pre-sets I have made for the Canon EOS 1DXMK3 HERE. Having given this a lot of thought when I was creating the ISO pre-sets I came to the conclusion that it is sub optimal to use pre-sets for capture sharpening. There are a number of important reasons for this and it is worth taking some time to understand why sharpening pre-sets are a bit of a waste of time and not recommended if an optimal result is your goal.
Sharpening Defaults: The sharpening defaults Adobe provide in Lightroom are Amount = 40 and, Radius = 1 and Detail = 25. These defaults are actually an extremely good starting point.
ISO Specific Pre-Sets and Capture Sharpening: Remember, if you are using the ISO specific pre-sets for the Canon EOS 1DXMK3 I produced then some of the higher ISO pre-sets include a component of additional sharpening over and above the Adobe defaults to counter the digital smoothing of noise reduction. This sharpening kicks in from ISO800 in the pre-sets. The sharpening amounts applied in the pre-sets are a cautious baseline. In other words, where sharpening has been applied at a given ISO pre-set it is only enough to counter the digital smoothing applied by the noise reduction algorithm.
I made mention in my post on these pre-sets that you will still need to add additional capture sharpening to your file. The amount of additional capture sharpening you will need to apply will vary depending on the quality of your lens, the sharpness of the capture and the atmospheric conditions at time of capture. In addition to these variables, the amount, radius and masking are also ‘subject dependant’ and the amount required for each of these sliders will vary depending on the subject in addition to the quality of your lens, sharpness of the capture and atmospheric conditions.
Sharpening at 1:1 100% Magnification: When making any adjustments to the sharpening sliders you absolutely must view the image at 100% 1:1 magnification. You cannot make accurate judgements about the sharpness of a capture at any other resolution.
Capture Sharpening Workflow: When I start working in the detail panel of Lightroom my preference is always to set the Radius first, before the Amount. I like to set Radius, Amount and then Masking in that order. Since optimally setting the Radius does have a visual affect on the Amount setting I actually believe Radius should be above the Amount slider in the Detail panel and have argued this point with Adobe. Adobe tell me most people just leave the Radius at its default of 1 and that this default is a very good starting point. I agree with them as a starting point; however, you can get a better result if you know what you are doing and to this end I want to explain how to set the sharpness sliders optimally (particularly the Radius).
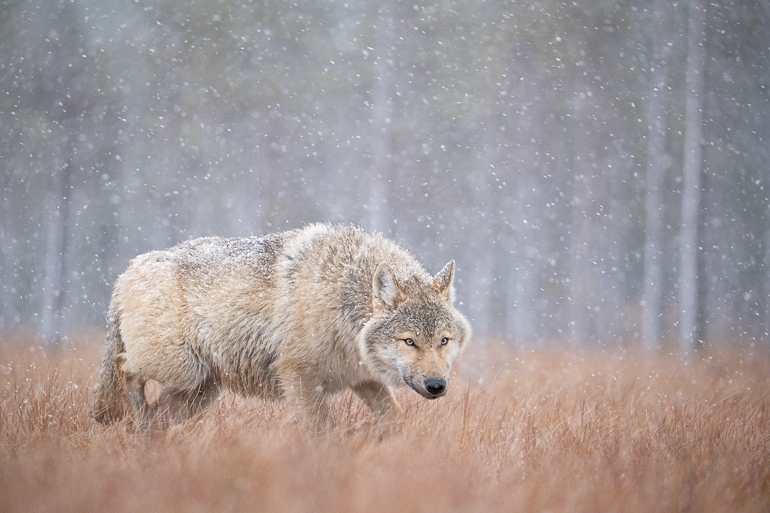
How to Set the Radius: Knowing when to adjust the Radius higher or lower than the default of 1 pixel is a critical skill to learn if you want to set your capture sharpening optimally. Generally speaking, if you have an image with a lot of high frequency textural detail you will want a lower radius (less than 1). This will help emphasise the fine detail and not cause it to be obscured. A landscape image that has a lot of fine grass would be a good example; or a wolf photograph such as that included below. Although there is a large soft area in the out of focus background (and some out of focus foreground), the area we do want sharp (the wolf) and the immediate grass under its feet has a lot of fine textural detail and will benefit from a lower radius. If you were to use a higher radius you would potentially cause ‘clumping’ and loose fine detail in the wolfs fur. Masking can then be used to mask off the out of focus area and to avoid introducing noise into these areas. If you hold down the option/alt key while you are adjusting the radius slider you will actually be able to see the effect varying the radius has on the photograph.
In a portrait photograph of someone with beautiful smooth skin for example, you would likely want a Radius setting higher than the default of 1. In this portrait example you would probably not want to sharpen and emphasise every pore of skin, but rather retain the softness of the skin and emphasise sharpening of the models eyes.
As a result of the Radius being extremely subject dependant it really is not possible to produce a usable general pre-set for capture sharpening that would do a better job than Adobe’s default. Technically I could make a series of pre-sets that vary the Radius; but if you have to take the time to select a pre-set on an individual image basis (based on subject) you might as well just take the same amount of time and set it specifically for that particular photograph you are working on. The only time a sharpness pre-set really makes any sense is if you are continually photographing the same subject, with the same lens and camera in the same environment at the same camera settings. A studio photographer who is always shooting newborns with the same lens in the same environment at similar apertures under the same lighting could speed up their workflow with a sharpness pre-set. A nature photographer such as myself who is constantly shooting different subjects with different lenses, at different f-stops in different conditions cannot really take advantage of a sharpness preset if optimal results are the goal.
How to Set the Amount: Before you set the amount slider it is important to understand that sharpening is applied to the luminance channel only – it has no effect on colour. That is why if you hold down the option or alt keys when adjusting the amount slider Lightroom will show you the image in black and white. This makes it easier to visibly see the result. Once zoomed into 100% 1:1 and holding down the option or alt key (mac or windows) you can visibly see the effect increasing or decreasing the amount slider has on the photograph. Setting this optimally is a matter of using your eyes to gauge what ‘looks good’. If you go too far with the slider you will start to see halos around the edges of objects. One approach that can work is to visibly sharpen the photograph until it looks a little bit too sharp and then back off the slider until it looks natural. If you are having trouble gauging the difference try setting up a before after comparison (the ‘C’ key is the shortcut) as you adjust the slider (at 100% 1:1). Trying to create an optimal pre-set for the amount is nigh on impossible as there are far too many variables to consider including all those listed previously: Sharpness of capture, quality of lens, atmospheric conditions, f-stop, diffraction etc.
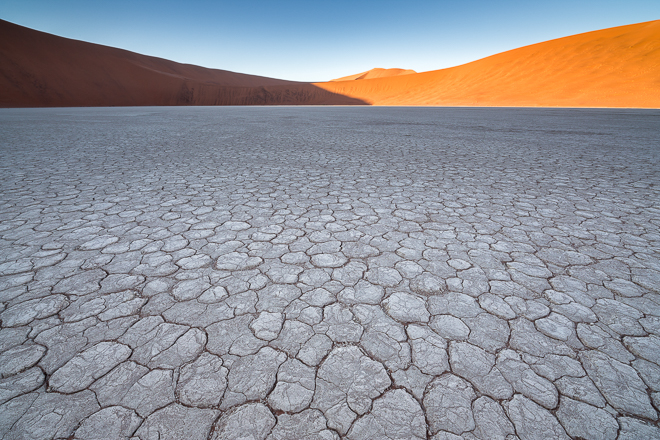
How to Set the Masking: Setting the correct amount of masking is also subject dependant. In the wolf example above we would want a higher masking setting (more masking) than we would in a landscape photograph such as the one below where we have depth of field from near to far and want everything to be pin sharp. In the wolf example above we would want to apply masking until we had prevented the sharpening from hitting the out of focus background and foreground too hard. In the example below, we would only want to mask out the empty flat area of sky and still hit the lovely foreground. As a result, it is impossible to create a single sharpening pre-set that would apply optimal masking across any photograph. I could create a number of different pre-sets that varied the masking, but then you would also need additional pre-sets that varied the Radius for each of these masking pre-sets (and that would be a lot of pre-sets!). Taking the time to choose an optimal pre-set in this example would take more time than actually setting the sliders optimally. If you hold down the option or alt key when adjusting the masking slider you can see which areas of the image are being masked out (black is masked).
Sharpening Detail: As I talked about in my post on ISO specific pre-sets for the Canon EOS 1DXMK3, the sharpening detail is quite a complicated slider so it requires a little more explanation. When adjusted to the left toward 0 the Detail Slider applies halo suppression that limits how strong the halos are in your amount settings. Moving the slider past 25 (the default) causes the slider to change its behaviour and apply a type of deconvolution sharpening similar to the de-blur tool in Photoshop. Deconvolution sharpening attempts to de-blur an image based on what type of blur it detects in an image. The thing to keep in mind is that excessive use of the sharpening detail slider will substantially increase the sharpening of the noise. Generally speaking, if you set the amount and radius correctly there is little need to change the detail slider and the default setting of 25 is appropriate.
Conclusion: By now you should be getting the distinct impression that capture sharpening pre-sets are sub optimal and that you are far better off taking a few seconds to set things optimally for each specific capture. I guarantee this will give you a better result and you will continue to get better at it the more you do it. In order to have image specific capture sharpening pre-sets it would be necessary to create a huge number of pre-sets that varied the combination of Amount, Radius, Masking and Detail. Even then, the variability of subject matter, lens and f-stop selection, along with atmospheric conditions and diffraction make it sub optimal at best. You would spend more time trying to choose the best pre-set than it took to adjust the sliders optimally.
Sharpening Pre-sets for Sale: I have seen people spruiking sharpening pre-sets for sale for Lightroom. The pre-sets are often given creative names like ‘Wild Seascape pre-set’ or ‘Vintage Wedding portrait pre-set’. Whilst these pre-sets ‘might’ get you in the ballpark they will never be optimal. In fact, I would argue they are no more optimal than the sharpening pre-sets Adobe include in Lightroom for free. Where these pre-sets might shine for you is in the stylised look they often provide in their colour adjustments . Then again, if it is just the ‘look’ you are after, you can easily create your own pre-set for any particular style you wish. Happy processing.

One thought on “Adobe Lightroom Capture Sharpening Pre-Sets”