Iceland the Highlands 2015 Workshop Report

In August this year I lead a new workshop into the highlands of Iceland with good friend Daniel Bergmann. Our Highland workshop for 2015 took a different approach to previous workshops in that we made the decision to specialise in just a few areas of Iceland that we regard as some of the most spectacular – in this case we decided to spend the majority of our time in the Highlands and several other key locations. This approach enabled us to spend more time in our chosen areas and gave us better opportunities for good light.

I am a strong advocate for spending as much time as possible in an area for photography and not moving from location to location too quickly. This approach both maximises the chances of really great light, but more importantly, it enables the photographer to slow down and get in tune with their surroundings and begin (hopefully) to see really strong compositions. It is actually exceedingly difficult to ‘hit the ground running’ in a new area and make great images right off the bat. More often than not the good images come after a period of time has elapsed and the photographer has had a chance to really tune into their surroundings.

As always, our daily itinerary was dictated by the weather and light to enable us to maximise any opportunities and to avoid any bad weather. As planning (and a little luck) would have it we were able to run with our originally planned itinerary without any severe bad weather.

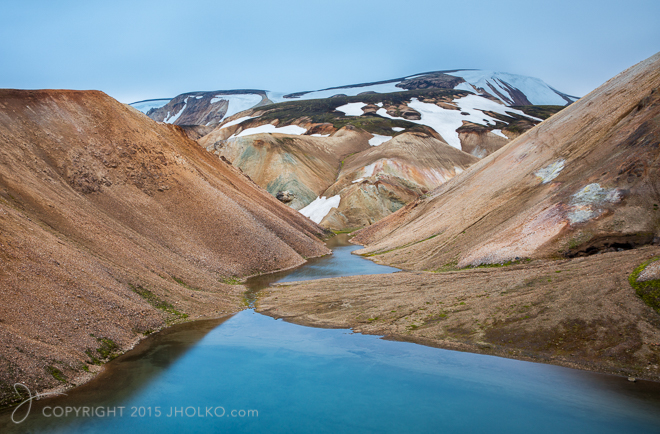
Day One – We drove from the capital city of Reykjavik to Hrauneyjar in the highlands, our base for three nights. By using just a small number of good hotels and guests houses as bases throughout this workshop we were able to really maximise our time in the field. We spent the majority of our time in the Fjallabak Nature Reserve. Our first stop was the spectacular Hnausapollur crater (water filled explosive crater) near Landmannalaugar. We then drove further towards Landmannalaugar with a stop at Frostastadahals (by the lake Frostastadavatn). We also had a windy sunset session at Veidivotn._MG_2174-Edit12014
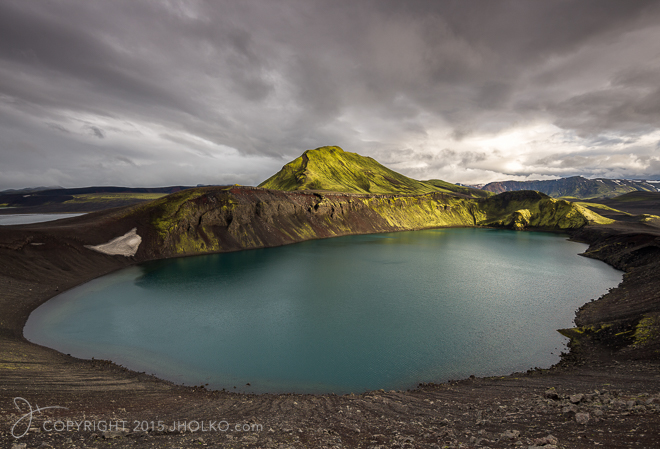
Day Two – We were back in the Fjallabak Nature Reserve and now visited the gigantic volcanic crater Ljotipollur. We also walked up the rim and to the eastern side of it and photographed the Tungna glacial river. We then continued to Landmannalaugar where we hiked the Laugahringur trail up to Mount Brennisteinsalda. A few of us went all the way to the top, while most of us stayed below and photographed the amazing Laugahraun lava field and the many valleys surrounding Mount Blahnukur. This part of the highlands is one of my favourite areas for photography and offers really incredible opportunities.

Iceland-0534-Edit12015Day Three – We photographed Haifoss waterfall and its neighbor Granni (further inside the canyon) at the beginning of the day. We then went to the black sand area of Veidivotn crater lakes where we photographed right through until sunset._H9P3595-Edit-Edit12012
Day Four – We left our hotel in the highlands and travelled across the Sprengisandur route to get to the north of Iceland. We made a short scouting stop at Godafoss waterfall before heading to Lake Myvatn, where we were based at Hotel Reynihlid for three nights. We also photographed Godafoss the following morning at sunrise.Iceland-064012015
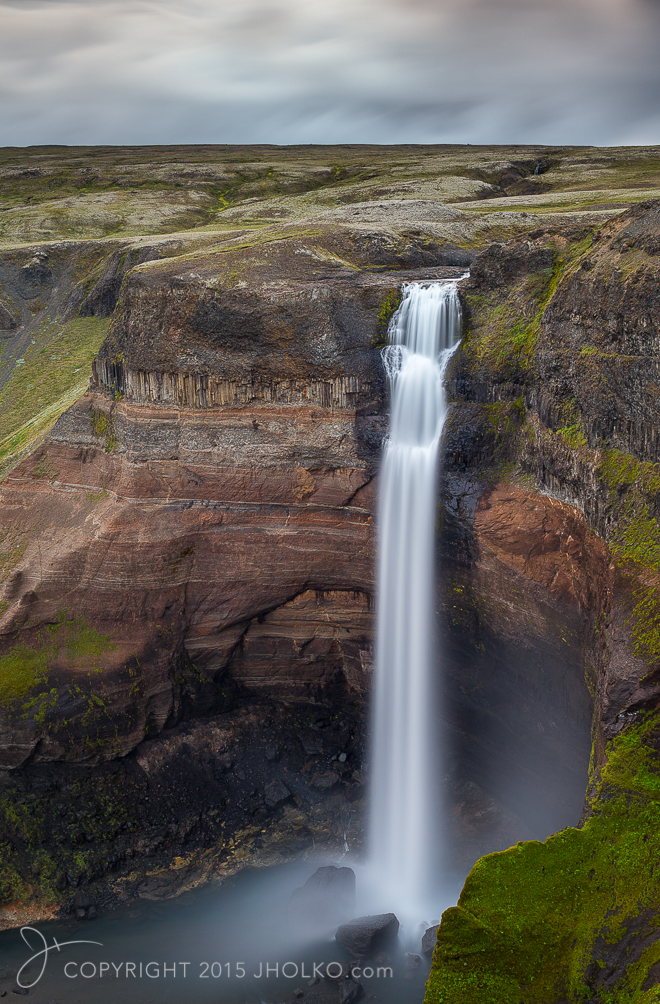
Day Five – We visited the geothermal area at the base of Mt. Namafjall, called Namaskard or simply Hverir (an alternate name for the field). Later that day we visited the mighty Dettifoss waterfall in Jokulsargljufur canyon. First from the western side and then from the eastern side. From the east we also photographed Selfoss waterfall, further up river.
Iceland-0678-Edit22015
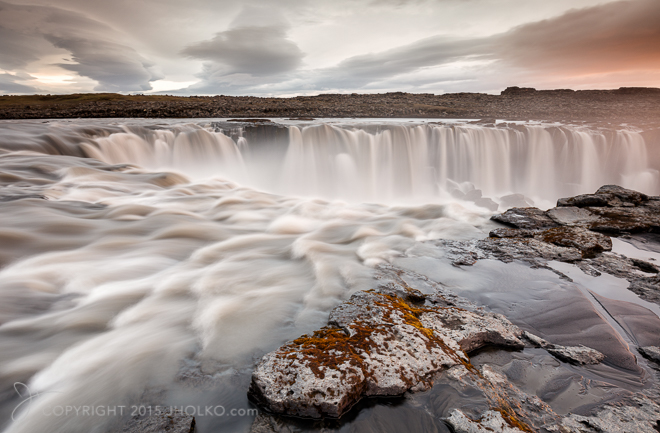
Day Six – Aldeyjarfoss waterfall was on the morning menu and in the evening we hiked to the upper geothermal area at Namafjall to photograph the spectacular geothermal features where there are bubbling fumaroles and mud pits.
Day Seven – A travel day with a stop for a bit of shopping at Akureyri. We also visited Hvitserkur sea stack at the Vatnsnes peninsula in the afternoon during low tide.

Day Eight – Hraunfossar waterfall  and Barnafoss were our morning shoot. In the afternoon we visited the (still) fairly little known Bruarfoss waterfall. Then made a short stop at Geysir area (for the erupting geyser Strokkur) and ended with a fantastic meal at Lindin restaurant at Laugarvatn.Iceland-0758-Edit12015Day Nine – On our last day of photography we went into the Southern Fjallabak (Sydra- Fjallabak) area. We drove past the Eyjafjallajokull glacier and Einhyrningur mountain (the unicorn) before spending a bit of time on the edges of Markarfljotsgljufur canyon. We then drove further into Fjallabak and went as far as to the Innri-Emstrua river. We photographed mountains on the way that can be collectively said being at Emstrur.

Our 2015 Iceland Highlands workshop proved a really super trip that netted us some wonderful photographs from some of Iceland’s most amazing highland locations. Our time in the highlands this year proved successful and as such  I will be leading two workshops to the highlands of Iceland in summer next year. Both workshops will have an emphasis on different regions of the Highlands as well as different coastal areas. These are workshops that will get you off the usual tourist route and into some of the more inaccessible, interesting and least visited areas of Iceland. We all also visit a few of the iconic locations as well as a few tucked away gems we want to keep up our sleeves. If you have never been to Iceland before and want to avoid the tourist traps, or if you are an Iceland regular and want to get into new territory then these are the workshops for you.

The first workshop will run from August 14th until August 23rd 2016 and will focus on the Highlands and Northern area of Iceland.  We will also visit the precipitous basalt cliffs and rock formations of the Snaefellsness Peninusla, amongst many other areas. You can download a detailed itinerary and information PDF form for the first workshop HERE.
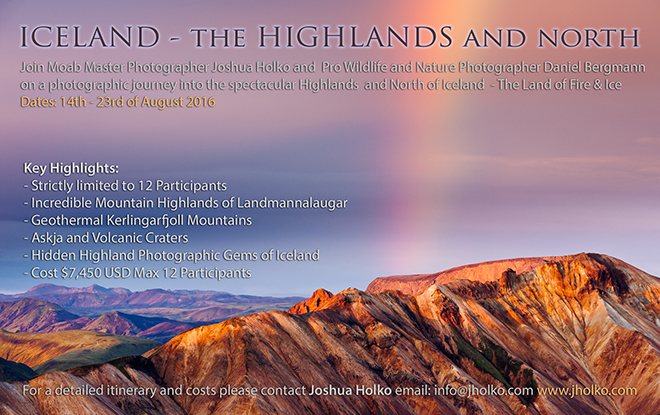
The second workshop will run from the 28th of August until the 6th of September 2016 and will focus on the Southern Highlands and eastern coastal regions of Iceland. Our intention on this workshop is to focus on some of the lesser known highland areas in the southern part of Iceland. We will also visit the precipitous ocean lined mountains at Stokksnes as well as vising the spectacular Laki Volcano and the world famous Jokulsarlon glacial lagoon. You can download a detailed itinerary and information PDF form for the second workshop HERE
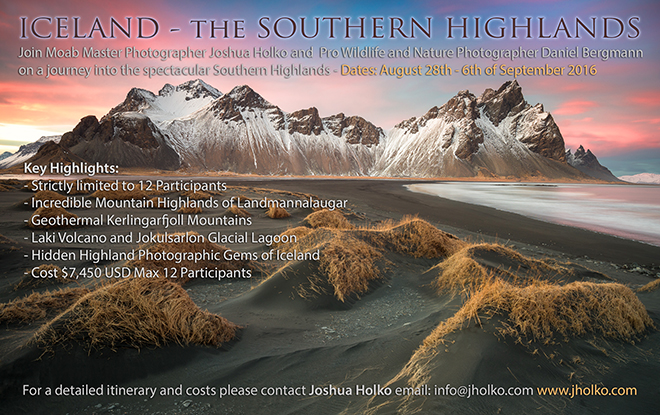
We have chosen August and early September for these workshops as this is an ideal time to visit Iceland for photography. The days are still long with Sunrise around 5 a.m. and sunset just before 10 p.m. The best light for landscape photography is therefore during the evening and early morning. This means that we may have an early dinner and then head out to photograph and sometimes be out before breakfast for a morning shoot. On cloudy days we’ll have a more normal routine. What we’ll do exactly on any given day will be decided around the weather and other conditions and there will be small changes to our original plan to make the most of our time in each area.

Cost: The cost for each workshop is $7,450 USD. There is no single supplement and single rooms will be provided wherever possible.

Duration: 11 days/10 nights for each workshop
Includes: Accommodation for ten nights in single rooms. Food and beverages (excluding alcohol). All transport during the duration of the workshop in a modified 4-wheel drive vehicle. All tuition and guiding services.
Excludes: International flights, travel insurance and alcohol
Group size: 12 per workshop

Due to initial bookings and expressions of interest there are now only a few places remaining. If you would like to register your interest for one of the remaining places or would like additional information please contact me at info@jholko.com.

How to Improve your Wildlife Photography without Spending a Lot of Money

During the first lecture I presented on Arctic Wildlife Photography at the AIPP Event in Perth Western Australia earlier this month I caught a number of people off guard in the audience when I explained my process for going out to photograph a particular species. It is an approach that will cost you much less than a new camera or lens and is guaranteed to help you get better photographs during your next wildlife outing. It is also an approach that requires a little investment in time, but its time well spent that will ensure you capture better images than you otherwise might have.

When I leave for a photographic expedition to photograph wildlife (it doesn’t matter what sort of wildlife) I don’t just pack my bags and head off into the wilderness to photograph a given animal with the latest and greatest gear. I do an extensive amount of research into the animal’s ecology so that I not only know where to find them, but also so that I am fully armed with knowledge of their behaviour. This knowledge is critical to capturing intimate images that would otherwise be impossible to realise. It enables me to read the many subtle signs an animal often displays and even predict their behaviour. Most of us know that a house cat is usually agitated or afraid when it flattens its ears. And we use this knowledge to deal with the cat accordingly. This same knowledge is a critical component to effective and successful wildlife imagery. It is far more important than a faster focusing lens or a camera with one stop more dynamic range. Those technical aspects of equipment are irrelivent if you have not equipped yourself with the right knowledge of your subject.

To cite an actual recent example of this in practice – When I set out on my Arctic Fox project (now coming into its third year) I went out and purchased every book I could on the ecology of Arctic Foxes so that I could learn as much as possible about their behaviour long before I ever pressed the shutter on my camera (I own not less than half a dozen different books on Arctic foxes). I wanted to arm myself with knowledge of the foxes behaviour so that I could recognise subtle signs and cues in their behaviour as I worked with the animals in the field. Wildlife give a great many clues about what they are going to do next through their behaviour and if you know and can recognise these clues you can predict the animals behaviour and greatly increase your ratio of quality keepers.Hornvik-9988-Edit42015The other thing you can do in addition to researching and reading about your subject is to enlist the help of someone studying the animal you want to photograph. A scientist or even a PHD student working with a particular species is likely to posses a lot more knowledge on your subject than you can probably otherwise acquire in a short period of time. Their assistance can be invaluable in the field in locating hard to find wildlife and in understanding wildlife behaviour.

Now I grant you, spending time purchasing books, researching and reading about your photographic subject is not nearly as glamorous as a purchasing a shiny new lens or camera and running straight out into the field, but it does cost a lot less money and provides a far great return on investment in photographic terms. The next time you plan to go out and photograph wildlife it is well worth taking some time out and doing some research and reading on your chosen subject. You will almost certainly learn something about your subject and you will capture better photographs as a result. I will be leaving for the Arctic in a couple of days to lead two photographic expeditions for Polar Bears and I will certainly be brushing up on my reading with a couple of new Polar Bear books on the long flights from Australia. Happy Reading…

AIPP The Event Conference Wrap Up in Perth Western Australia

I returned home from the AIPP (Australian Institute of Professional Photography) Event conference in Perth Western Australia a little over a week and a half ago where I was presenting on both Polar Wildlife Photography and Extreme Latitude landscape photography over the course of two days during the event. This was a really fantastic conference to attend and over the course of the four days I was in Perth I met some really fantastic people and was not only afforded the opportunity to talk about my photography, but also to network with the trade (an opportunity I do not often get because of my travel commitments).theeventWhat was really fascinating for me (and it has taken me a few days to come to this realisation) is that during the course of the two one and half hour seminars I presented there were almost no questions about which cameras I had used to make the photographs. This was an incredibly refreshing revelation and has in many ways re-envigorated my enthusiasm for sharing my photography. Instead, questions ranged from how to expose in these extreme environments to what sort of clothing I wear and how to prepare for this sort of photography as well as what I look for when I press the shutter. In this era of gear fascination that dominates all things photography (particularly in social media and forum circles) this was quite honestly an incredibly refreshing revelation. I feel as photographers (be it professional or amateur) we tend to get far to focused on equipment in the pursuit of better photographs. We constantly chase the next new thing in the belief it will improve our photography when the reality is it likely will do little for our photography other than drain our wallets.

I read a very interesting article a few weeks back on the pursuit of material possessions in our daily lives and how the scales for the majority of people are skewed towards acquiring and owning ‘things’ rather than having ‘experiences’. Whilst I cannot recall the exact website where I came across the article it struck a chord with me and I think there are some really interesting parallels we can draw with photography.

The idea of owning a new piece of camera equipment is very appealing to photographers (myself included). We get drawn into the marketing hype and specification creep of new models and before we know it we are caught in a never ending upgrade cycle that does little to nothing to improve our image making. It is the pursuit of material things in a false belief. Granted, there are occasions when a new piece of equipment does offer a quantifiable increase in quality of image making – but those instances are rare and more often than not the opposite in fact occurs as we struggle with the new equipment. I have written about this phenomena before in a series of Articles on creating photographs with Mystery and Emotion and the problem of our brain focusing on working as a technician, rather than working creatively.

I would advocate that we would be better off diverting our attention and efforts (at least some of them) toward experiences and education. In particular experiences and education that will likely improve our image making. To this end I am going to share a few of the discussion points from my lectures at the Event here on my blog over the course of the coming days – the first of which will be a sure fire way to improve your wildlife photography without spending much money. Stay tuned.

Canon 5DSR and Canon 24mm Lens Options – What is the best Canon 24mm lens?

If you follow the latest camera news you will no doubt be aware that Canon has now started shipping its new 50 mega pixel EOS 5DS and 5DSR cameras. I took delivery a couple of days ago of the new 5DSR (the version without the anti-aliasing filter – Or rather, the version with the cancellation filter) and have been familiarising myself with the new camera. There isn’t much to report in this regard, other than to say if you have previously used a Canon 5D MKIII the new 5DS and 5DSR are going to feel like old friends. There are some interesting software differences I have encountered between the 5DMIII and the 5DSR, but nothing that should surprise most users. Perhaps the most interesting observation I can make in this regard is that you cannot ‘zoom-in’ on the live-view image when the Canon lens mounted on the camera is set to ‘Auto Focus’. You must put the lens into ‘Manual Focus’ in order to zoom in and focus with live-view.

Edit – It seems that by default the camera ships with face detection auto focus mode enabled. You have to disable this in the menu in order to activate the zoom capability in Live View. Thank you to David for the tip.

Canon_5DSR-frontI am not going to spend too long talking about my reasoning for purchasing the new Canon 5DSR, suffice to say I have been wanting a smaller, lighter weight camera than my Canon EOS 1DX’s for hiking and I also wanted something with more pixels for my landscape photography – Both for cropping power, and for print resolution. In fact, it is print resolution that really interests me the most and over the next couple of weeks I am going to do some comparisons between prints made with the Canon EOS1DX and the new 5DSR. I hope to have some findings to report before I leave for the AIPP Event in Perth later this month.

Just as an aside, I am well aware that Sony has several high resolution small light weight cameras on the market (with another coming very shortly – the A7R MKII). Whilst I applaud Sony for their innovations in chip design I personally find the ergonomics of their cameras appalling and the battery life insufficient for my workload. Its one thing to sit and compare online specifications in my experience and another entirely to work with a camera out in a remote location in inclement weather. After a week with an A7R in Iceland last year I found that it was not a camera for me. On top of everything else, I am somewhat old school and still very much appreciate an optical viewfinder.

As many of you are aware I prefer to write about photographs than about equipment, but I am going to break with that trend for a moment and spend a little time discussing some initial testing of this new camera I have been conducting between rain showers here in Melbourne.  The new Canon 5DSR fills a niche in my photography for a high resolution camera that will be used on a tripod at ISO 100 with the mirror locked up with a cable release for the maximum possible image quality. I have absolutely no interest in using this camera handheld, nor in shooting with it at anything other than its native ISO of 100. The Canon EOS 1DX’s will remain my primary cameras for handheld work, wildlife and high ISO photography; so the 5DSR is really a very specialised tool for my serious landscape work where I can use a tripod and take a more contemplative approach. As such I wanted to see how it would perform with the various 24mm lens offerings from Canon. 24mm is the most common focal length I find myself using when shooting wide angle out in the landscape. I rarely shoot wider than 24mm unless the subject or situation really require it. Personally, I find the ‘free drama’ of ultra wide angle lenses to be poorly utilised most of the time and as such I tend to shy away from ultra-wide lenses. There are exceptions however, and as such I did also recently purchase the new Canon 11-24mm F4 L Lens. This ultra wide zoom fills another specialised niche for me of occasionally needing an ultra-wide zoom lens when shooting from zodiacs in the Arctic and Antarctica. In these instances,  its impossible to zoom with ones feet and occasionally there is just no option other than an ultra-wide if you want to capture an iceberg in its entirety.

I actually surprised myself this week when I realised I  currently own four different 24mm lenses from Canon. The Canon 24mm F3.5L MKII TSE, Canon 24-70mm F2.8L MKII, Canon 16-35mm F4L IS and the new Canon 11-24mm F4L Ultra Wide (I also used to own the Canon prime 24mm F1.4L MKII but recently sold that lens as I have found little use for it of late). This got me thinking about which of these lenses might be the best performing optic on the new Canon 5DSR and so armed with a rather wonderful brick wall as my subject I set about a real world test to find out. The results might surprise you in some respects and less so in others.

METHODOLOGY

The testing methodology was simple. The camera was mounted on a very sturdy tripod, (Gitzo GT3530 LSV with an Arca Swiss Z1 Ballhead) perfectly levelled and placed parallel to the wall. The aperture was set to F8 (an aperture I often find myself using with 24mm lenses when shooting landscapes in the field), the mirror locked up and a cable release attached. Each lens was critically focused using live-view zoomed into 16X (the maximum possible). Then I simply shot a single image, re-focused critically each time, swapping lenses as I went along. The focal length does vary slightly as a result of the zoom lenses. But this has no impact on the results.

You can DOWNLOAD THE RAW FILES here to draw your own conclusions.

Footnote: Thank you Canon for finally implementing Mirror Lock up with 2 second self timer in a single button press! However, it would have been nice to have the option to extend the self timer to longer than 2 seconds as it can take some time for long lenses to settle.

DISTORTION

The very first thing to note when comparing the RAW files is the lack of distortion from the 24mm F3.5L MKII TSE lens. In comparison to the zoom lenses there is almost no light fall and almost zero distortion. Being a prime lens with such a large image circle there are really no surprises here and anything less than this performance would have been disappointing. What is surprising is that out of the three zoom lenses the 24-70mm F2.8L MKII shows the most significant light fall off and distortion at F8. I had quite honestly expected the 11-24mm F4L lens to be the worst performing in this regard. The 16-35mm F4L IS equites itself admirably just edging out the 11-24mm F4L lens in terms of distortion. Not surprisingly the Canon 11-24mm F4L Lens shows the most chromatic aberration out of the four lenses. However, chromatic aberration distortion is easily removed with a single click of the mouse these days and therefore is really irrelevant in the overall comparison. Just as an aside, it is extremely impressive that Canon were able to build such a high quality ultra wide rectilinear zoom lens.

It is important to note that once you apply lens distortion corrections in Lightroom to the three zoom lenses (there are no auto corrections for the 24mm F3.5L MKII TSE lens) the differences disappear and the lenses are for all intent and purpose equal in terms of distortion. I would have no hesitation in using any one of these lenses and being concerned about distortion with the 5DS and 5DSR.

RESOLUTION

Caveat: In order to judge resolution in real world applications I simply zoomed to 100% on each image in Adobe Lightroom and compared one lens to another using the side-by-side compare tool. If you start to look closer than 100% you might find more appreciable differences between the files. Since I have no need to look past 100% I stopped there. Each image was compared with Lightroom’s default sharpening of Amount 25, Radius 1, Detail 25. Exposures were normalised in Lightroom to account for the slight variance between captures.

All of the lenses equitted themselves superbly in the centre in terms of resolution. There is absolutely no appreciable difference of any real world significance between the lenses in terms of ultimate resolution in this regard. We would probably have to shoot these lenses wide open to find any significant differences in the centre resolution. We have to look to the outer edges and extreme corners to really see any significant differences between the various lenses at F8.

I had expected to find that the Canon 24mm F3.5L TSE MKII lens would be the highest resolver by a fairly significant margin with its larger imaging circle and that it would therefore offer the best resolution from amongst these lens offerings. This is indeed the case and out of the four lenses tested the 24mm F3.5L MKII TSE is indeed the highest resolving lens at F8. I was surprised to find however, that the 24-70mm F2.8L MKII was much closer than I expected in terms of resolution when compared to the 24mm F3.5L MKII TSE lens and that you have to really look into the very extreme corners to see an appreciable difference. This is really superb performance from the 24-70mm F.28L MKII lens and speaks volumes about how good this mid range zoom lens from Canon truly is. As an aside, the 24-70mm F2.8L MKII is one of the lenses Canon recommends on the new 5DS and 5DSR cameras.

The next surprise was the Canon 16-35mm F4L IS lens. This light weight, relatively inexpensive zoom lens proves a very worthy contender on the 5DSR and a very close match for ultimate resolution when compared to the 24-70mm F2.8L MKII Lens. Depending on which corner you choose to look at, either the 16-35mm F4L IS Lens or the 24-70mm F2.8L MKII lens performs better. In a blind test I could not pick accurately with anything better than 50% chance. This is remarkable performance in such an inexpensive wide angle zoom lens and I would have no hesitation in using this lens in combination with the 5DSR at 24mm. I have not tested the performance of the 16-35mm lens at other focal lengths, but I would expect some drop off at 16 and 35mm in terms of ultimate corner resolution. This will almost certainly be most evident in the extreme corners.

The Canon 11-24mm F4L lens was also a surprise performing significantly better than I had expected. It is really only in the extreme corners where this lens starts to fall off in terms of resolution and even then it holds up extremely well in comparison to the other two zooms. Depending on which corner you look at it, it can be very hard to pick which lens is which. The 11-24mm F4L lens is expensive (its $3000 USD list price) and as such one would hope it would be a solid performer and high resolver. Given this is an ultra-wide rectilinear zoom lens the performance is nothing short of excellent and again I would have no hesitation using this lens on the Canon 5DSR at 24mm in the field. Like the 16-35mm F4L IS lens I would expect some fall off in resolution at its widest setting of 11mm; although I have not had time to test this. I do plan to fully test the 11-24mm F4L lens on the new 5DSR at all focal lengths over the coming days.

In summary, I think its worth also noting that there is also sample variance from lens to lens in terms of each lenses optical element alignment and that this variance has an impact on the lenses resolving power across the plane. This is clearly evident in the RAW files which show some corners being sharper than others.  I would expect to see sample variance from different lenses if this same test were conducted again with different lenses.

CONCLUSION

The first thing I think that is worth noting is that this was a ‘real world’ test that was designed to simply show how each lens resolves detail at F8 on the Canon 5DSR. I chose a flat brick wall for this test so that I could easily see resolution fall off towards the edges of the frame. Whilst I don’t normally spend my time photographing brick walls for a living; brick walls do provide a very good opportunity to easily compare resolution between these four 24mm lenses. I used F8 for this test since this is an aperture I find myself regularly shooting with in the field at this particular focal length. I am usually looking for the optimum aperture for resolution and depth of field (often F8 at 24mm). Different apertures will yield different results and that sort of testing (wide open for example) doesn’t really interest me. You should keep that in mind when making your own determinations and conclusions about resolution with these lenses.

All of these lenses performed very well (and better than expected). Frankly, the differences in real world applications are small enough that I personally will have no hesitation in using any one of the these lenses at 24mm to capture a given photograph. In point of fact, I would quite happily switch between them depending on what I was photographing and my immediate requirement for a zoom or not. All things being equal the Canon 24mm F3.5L MKII TSE would be the best choice of the bunch, closely followed by the 24-70mm F2.8L MKII. However, TSE lenses are slower to use than regular lenses (if you employ movements) and are less flexible than zooms. As such, you should use the right lens for capturing the photograph and not worry about which might be slightly sharper – go for the photograph first and foremost.

Lastly, I want to make note that shooting resolution test charts is really not something that interests me. I am in the business of capturing images in the field and not in comparing and testing equipment (I usually prefer to leave that task to people of a more scientific mind). As such, I conducted this test purely for my own benefit so that I could satisfy myself which was the better 24mm lens choice for the EOS 5DSR for my shooting style. The RAW files I make available so that you can draw your own conclusions for your style of shooting.

The EOS 5DSR will be my primary landscape camera for my Iceland Highlands Workshop this August and I am looking forward to photographing the incredible highland landscapes of Iceland with this new high resolution camera. In terms of lens choice for this Iceland expedition I will take the 24mm F3.5L MKII TSE, 24-70mm F2.8L MKII and 70-200mm F.28l IS MKII.

Objective Editing of your Photography

I wrapped up my 2015 South Island New Zealand workshop a few days ago and am now enjoying a second trip around the island on a back-to-back tour. During the first workshop one of the many photographic discussions we had over dinner was about the process of editing ones photographs and this got me thinking more deeply about being truly objective when self critiquing our own photography.

One of the most important, underdeveloped and most frequently overlooked skills that we photographers need to develop throughout our career is the ability to self-analyse, self-critic and self-edit our own photography. To be clear, the term ‘editing’ does not in any way refer to post production; rather it holistically refers to the ability to choose only the very best images from our shooting session, relegating the remainder to seconds and thirds (which frankly, should probably never see the light of day). The ability to ruthlessly cull and conscientiously edit our own images is in all likelyhood the most misunderstood, and poorly exercised skill practiced by the vast majority of photographers. For just a moment, lets assume you fall into this category. You may, or may not be a discerning expert in editing your images (it would make you a rare commodity), but for the sake of the argument lets assume for a moment you are not. Assuming this is a bridge you are willing and able to cross (vanity and ego need to be put aside at this point if we are to have any hope of actually improving our image editing skills) how does one go about improving this critical skill?

Before I address this question I want to point the finger of blame at Social Media for what what is in all likelihood the primary modern catalyst for many photographers developing such poor editing skills. I touched on this briefly in Part Four of my series of articles on Creating Emotive photographs where I discussed the rush to share imagery through social media platforms at the expense of quality photography; but I want to expand on this further in this article. I also want to discuss why the ability conscientiously edit photographs is such a poorly practiced skill and what you can do to improve your ability to objectively edit your own photography.

It is important to focus particularly on educating oneself on what makes a good photograph before you can have any hope of objectively editing your own images. See Part Three of my series of Articles on Creating Evocative Photographs where I discuss the importance of reading books about photography, visiting galleries and studying art. Learning what a good photograph actually looks like might seem like an easy task at first blush; but I assure you it takes a good deal of experience and maturity as a photographer to truly recognise the image that excels. Learning to separate genius from cliché and emotive and interesting from banal and lifeless is actually a lot tougher than you might think. It only takes a saturated sunset image to wow most people but as photographers who strive for more we know there really isn’t anything more cliché or boring in terms of subject. We are looking for more in our own imagery and we need to know what that ‘more’ is. The problem is we can’t know what that ‘more’ is if we haven’t learned what makes a truly great photograph. We can’t know what makes a truly great photograph unless we have spent the time to learn from those who went before us. We have to actually put our cameras (and cell phones!) down and spend some real quality time educating ourselves.

I stand by my comments that most photographers would be far better off investing the money allocated for their next camera or lens purchase in gallery and museum entrance fees, books and prints so as to better educate themselves on what makes a good photograph. The camera is just a tool to capture a photograph. The quality of the photograph that emerges from the camera is going to depend on the photographer wielding the tool. It is therefore the responsibility of the photographer to educate themselves on what makes a good photograph. Think about that for a second…Education will make you a better photographer. Not the new camera the manufacturers brainwashed you that you had to have because yours was suddenly superseded. If you take this advice to heart I probably just saved you several thousand dollars and improved your photography in a single swipe.

Ask yourself how many contemporary photographers can you actually name who work in your chosen field of interest and whose work you know well? If we are to have any hope of producing high quality photography in our chosen genre we need to know who the leading photographers are in that specific field so we at the very least know and understand where the bar is set for image making. You should be able to rattle off a list of modern contemporary photographers whose work you know and admire. That will give you an excellent starting point when editing your own images. Its not a direct comparison you are going to be making; rather it is an understanding of wether your photograph is really any good or whether is it just the best you were able to do of that particular subject on a given day. There is no shame in putting the images from a recent shoot in the reject bin and instead planning to revisit and retry the location having learned from your past experience. I do this all the time and have lost count of the number of places I have visited and photographed and subsequently decided I need to revisit for take two (or three or four or more!).

I want to share some statistics from my recent scouting trip to the Arctic that might help put this editing process into perspective. I covered over 500 kilometres on snow mobile in the middle of the arctic winter this March in a remote part of Svalbard over a period of a week. I endured temperatures below -30 Celsius with wind chill for more than ten hours a day. I got frost nip in my fingers and nose on several occasions from lying in the snow and ice for hours at a time waiting for wildlife and light. I lived on Drytek freeze dried meals out in the field because it was the only thing that is safe to travel with in Polar Bear country. In short, I suffered to shoot the nearly 3000 frames I took over the period of a week out in the field. NONE of this matters however, and absolutely none of it has any bearing or relevance on wether my photographs are actually any good. Its all superfluous information that might make a good story and ‘making of’, but ultimately contributes nothing to the photograph itself. And here is the rub. You have to have a true quality hit photograph before you can have a good making of story. Here is the really critical element to these statistics that might shock some newcomers to photography. I probably made between three and six photographs that I would consider to be really stand out images out of the 3000 I shot that I will want to put my name to and share. And that is a really good ratio. I probably have several hundred variations on these three or six images as a result of using high speed capture and I probably have several hundred more that are close, but just not quite there in terms of being really stand out images. The rest are frankly rejects that should never see the light of day. And honestly, neither should the previous few hundred that got close or the slight variations that almost make it over the line but ultimately are just not quite as good. This ratio doesn’t make me a bad photographer – it makes me a conscientious editor of my own work. I realise that the back story is superfluous to the photograph outside of my own personal want to record and share the adventure. I have to be objective when I analyse and edit my photographs and put the journey of their capture to one side and focus on wether I actually made a good photograph. This is a hard skill to master when you are the one who has worked and suffered to create; but its an absolutely necessary one to develop and practice if you want to elevate your photography to the next level.Hornvik-9491-Edit-Print-MoabSMR-RelCol32015

I believe there is a strong lesson to be learned from this example and I encourage you to think objectively and to exercise a ruthless approach to editing your own photography.  Try and be objective and truly neutral in the assessment of your photograph when editing your images. Is it really a good photograph? Or, is it merely the best you were able to make on the day at that particular location? There is a marked and critical difference that many photographers would do well to understand.

I appreciate that not everyone falls into the bucket of wanting to produce and share the best that they can do and that some people just want to share their photographic adventure as they journey through life – and thats just fine. But for those of you out there who really do want to take it to the next level I think its worth taking a good look at the skill of editing and asking some tough questions about our images and our ability to objectively edit them. I’ll wager the toughest question you are going to have to ask yourself is do you need to take this advice? Take my advice on this – You do. And So Do I. Once we step down from our pedestal and the ethos of “this does not apply to me because I already know what I am doing” we free ourselves from the shackles of our current editing prison and open the doors to new potential and growth. That next book you pick up might just give you new insight and ideas that you had never considered and that will improve your photography and your editing.

I encourage you to spend quality time learning who the leaders are in your chosen field and genre. Study their photography and learn from their compositions and approach to their image making. I have a number of contemporary photographers I follow whose work I consider exemplary in their field (Ill share their names in a separate post at a later date). I encourage you to dive headlong into as many photography books as you can, free from the distractions of the internet. Take your next lunch break at the local gallery or head to the library and pick up a book on art. I promise you your photography will improve in leaps and bounds and you will become a far more conscientious editor of your own photography.