New Zealand 2015 South Island Workshop Report

In May 2015 I co-led my annual Autumn workshop to the South Island of New Zealand with co-nature photographer and friend Phillip Bartlett. Our 2015 masterclass workshop was a brand new itinerary that had been designed to provide us the best possible opportunities for photography utilising a number of different locations as bases in the South Island. We forgo trying to ‘do everything’ in the South Island in a single trip and instead focused our efforts on certain key areas to really maximise our chances to get everyone the best photographs.

The South Island of New Zealand is home to some of the most spectacular scenery and landscapes in the world. It is no coincidence that Peter Jackson chose this part of the globe to film the Hobbit and the Lord of the Rings movies. Perhaps nowhere else in the world can one see and photograph precipitous mountains plunging into temperate rainforest and wild ocean beaches in so short a space. New Zealand is home to an unbelievably diverse range of subject matter, all packed together in a very small land area. Glaciers, majestic mountain ranges, moss-covered rain-forests, hidden valleys, and ocean-beaten coastlines are among the incredible array of natural wonders found there. It is an island of ever-changing weather and spectacular light conditions. It is a country made for photography.

This masterclass landscape workshop was about maximising our time photographing in some of the most spectacular parts of New Zealand. Our small group size of just six photographers provided us a really small intimate group that enabled us to put in some long hours in the field in some of the most spectacular parts of the South Island. The workshop ran for 12 days (11 nights) and we stayed in good hotels which were functional and clean. We utilised several primary locations as bases from which we travelled to each shooting location. We had a good mix of weather and light during the workshop and although we encountered some rain in the Fox Glacier area we were still able to maximise our opportunities with some extraordinary light and conditions.

Day One: Christchurch to Twizel: Our workshop began as we departed Christchurch headed for Twizel, which was our base of operations for the next three days. The Twizel / MacKenzie area is surrounded by spectacular mountains and lakes, and is adjacent to the Aoraki/Mt Cook National Park, home to New Zealand’s highest peaks. We arrived at our lodging in the mid-afternoon and settled in before going out for our evening shoot of the Southern Alps and Aoraki/Mt Cook. We were fortunate get some lovely last light on Mount Cook from our vantage point.

Day Two: Twizel: We left our lodging pre-dawn and travelled up into the mountains to be in position for  first light on the mountains. We worked the landscape in the Tasman Valley as the sun rose before returning for breakfast. Following breakfast we were out in the field again exploring the rugged terrain and Autumn colour. We returned for lunch and a short break, departing for the mountains again for the late afternoon light and sunset.NewZealand-2164-Edit32015Day Three: Twizel: Another early start as we set up to photograph first light and sunrise on the mountains. After breakfast we travelled off-road in our 4-wheel drives deep into the heart of the MacKenzie wilderness to photograph where few others venture. This part of New Zealand’s South Island offered us incredibly unique photographic opportunities in a very remote wilderness setting. We returned for lunch and a break before we headed out again for our last light evening shoot in the mountains.

Day Four: Twizel – North Otago: After being surrounded by mountains for the past three days, we departed on day four for the open spaces of the east coast. We arrived in the afternoon and, after taking a short rest, we split into two groups. Group one loaded up their long lenses for photography of the endangered Hoiho (Yellow-eyed penguin), which come ashore in the late afternoon after a day fishing at sea. These fascinating and very rare birds are so-called by Maori because of their distinctive high-pitched call. Our second group photographed sunset at the iconic Moeraki Boulders.NewZealand-2355-Edit12015Day Five: North Otago – Te Anau: Sunrise on day five found us on the beach shooting the other-worldly and alien Moeraki Boulders, unusual spherical rock formations embedded in the sand that make for wonderful photography. This peculiar natural phenomenon is contrasted beautifully by the wide-open expanse of the Pacific Ocean. We then left the coast and made our way west to the lakeside town of Te Anau, located on the fringe of the Fiordland National Park. We arrived late in the afternoon and photographed by the lake shore late into the evening.NewZealand-1757-Edit-212015

Day Six: Te Anau: We departed well before sunrise and headed deep into fjord land to photograph the spectacular mountains and lakes that make this area so famous. Getting well off the tourist trail we travelled off road to some of New Zealand’s most spectacular and least known areas.NewZealand-2816-Edit52015Day Seven: Te Anau: We spent a full day in the Milford Sound area of the Fiordland National Park. We  photographed dramatic mountains carved out by glaciers, lush rainforest draped in mosses and lichens, and crystal-clear rivers. We then returned to Te Anau, arriving in the late evening. We also took a cruise up the Sound to photograph the cascading waterfalls and precipitous mountains that plunge hundreds of metres into the ocean.

NewZealand-2928-Edit62015Day Eight: Te Anau – Wanaka: We began with a  sunrise shoot on the shores on Lake Te Anau. After breakfast we travelled north through Central Otago as we made for another lake town: Wanaka. We arrived in the early afternoon and left soon afterwards for our shoot location, overlooking Lake Wanaka and the mountains.

NewZealand-1988

Day Nine: Wanaka – Fox Glacier: We arrived at the heli-pad pre-dawn and were transferred up into the mountains to capture the sunrise over Lake Wanaka from a unique vantage point. After breakfast we left the lakes district behind us as we travelled over to the West Coast and our base for the next three nights: Fox Glacier. Along the way we stopped to photograph forest, waterfall and coastal scenery. We arrived at the village of Fox Glacier in the early evening and were straight up in the helicopter for doors off aerial photography over the spectacular Southern Alps.NewZealand-3313

Day Ten: Fox Glacier: Day ten greeted us with rain showers but we soldiered on and were able to capture some interesting reflections of the Southern Alps in the dark tannin stained waters of Lake Maethson. We also had a chance to catch up on some image editing and processing after breakfast as well as looking at the uses of Tilt Shift lenses for landscape photography. After lunch we explored a nearby rainforest, the perfect place for contemplative macro photography. In the evening we travelled down to Gillespies Beach to photograph the dramatic surf and drift wood formations in some fairly typical west coast wild weather.

Day Eleven: Fox Glacier – Greymouth: Day eleven again greeted us with sporadic rain showers, so we left Fox Glacier behind and headed north to the small sea-side town of Greymouth. We photographed the spectacular pancake rock formations and blowholes at Punakaiki in dramatic seas late into the afternoon and during the best light of day at sunset.NewZealand-3851-Edit12015Day Twelve: Greymouth – Christchurch: We departed Greymouth well before dawn and made for a quiet out of the way, and little known location where we could photograph some wonderful trees in a serene and peaceful lake. We had torrential rain on our last day of photography that really worked to our advantage – creating a lovely soft ethereal contrast in the trees. We concluded our workshop back in Christchurch with flights out in the late afternoon.

NewZealand-2150-Edit22015

Our 2015 Masterclass workshop provided us with some fantastic opportunities to create really unique images and it was an absolute pleasure to share it with all the participants. The South Island of New Zealand is a fabulous country for landscape photography and should be high on any landscape photographers wish list of places to visit and photograph. Our 2016 New Zealand South Island Masterclass Workshop is already sold out, but you can still register to go onto the wait list or to be amongst the first to be notified when dates for 2017 are finalised.

Canon 5DSR and Canon 24mm Lens Options – What is the best Canon 24mm lens?

If you follow the latest camera news you will no doubt be aware that Canon has now started shipping its new 50 mega pixel EOS 5DS and 5DSR cameras. I took delivery a couple of days ago of the new 5DSR (the version without the anti-aliasing filter – Or rather, the version with the cancellation filter) and have been familiarising myself with the new camera. There isn’t much to report in this regard, other than to say if you have previously used a Canon 5D MKIII the new 5DS and 5DSR are going to feel like old friends. There are some interesting software differences I have encountered between the 5DMIII and the 5DSR, but nothing that should surprise most users. Perhaps the most interesting observation I can make in this regard is that you cannot ‘zoom-in’ on the live-view image when the Canon lens mounted on the camera is set to ‘Auto Focus’. You must put the lens into ‘Manual Focus’ in order to zoom in and focus with live-view.

Edit – It seems that by default the camera ships with face detection auto focus mode enabled. You have to disable this in the menu in order to activate the zoom capability in Live View. Thank you to David for the tip.

Canon_5DSR-frontI am not going to spend too long talking about my reasoning for purchasing the new Canon 5DSR, suffice to say I have been wanting a smaller, lighter weight camera than my Canon EOS 1DX’s for hiking and I also wanted something with more pixels for my landscape photography – Both for cropping power, and for print resolution. In fact, it is print resolution that really interests me the most and over the next couple of weeks I am going to do some comparisons between prints made with the Canon EOS1DX and the new 5DSR. I hope to have some findings to report before I leave for the AIPP Event in Perth later this month.

Just as an aside, I am well aware that Sony has several high resolution small light weight cameras on the market (with another coming very shortly – the A7R MKII). Whilst I applaud Sony for their innovations in chip design I personally find the ergonomics of their cameras appalling and the battery life insufficient for my workload. Its one thing to sit and compare online specifications in my experience and another entirely to work with a camera out in a remote location in inclement weather. After a week with an A7R in Iceland last year I found that it was not a camera for me. On top of everything else, I am somewhat old school and still very much appreciate an optical viewfinder.

As many of you are aware I prefer to write about photographs than about equipment, but I am going to break with that trend for a moment and spend a little time discussing some initial testing of this new camera I have been conducting between rain showers here in Melbourne.  The new Canon 5DSR fills a niche in my photography for a high resolution camera that will be used on a tripod at ISO 100 with the mirror locked up with a cable release for the maximum possible image quality. I have absolutely no interest in using this camera handheld, nor in shooting with it at anything other than its native ISO of 100. The Canon EOS 1DX’s will remain my primary cameras for handheld work, wildlife and high ISO photography; so the 5DSR is really a very specialised tool for my serious landscape work where I can use a tripod and take a more contemplative approach. As such I wanted to see how it would perform with the various 24mm lens offerings from Canon. 24mm is the most common focal length I find myself using when shooting wide angle out in the landscape. I rarely shoot wider than 24mm unless the subject or situation really require it. Personally, I find the ‘free drama’ of ultra wide angle lenses to be poorly utilised most of the time and as such I tend to shy away from ultra-wide lenses. There are exceptions however, and as such I did also recently purchase the new Canon 11-24mm F4 L Lens. This ultra wide zoom fills another specialised niche for me of occasionally needing an ultra-wide zoom lens when shooting from zodiacs in the Arctic and Antarctica. In these instances,  its impossible to zoom with ones feet and occasionally there is just no option other than an ultra-wide if you want to capture an iceberg in its entirety.

I actually surprised myself this week when I realised I  currently own four different 24mm lenses from Canon. The Canon 24mm F3.5L MKII TSE, Canon 24-70mm F2.8L MKII, Canon 16-35mm F4L IS and the new Canon 11-24mm F4L Ultra Wide (I also used to own the Canon prime 24mm F1.4L MKII but recently sold that lens as I have found little use for it of late). This got me thinking about which of these lenses might be the best performing optic on the new Canon 5DSR and so armed with a rather wonderful brick wall as my subject I set about a real world test to find out. The results might surprise you in some respects and less so in others.

METHODOLOGY

The testing methodology was simple. The camera was mounted on a very sturdy tripod, (Gitzo GT3530 LSV with an Arca Swiss Z1 Ballhead) perfectly levelled and placed parallel to the wall. The aperture was set to F8 (an aperture I often find myself using with 24mm lenses when shooting landscapes in the field), the mirror locked up and a cable release attached. Each lens was critically focused using live-view zoomed into 16X (the maximum possible). Then I simply shot a single image, re-focused critically each time, swapping lenses as I went along. The focal length does vary slightly as a result of the zoom lenses. But this has no impact on the results.

You can DOWNLOAD THE RAW FILES here to draw your own conclusions.

Footnote: Thank you Canon for finally implementing Mirror Lock up with 2 second self timer in a single button press! However, it would have been nice to have the option to extend the self timer to longer than 2 seconds as it can take some time for long lenses to settle.

DISTORTION

The very first thing to note when comparing the RAW files is the lack of distortion from the 24mm F3.5L MKII TSE lens. In comparison to the zoom lenses there is almost no light fall and almost zero distortion. Being a prime lens with such a large image circle there are really no surprises here and anything less than this performance would have been disappointing. What is surprising is that out of the three zoom lenses the 24-70mm F2.8L MKII shows the most significant light fall off and distortion at F8. I had quite honestly expected the 11-24mm F4L lens to be the worst performing in this regard. The 16-35mm F4L IS equites itself admirably just edging out the 11-24mm F4L lens in terms of distortion. Not surprisingly the Canon 11-24mm F4L Lens shows the most chromatic aberration out of the four lenses. However, chromatic aberration distortion is easily removed with a single click of the mouse these days and therefore is really irrelevant in the overall comparison. Just as an aside, it is extremely impressive that Canon were able to build such a high quality ultra wide rectilinear zoom lens.

It is important to note that once you apply lens distortion corrections in Lightroom to the three zoom lenses (there are no auto corrections for the 24mm F3.5L MKII TSE lens) the differences disappear and the lenses are for all intent and purpose equal in terms of distortion. I would have no hesitation in using any one of these lenses and being concerned about distortion with the 5DS and 5DSR.

RESOLUTION

Caveat: In order to judge resolution in real world applications I simply zoomed to 100% on each image in Adobe Lightroom and compared one lens to another using the side-by-side compare tool. If you start to look closer than 100% you might find more appreciable differences between the files. Since I have no need to look past 100% I stopped there. Each image was compared with Lightroom’s default sharpening of Amount 25, Radius 1, Detail 25. Exposures were normalised in Lightroom to account for the slight variance between captures.

All of the lenses equitted themselves superbly in the centre in terms of resolution. There is absolutely no appreciable difference of any real world significance between the lenses in terms of ultimate resolution in this regard. We would probably have to shoot these lenses wide open to find any significant differences in the centre resolution. We have to look to the outer edges and extreme corners to really see any significant differences between the various lenses at F8.

I had expected to find that the Canon 24mm F3.5L TSE MKII lens would be the highest resolver by a fairly significant margin with its larger imaging circle and that it would therefore offer the best resolution from amongst these lens offerings. This is indeed the case and out of the four lenses tested the 24mm F3.5L MKII TSE is indeed the highest resolving lens at F8. I was surprised to find however, that the 24-70mm F2.8L MKII was much closer than I expected in terms of resolution when compared to the 24mm F3.5L MKII TSE lens and that you have to really look into the very extreme corners to see an appreciable difference. This is really superb performance from the 24-70mm F.28L MKII lens and speaks volumes about how good this mid range zoom lens from Canon truly is. As an aside, the 24-70mm F2.8L MKII is one of the lenses Canon recommends on the new 5DS and 5DSR cameras.

The next surprise was the Canon 16-35mm F4L IS lens. This light weight, relatively inexpensive zoom lens proves a very worthy contender on the 5DSR and a very close match for ultimate resolution when compared to the 24-70mm F2.8L MKII Lens. Depending on which corner you choose to look at, either the 16-35mm F4L IS Lens or the 24-70mm F2.8L MKII lens performs better. In a blind test I could not pick accurately with anything better than 50% chance. This is remarkable performance in such an inexpensive wide angle zoom lens and I would have no hesitation in using this lens in combination with the 5DSR at 24mm. I have not tested the performance of the 16-35mm lens at other focal lengths, but I would expect some drop off at 16 and 35mm in terms of ultimate corner resolution. This will almost certainly be most evident in the extreme corners.

The Canon 11-24mm F4L lens was also a surprise performing significantly better than I had expected. It is really only in the extreme corners where this lens starts to fall off in terms of resolution and even then it holds up extremely well in comparison to the other two zooms. Depending on which corner you look at it, it can be very hard to pick which lens is which. The 11-24mm F4L lens is expensive (its $3000 USD list price) and as such one would hope it would be a solid performer and high resolver. Given this is an ultra-wide rectilinear zoom lens the performance is nothing short of excellent and again I would have no hesitation using this lens on the Canon 5DSR at 24mm in the field. Like the 16-35mm F4L IS lens I would expect some fall off in resolution at its widest setting of 11mm; although I have not had time to test this. I do plan to fully test the 11-24mm F4L lens on the new 5DSR at all focal lengths over the coming days.

In summary, I think its worth also noting that there is also sample variance from lens to lens in terms of each lenses optical element alignment and that this variance has an impact on the lenses resolving power across the plane. This is clearly evident in the RAW files which show some corners being sharper than others.  I would expect to see sample variance from different lenses if this same test were conducted again with different lenses.

CONCLUSION

The first thing I think that is worth noting is that this was a ‘real world’ test that was designed to simply show how each lens resolves detail at F8 on the Canon 5DSR. I chose a flat brick wall for this test so that I could easily see resolution fall off towards the edges of the frame. Whilst I don’t normally spend my time photographing brick walls for a living; brick walls do provide a very good opportunity to easily compare resolution between these four 24mm lenses. I used F8 for this test since this is an aperture I find myself regularly shooting with in the field at this particular focal length. I am usually looking for the optimum aperture for resolution and depth of field (often F8 at 24mm). Different apertures will yield different results and that sort of testing (wide open for example) doesn’t really interest me. You should keep that in mind when making your own determinations and conclusions about resolution with these lenses.

All of these lenses performed very well (and better than expected). Frankly, the differences in real world applications are small enough that I personally will have no hesitation in using any one of the these lenses at 24mm to capture a given photograph. In point of fact, I would quite happily switch between them depending on what I was photographing and my immediate requirement for a zoom or not. All things being equal the Canon 24mm F3.5L MKII TSE would be the best choice of the bunch, closely followed by the 24-70mm F2.8L MKII. However, TSE lenses are slower to use than regular lenses (if you employ movements) and are less flexible than zooms. As such, you should use the right lens for capturing the photograph and not worry about which might be slightly sharper – go for the photograph first and foremost.

Lastly, I want to make note that shooting resolution test charts is really not something that interests me. I am in the business of capturing images in the field and not in comparing and testing equipment (I usually prefer to leave that task to people of a more scientific mind). As such, I conducted this test purely for my own benefit so that I could satisfy myself which was the better 24mm lens choice for the EOS 5DSR for my shooting style. The RAW files I make available so that you can draw your own conclusions for your style of shooting.

The EOS 5DSR will be my primary landscape camera for my Iceland Highlands Workshop this August and I am looking forward to photographing the incredible highland landscapes of Iceland with this new high resolution camera. In terms of lens choice for this Iceland expedition I will take the 24mm F3.5L MKII TSE, 24-70mm F2.8L MKII and 70-200mm F.28l IS MKII.

AIPP Guest Speaker at The EVENT in Perth Western Australia

Later this month I will be attending the AIPP Event in Perth Western Australia. This will be the first time I have attended The Event (as I have always been travelling overseas when it has been on in the past) and I am looking forward to the wide selection of speakers that will be giving up their time this year. Personally, I will be presenting two lectures on both Polar Wildlife Photography and Polar Landscape Photography during The Event as well as attending several of the social events scheduled over the course of the Event. Hope to see you there.TheEventPerth

Polar Bears on the Edge – Press Release

Recently I wrote about the release of a very important new book on conservation of the Polar Bear. The following press release goes along with the release of this new book.Polar Bear Blues

PRESS RELEASE: New book punctures myth that polar bear conservation is success story

The climate is changing, sea-ice is melting, polar bears are suffering. And yet, the establishment accepts that about 1.000 polar bears are hunted every year. On average, one polar bear is shot every 9 hours, or almost 3 every day. Polar bears are systematically being hunted out.

A new book documents how lack of political courage and the corruption of science and management by commercial interests combine to threaten polar bears as much as global warming. „Polar Bears on the Edge“ is a relentless account of polar bear management failure and a daring attempt to finally initiate true protection of the species before it is too late.

Over-hunting will eradicate polar bears before climate change can.

Polar Bears have become one of the strongest symbols of our climate change challenge, and the effects of climate change have been elevated to the sole major threat to polar bear survival. The challenges polar bears face through deterioration of habitat are used by the community of polar bear workers as an opportunity to do nothing about over-hunting.

Commercialized polar bears corrupt Arctic politics, science and management.

Why does this over-hunting not make headlines? Why is this scenario allowed to continue? Danish veteran Arctic guide and traveler Morten Joergensen suggests several reasons why. He further documents manipulations with polar bear population figures, so that “reality” is made to mirror the opportunistic policies. The lack of arms-length between decision-makers, scientists, managers and consumers is demonstrated. The prevalence of letting money and rifles talk means that polar bears are facing extirpation.

How bad is it?

It is quite simple: The numbers do not add up. There are probably no more than 20.000 polar bears left today, the population down by 20-40% in 40 years. Science reckons they can multiply by less than 4% per year, but we allow 5% per year to be shot. A confluence of interests leads to this over-hunting being condoned by particularly Canada and Greenland, but also the USA and Norway. Neither is it challenged by elite scientists, polar bear managers, or our largest conservation NGOs such as WWF.

Change of policy  –  or extinction before mid century

In clear language, the author describes how the current hunting regime in itself will lead to polar bear extinction in the wild in only decades. But the book also argues that there is a chance to keep polar bears around if a complete revision of management policies happens very soon. Maximum harvest management must be replaced by a moratorium on polar bear hunting, the affected communities must be compensated, all international trade in polar bear parts must be banned, and new refuges must be set aside for the bears to survive in. That way, we might still have polar bears after 2050.

Morten Joergensen:

POLAR BEARS ON THE EDGE. Heading for Extinction while Management Fails

Softcover, 218 pages including photographs. US$ 19,95, € 18,50, DKK 140,-

ISBN 9-783937-903231. Published by: Spitsbergen-Svalbard.com. Also available as eBook.

Link to crowd-funding campaign for further distribution and with further information: bit.ly/1ELpk3d

For more information, interview requests or reviewer’s copy, contact Morten Joergensen: ursmar2015@gmail.com

Link to forum for further discussion, group-forming and action: https://www.facebook.com/ProtectThePolarBear

Book Review: Simply Peter Dombrovskis

My third book review for 2015 is Simply Peter Dombrovskis. If you are a landscape or Nature photographer and you are not familiar with the work of Peter Dombrovskis you should take some time out of your day at your first opportunity and research his work. Peter is undoubtedly Tasmania’s most well known and most celebrated landscape photographer and is regarded by many (myself included) as an icon of Australian photography. He came to fame and prominence in 1982-1983 when one of his photographs ‘Morning Mist, Rock Island Bend‘ (undoubtedly his most recognisable and celebrated photograph) was used as the lead image in the campaign that successfully prevented the damning of the Franklin River.RockIslandBend
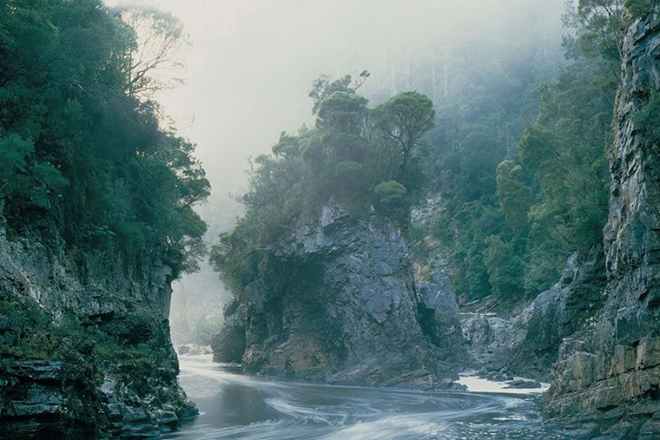
Morning Mist, Rock Island Bend – Peter Dombrovskis

Peter Dombrovskis was born in Wiesbaden, Germany in 1945 of Latvian parents. He emigrated to Australia in 1950 with his mother Adele and started taking photographs in the 1960’s. He was strongly influenced by Lithuanian-Australian pioneer, conservationist and photographer Olegas Truchanas, who became a source of inspiration. He was equally influenced by landscape photographers of mid-century America such as Ansel Adams, Edward and Brett Weston and Eliot Porter and glimpses of these photographers styles can be seen in Peter’s own imagery. Sadly Peter passed away in 1996 while photographing in the Western Arthur Range in southwest Tasmania and this new book is in many ways a retrospective of his finest images. From the inside dust jacket:

This rare book. an exhibition of photographs by Peter Dombrovskis. The presence of sixty of his unique images, beautifully reproduced in full color on premium grade Real Art paper manufacturer from sustainable plantation forests, totally chlorine free.simplyPeter photographed in large format film and the quality of his images is superbly reproduced throughout this new book. The eye takes great pleasure in the reproduction of even the finest details in each photograph. Simply Peter Dombrovskis is much more than just a collection of Peter’s best work however; it is also a wonderful visual insight into the Tasmanian landscape and wilderness. If you have been fortunate to travel and photograph in Tasmania you will know exactly what I mean. If you have not yet photographed in Tasmania then do yourself a favour and bump this spectacular location up your to do list (I will be offering a Tasmania workshop in the near future).

If I had to gripe about any aspect of Simply Peter Dombrovskis it would be the shelf price. At $190 Australian dollars this is not an inexpensive book to purchase. However, the quality of the reproductions is first rate and this is in many ways the definitive collection of images from the significant body of work Peter amassed during his lifetime. The book has been produced without compromising quality and is superbly presented. I suspect the imagery will be enjoyed long after the price is forgotten.

Presentation: Simply Peter Dombrovskis is hardbound in black linen with a smart, clean dust jacket that is simple and elegant. The paper is a medium to heavy weight semi-gloss lustre that oozes quality. Although I personally prefer art papers to lustre papers the choice of paper in Simply Peter Dombrovskis is well chosen and appropriate for the imagery. Most of the included photographs are printed with a white paper border to help frame and contain the image and keep the eye from running off the page. There are a few full bleed images included and I felt these detracted from the rest of the presentation. Each photograph is elegantly titled at the bottom of the page along with the location of where the photograph was taken. There is an elegance to the presentation of the images in this book that resonants with me and I very much enjoyed the overall presentation.

Print Quality: The 2014 Canon APPA Gold awards book I reviewed earlier this year is the gold standard in print quality that surpasses anything I have yet seen from an offset printer. Simply Peter Dombrovskis is almost on a par, with deep rich colours that are the closest you are likely to get to the original prints. The quality of the printing is superb and does full justice to the photographs. Just as an aside: If you are visiting Tasmania, be sure to stop into the Wilderness Gallery at Cradle Mountain where prints of Peter’s work are on display in a retrospective exhibition.

Conclusion: Simply Peter Dombrovskis  is a solid four star presentation of some of Peter’s best photography and I recommend that you strongly consider adding this book to your photographic library.  **** You should own this book and consider it an important part of your photography library.

Footnote: Simply Peter Dombrovskis is already out sold out of its initial print run making this book a very noteworthy addition to any collector’s library if you are able to obtain one.

My personal thanks to Gail for the very kind and thoughtful gift of this book.