We are well into the first quarter of 2026, and to date I have been in Australia, Mongolia (for Pallas Cat and Snow Leopard), the UAE (United Arab Emirates for the incredible Xposure festival), Colombia (for Birds), and Iceland (for two Arctic Fox trips and a private landscape trip) and in a couple of weeks I will be in Svalbard, north of Norway for both a private Snow Scooter trip and a 10-day boat charter. That’s six countries in just three months, more than 60,000 RAW captures with my two Canon EOS R1s, and a lot of time in airports in transit around the world. And that got me thinking… With all the photography I have already done this year, what do I want to see next from Canon?
Pre-Capture: First and foremost, I want a firmware update to bind pre-capture to a single custom button on the EOSR1. I wrote extensively about this feature request recently HERE, so I won’t belabour the point further. I have subsequently written to Canon Australia and am hopeful we will see this feature via firmware soon. I feel somewhat blessed that we at least have RAW pre-capture, and are not limited to jpeg, as is currently the case with Nikon. As an aside, Sony already allows pre-capture binding (as does the Canon EOS R6 MK3).
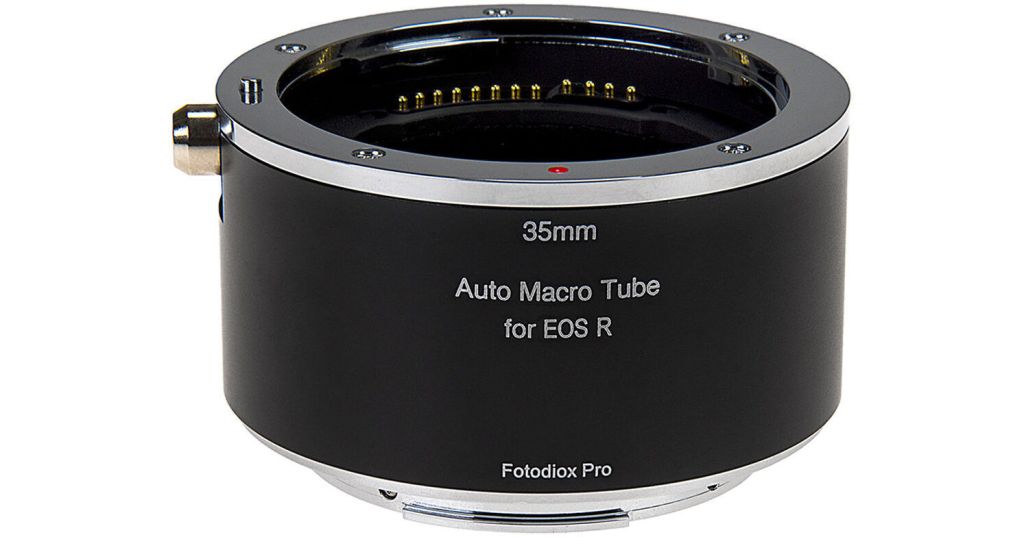
RF Extension Tubes: Currently, the RF lens lineup has some gaps that I would very much like to see Canon fill. These include an RF extension tube or a series of tubes. Canon used to make EF extension tubes, and these are extremely useful for closing the close focus distance on subjects in the field. I still own an EF extension tube, but unfortunately, these cannot be adapted to RF glass. There are a number of aftermarket options available, with mixed reviews, but nothing from Canon currently. Extension tubes are most commonly used for Macro work, but they are also a really useful tool for wildlife photographers who want to capture tight headshots of small subjects or small details.
Mega Pixels: 24 is enough for what I do and provides incredible high-ISO performance to boot in the EOS R1. I have no hesitation in shooting the EOS R1 at ISO 12,800 or even ISO 25,600. That said, I would gladly trade more pixels (anything over 24) for even better ISO performance, but I fear we are reaching the limit of physics at this point, and further improvements in ISO performance in the future are likely to be mostly computational. I know others want more pixels for cropping power – I am just not amongst them. If you need more than 24 megapixels, buy an EOS R5 MK2.
Canon Camera Connect App: I would like to see significant improvements in this App that make it more reliable and stable in connection and much faster to use in the field. Currently, connecting to the camera is too slow to be a viable method of camera control for wildlife (most of the time). The app also frustratingly drops its connection on occasion and can be problematic with reconnection. If the application were faster to connect and more reliable, it would turn any smartphone into a fantastic control screen for any Polecam or camera trap system.
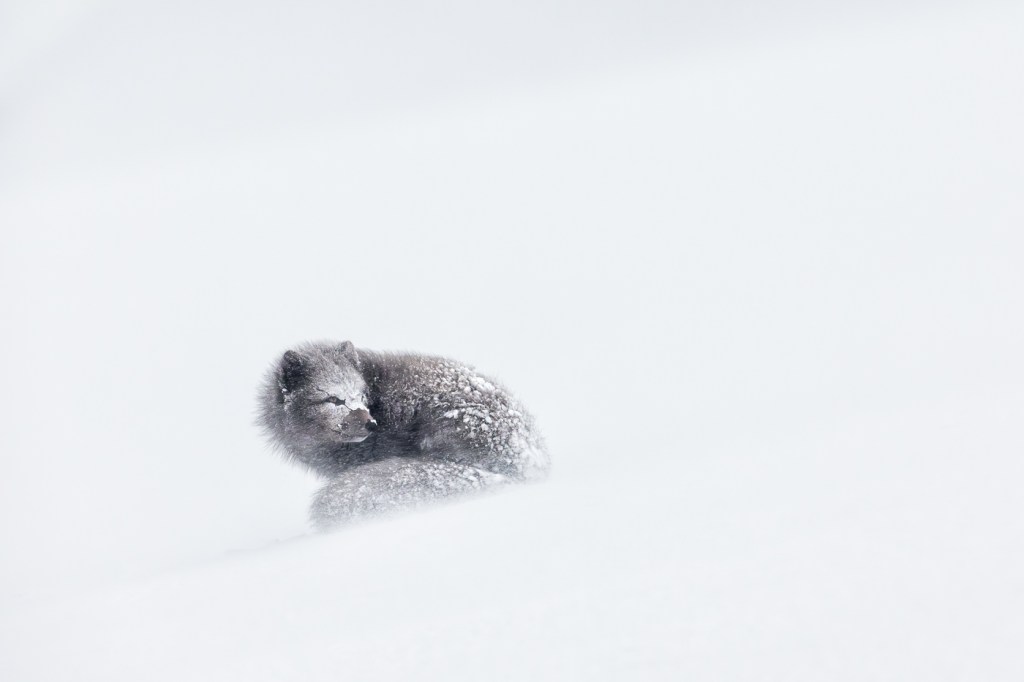
Auto Focus: The autofocus in the EOS R1 is the best I have ever used and the camera tracks subjects better than all previous Canon cameras. Its ability to track and stay on the subject’s eye is phenomenal. However, it cannot ‘stay on target’ as well as the EOS 1DX MK2 or MK3 could in heavy snowfall, and has a nasty, annoying habit of grabbing snowflakes in front of the subject. Even tweaking the AF sensitivity settings in the AF menu cannot overcome this issue. This is an issue I have seen repeated on the Nikon Z9 and Sony A1 and A1 MK2 cameras. In general, the AF on these cameras is so ‘tweaked’ and sensitive that falling snow causes continual interference. On my previous 1DX MK3, I could not track the subject’s eye (the camera did not have eye tracking), but I could keep the focus points on the subject, and the camera would successfully ignore falling snow. This could be addressed in firmware with a ‘snow setting’. If we can have a special ‘net’ setting to avoid the net in soccer goals (for photographers shooting from behind the net), we can have a snowfall setting, please, Canon.
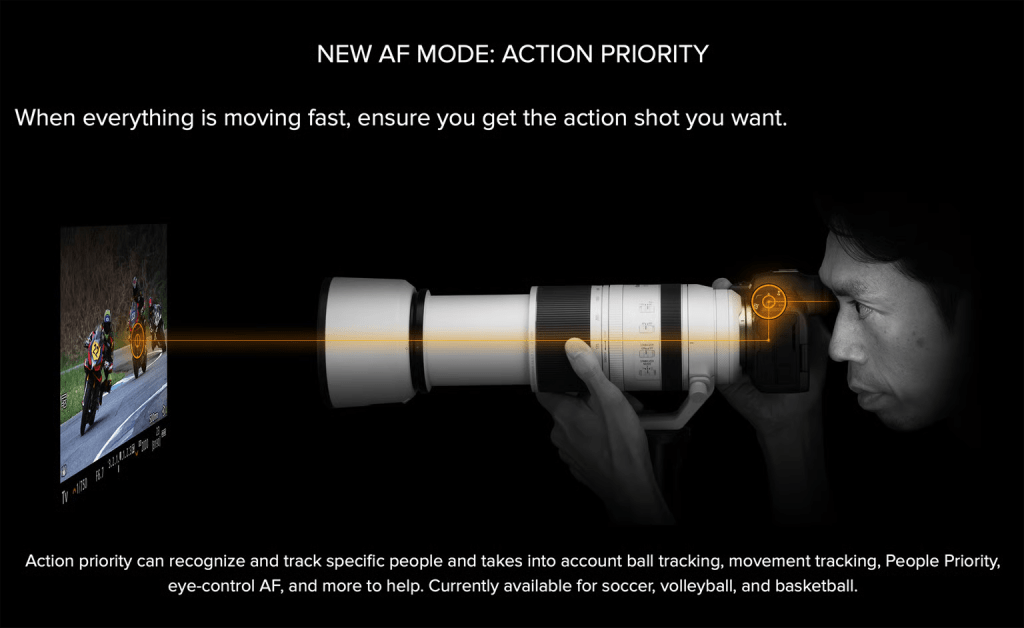
Action Priority: Canon has teased us with the initial offering of ‘Action Priority’ for select sports. Further down the line, special focus cases for different wildlife could be a real boon with this technology.
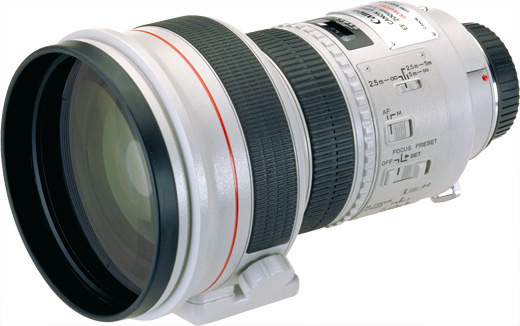
Telephoto Lenses: Over the years, Canon has made both f1.8 and f2.0 EF 200mm lenses. With the RF system, it should be possible (in theory) to make a 200mm lens even faster than f1.8 (or another at f1.8). Such a lens would be the background ‘obliterator’ and an awesome tool in the arsenal of any wildlife photographer whose subject distance can be controlled relatively easily. Penguins, for example, would be the ideal subject for such a lens. Portrait and Wedding photographers would also have strong arguement to employ such a lens. Lenses such as this are highly specialised, but offer creative options not otherwise available. Lenses such as this also tend to be showpieces of what is possible by a manufacturer, but do serve a real functional purpose for creatives.
Super Telephoto Lenses: The much-rumoured 300-600mm RF lens is certainly on my wish list and would complement Canon’s excellent RF 100-300mm F2.8L IS USM lens. I would also love an RF 600mm f4 with a built-in 1.4 or 1.7 teleconverter. The addition of a built-in teleconverter makes a huge difference in the field when you have a subject like a Polar Bear slowly approaching from a distance. Those few seconds saved by flicking in a built-in teleconverter vs having to unscrew the lens and screw in a converter can often mean the difference between getting the shot and missing the best moment. I would also appreciate an 800mm f6.3 DO lens that is small and lightweight for hiking (like Nikon offers), yet still offers incredible reach with a reasonably fast aperture. Such a lens would be fantastic for hard-to-reach targets, such as Snow Leopards or small birds.
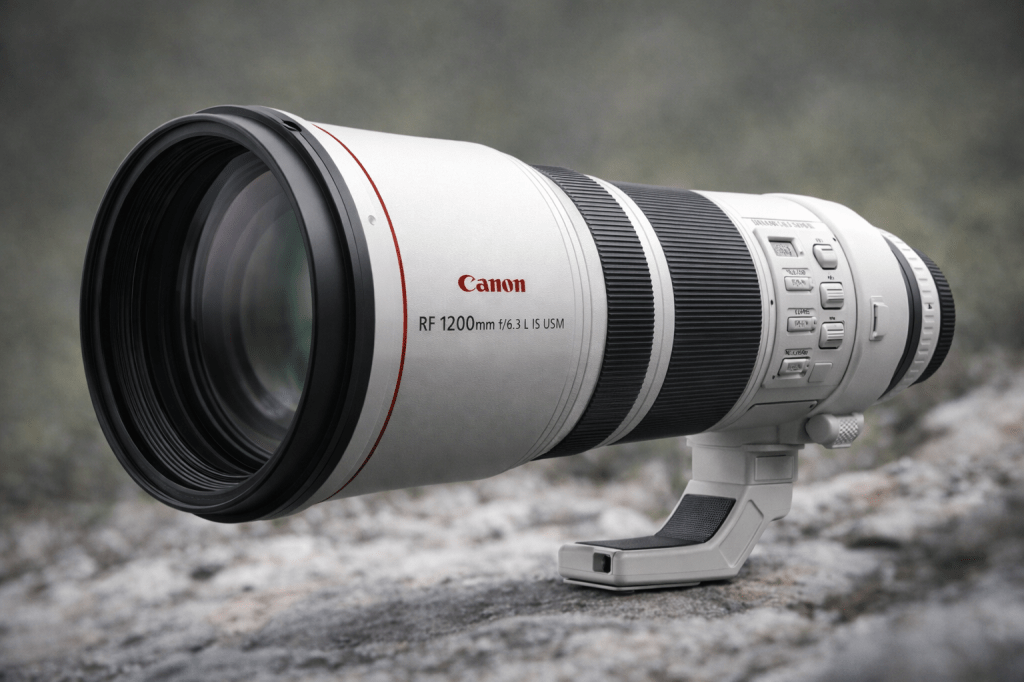
Ridiculous Super Telephoto Lenses: Ok, it’s a long shot Hail Mary, but an RF 1200mm f6.3 or f7.1 (Canon used to make an EF 1200mm f5.6) would be wonderful for bragging rights and really small birds. At this focal length, heat haze and air pollution are a real and present danger, so such a lens would be most useful for small birds and other similarly small critters. I can definitely see a use for this lens from the floating hide. The likelihood of such a lens is extremely low, as it would be very expensive to produce and very few would be sold. But Canon would sell at least one!
Tilt Shift Lenses: Canon has made really excellent EF TSE lenses over the years. The 17mm, 24mm, 50mm, and 90mm are all outstanding. I have owned the 17mm, 24mm and 90mm in recent times. All can be adapted to RF mount with the Canon adapter. RF versions have long been rumoured with talk of auto-focus capability. I am not sure I need an AF TSE lens, but I would really like a 20mm TSE in the RF mount. 20mm is my favourite focal length for wide-angle landscape work, and the addition of tilt and shift adds a lot of creative control.
It is still early in 2026 and Canon has not as yet made all its announcements for the year. With luck, we may see some of the above later this year. Let me know what you would like to see from Canon next?
I need to get something off my chest about the Canon EOS R1 that’s been at the front of my mind over the last two weeks during my Birds of Colombia workshop. Before I do, I want to clarify that the EOS R1 is the best camera (mirrorless, DSLR or otherwise) that I have ever had the privilege to use. It is an incredible camera across the board, from its industry-leading autofocus to its phenomenally clean high-ISO images. It is a masterpiece and a tool that any photographer worldwide should be happy to use. But! It has an Achilles heel that Canon could fix in a single firmware update. Allow me to explain.
The Canon EOS R1 is Canon’s flagship. The pinnacle. The no-compromise, built-for-professionals, wildlife-and-sports-dominating machine. And yet (inexplicably) the user cannot bind pre-capture to a custom button. Let that sink in for a moment. One of the most powerful features for wildlife and sports photographers, the ability to buffer frames before you fully depress the shutter, cannot be assigned in a way that makes it instantly accessible in the field. For a camera aimed squarely at action professionals, that’s not just an oversight. It’s baffling and makes me seriously question Canon’s ability to listen to the needs of its working pro photographers.
Now here’s the part that irks me and really twists the knife. This ‘binding’ functionality can now be found on the Canon EOS R6 Mark III. A significantly lower-tier body. Not the flagship. Not the no-holds-barred professional tool. Somehow, the R6 Mark III gets the flexibility, while the R1, the supposed apex predator, does not. I genuinely struggle to understand the product logic and thought process here.
For wildlife photographers working in unpredictable environments such as snow leopards cresting a ridge, hummingbirds buzzing past feeders, Pallas’s cats darting between rocks, pre-capture isn’t a gimmick. It’s the difference between getting the shot and going home empty. And the same applies to sports photographers looking to capture the decisive moment. Pre-capture needs to be instantly deployable. It needs to be muscle memory. I don’t want to dig through menus or compromise another critical control to access it. I want it bound to a custom button so I can toggle it seamlessly as conditions change. And yes, I know I can assign it to a custom shooting mode (which is my current workaround), but that isn’t a perfect solution suitable for a flagship product.
In high-end fieldwork, ergonomics and customisation aren’t luxuries; they are essential workflow elements. When you’re wearing gloves in sub-zero conditions or reacting to split-second behaviour, you don’t have time for pause or friction. The whole point of a flagship body is to remove friction. To anticipate professional needs. To give us more control, not less.
What makes this especially frustrating is that the hardware is clearly capable. This is not a limitation of processing power or buffer depth. It’s firmware. It’s menu logic and its exclusion is a design decision. And when a mid-tier body receives that flexibility while the flagship does not, it raises uncomfortable questions about segmentation strategy versus user experience. It raises eyebrows that Canon might be deliberately holding this capability back to sell us a MK2 camera in the near future.
Canon builds incredible cameras. I’ve trusted them for decades in some of the harshest environments on Earth. The R1 is, without any doubt, a phenomenal tool. But choices like this undermine confidence. Professionals, like myself, invest heavily, not just financially, but in muscle memory, system familiarity, and long-term ecosystem loyalty. When basic functional customisation is arbitrarily limited, it feels like we’re being managed instead of supported.
This isn’t about spec sheets or marketing hype. It’s about real-world use. It’s about being on a windswept ridge with a once-in-a-lifetime moment unfolding and knowing your camera is working with you and not against you. In the final home stretch of two weeks of intense bird photography here in Colombia, this issue has come to the front of my mind consistently during the days in the field.
Canon, if you’re listening: This is a firmware fix. Give R1 users the ability to bind pre-capture to a custom button. The capability clearly exists within the system. Professionals shouldn’t have fewer ergonomic options than mid-tier bodies. Flagship should mean freedom.
Over the last few years, I have created ISO-specific and Adaptive Noise Reduction presets for the Canon EOS R1, Canon EOS 1DX MK3, Canon EOS R3, and Canon EOS R5 MKII using the traditional legacy Noise Reduction sliders in Lightroom. These time-saving, optimised presets have since been downloaded, tested and adopted by many other Canon users as their working defaults. With the introduction of Lightroom’s new A.I Noise Reduction (and the capability to apply this without creating a new DNG file), the game has significantly changed.
Before we get into the significant advantage Lightroom’s A.I Noise Reduction brings to the table, I just want to apologise for the length of this post. There is a lot to cover, and it is essential to detail the methodology for these presets as well as explain what is actually happening ‘under the hood’ in Lightroom so that you know how to best take advantage of this hard work. Of course, there is nothing to stop you from creating your own presets based on this information. I encourage you to do so if that floats your boat. If you have neither the time nor the patience, then read on…
Since the release of the original legacy presets, Adobe has made a significant and important update to Lightroom, which means the newer and more powerful A.I Noise Reduction algorithm no longer requires the creation of a separate DNG file. This change means I could create a new set of updated presets to take full advantage of the A.I Noise Reduction algorithm without every file needing the creation of a new DNG. After spending a full week locked in my studio, staring at my computer screens and analysing test files in great detail, I have now created optimised A.I noise presets for the Canon EOS R1 using the new A.I Noise Reduction algorithm. These new presets are significantly different to the legacy presets previously released and offer an improved result that takes full advantage of the new A.I algorithm. If you would like to take advantage of these finished and optimised presets (including the test RAW files), you can purchase them through my store, Melrakki Publishing, HERE, for $50 AUD. These presets represent days of work to complete, so I ask that you please support this work by purchasing them if you want to take advantage of them. If you have previously purchased our legacy Canon EOS R1 Noise Reduction presets, you can continue to use these without issue.
Please note: The new A.I Presets do not stack with the original legacy presets, but replace them for those looking for the best possible result. If you were a previous purchaser of our Canon EOS R1 Noise Reduction presets, I am offering a 50% discount on the new A.I presets. Please contact me to receive your discount code before placing an order.
History: I previously included some critical history in the creation of the legacy presets in a detailed and long post HERE. (recommended reading) However, it is very important to note that the new A.I Noise Reduction algorithm significantly changes the game when it comes to Noise Reduction. Most obviously, there is only one Noise Reduction slider to adjust instead of six (more on this below). Whilst this significantly simplifies things, it does mean returning to the very beginning of testing for every single ISO and camera. Hence, we are starting with the Canon EOS R1 (my preferred camera). If time permits, I will get to the Canon EOS R5 MKII and others.
A.I Noise Reduction: A few important notes about how the new Adobe Lightroom A.I Noise Reduction actually functions: A.I Denoise does not include any aspect of sharpening (under the hood). Even as you adjust the slider to the right to perform stronger denoising, the A.I is not actually trying to perform sharpening (but it is trying to preserve RAW details – Adobe’s terminology). It does try to retain the sharpness of the original content as much as possible, and in some cases, this may perceptually appear to be increasing sharpness (because it can be harder to judge the sharpness of the original content with all the noise present, and also because the default legacy NR setting of Colour 25 tends to smear some colours).
Turning on A.I Denoise via the checkbox will automatically turn off the legacy Noise Reduction controls. This is to prevent unwanted ‘stacking’ of A.I and Traditional Noise Reduction. If you are applying Denoise via the new preset, the legacy Noise Reduction is also turned off for you. If you wish, you can always add additional legacy noise reduction on top (although I would advise against this).
Turning on A.I Denoise: When AI Denoise is on, there are two components of AI-based noise reduction happening: luminance and colour. This is similar to the legacy noise reduction with its Luminance and Colour sliders, except that the AI-based one should generally be a lot better (and it is on the Canon EOS R1). The single slider underneath the Denoise checkbox controls only the luminance component of the AI-based noise reduction. The colour component of the AI-based noise reduction is always applied automatically when Denoise is checked, and there are currently no controls for it.
Adobe designed it this way because they found in practice that the AI-based colour aspect of noise reduction worked really well and didn’t need adjustment (I agree with them after significant testing). In contrast, the luminance aspect of noise reduction is always a matter of taste, and a tradeoff between noise and original scene detail (like fur and texture).
A setting of 1 in A.I Noise Reduction does not mean entirely off. Instead, it means that the “luminance” component of Denoise is off completely, but there is still the chroma/colour component of Denoise applied. You can test this for yourself by taking a very high ISO image (at least ISO 102,400 on the EOS R1). Then, manually set the legacy Luminance and Colour NR sliders both to zero, so the image at 1:1 should look nasty with lots of luminance and colour noise visible everywhere. Then turn on (AI) Denoise and set Amount to 1. Then toggle on/off the Denoise checkbox. What you should see is that with the box off, you see both lots of colour and luminance noise on the photo. But with the box checked (and the slider set to 1), the colour noise goes away, and you just have luminance noise left. So, if you want to turn off A.I Denoise completely, just uncheck the box.
It is therefore essential to note that when you set the Denoise slider to its minimum value of 1, it’s basically doing the minimum amount of “luminance” AI-based noise reduction, but a full/automatic dose of “colour” AI-based noise reduction. It is not doing the legacy Colour noise reduction under-the-hood with a default value of 25. It may look like that, visually, for some files, especially at low ISO. But at higher ISO settings you will likely find that the AI-based colour denoise works a lot better at preserving small colour details, like the colours of small flowers, or colours in the eyes of small subjects (think a bird or fox that is smaller in the frame).
Also, while in general I recommend turning off legacy Noise Reduction when using A.I Denoise, there may be some cases where it can be helpful to use a bit of legacy Colour NR in addition to Denoise. This is mostly for very high ISO images, where there may be a bit of residual colour noise left after A.I Denoise (not the case for Canon EOS R1 files at any ISO – your mileage may vary with other cameras). Sometimes this is seen as a low frequency colour mottling (colour blobs that are subtle but visible in what should be smooth areas like solid colored backgrounds. Think out of focus sky or green grass etc). Using legacy Colour Noise Reduction with Colour Smoothness at a high setting can be very effective at taming this residual colour noise. Just be careful with the amount because it can lead to smearing of small colour details.
Canon R1 Performance: If you are only interested in how the Canon EOS R1 stacks up and performs, here is the conclusion: The EOS R1 significantly ups the game with performance that demonstrably exceeds the EOS R3 and EOS 1DX MK3. When comparing EOS R1 high ISO files against either the EOS 1DX MK3 or the EOS R3, it is clear that Canon has made forward strides in high-ISO sensor development. Directly comparing ISO 12,800, 25,600, 51,200 and 102,400 on the EOS R1 to either the EOS R3 or EOS 1DX MK3 shows that the sensor in the EOS R1 retains more fine-textural detail at these high ISO settings. Fine hairs and ultra-fine detail are clearer and more accurately rendered by the EOS R1. The grain structure is also more organic and ‘film-like’, and it appears less ‘digital’ than previously tested cameras. In addition, the EOS R1 files are more malleable and more resilient to abuse of the traditional Lightroom Noise Reduction sliders while producing a more natural result. Extreme settings of these sliders render more pleasing and preferred results than either the EOS R3 or EOS 1DX MK3 sensors. The EOS R1 is also the first sensor tested to facilitate a workable, high ISO of 25,600 without losing detail in real-world RAW files. Based on my testing experience, the EOS R1 represents the very pinnacle of Canon’s digital sensors, with high ISO performance that outperforms any other sensor tested to date. I have no hesitation in personally shooting the EOS R1 at ISO settings up to and including ISO 25,600. As long as your files are well exposed, the EOS R1 can render superb results that retain ultra-fine detail even at this extreme ISO.
Methodology: Over the last week, I have done extensive testing and analysis in creating these A.I ISO-specific noise reduction presets for the Canon EOS R1. To make them, I photographed a large X-Rite Color Checker (A4 video version) in a D6500 light-controlled graphic light workstation with the Canon EOS R1 and an RF 85mm f1.2 L series lens at f5.6 at every single ISO stop from 50 to 102,400. Technically, you can push the EOS R1 to H1 ISO 204,800, and the ultra-extreme H2 to ISO 409,600, but RAW files at these extreme ISO settings break down so badly that it is little more than a marketing gimmick. Thankfully, this extreme ISO range is disabled by default in the EOS R1, and that is how I suggest you leave it – permanently. For the curious amongst you, there is no saving ISO 409,600. Even ISO 102,400 should be used as an absolute last resort. Whilst ISO 50 is an option on the Canon EOS R1 and has no noise of consequence, it does have a more limited dynamic range (approximately one stop less) than ISO100 and, as such, is not recommended. You are better off using a Neutral Density filter if you need to shoot at ISO lower than 100. All of that said, the presets do include Noise Reduction for the full ISO range from ISO 50 all the way to ISO 409,600.
1/3rd stops are ‘push’ or ‘pull’ ISO stops that use in-camera software ‘under the hood’ to adjust the exposure +/- 1/3rd of a stop accordingly. As such, I never use 1/3rd stop ISO increments and have my EOS R1 cameras set to full stop ISO only. I also find that when I am shooting in the field, I prefer one click to go from ISO 400 to 800, for example, instead of having to make multiple clicks to gain a stop of light. Noise Reduction presets are included for 1/3rd stop increments for those who like to shoot this way or who prefer to shoot Auto ISO.
Aperture priority was used meter as read (no exposure compensation), and only the ISO and shutter speed were varied. The X-Rite Colour Checker was used as it enabled me to carefully monitor and check for noise in the shadows, and because I wanted to be able to check for individual colour shifts, mottling, speckling and bleeding at each specific ISO in very specific colours. It should be said that any differences in colour shift would, in all likelihood, not be visible in normal photographic scenes, but using the X-Rite Colour Checker makes it far easier to visually detect shifts or bleed in colour and thus makes it far easier to apply optimal noise reduction in Lightroom.
The RAW files were imported into Lightroom with the Adobe Colour Profile and carefully analysed at 100%, 200% 400% and 800% magnification. Unlike sharpening, which must be gauged at 1:1 100% magnification, Noise Reduction requires additional zooming. I spent the better part of the week just staring at these RAW files at different magnifications and visually comparing them side by side as I tweaked the A.I Noise Reduction Slider for each ISO. The goal was never to make ISO 102,400 look as good as ISO 100 (that is not possible – but we can get close with the new A.I NR!); instead, ISO 100 was used as a reference point for all other ISO RAW files to be compared. Then, the sliders were adjusted for each full stop of ISO difference. In other words, the goal was to make ISO 200 look as close as possible to ISO100, ISO 400 as close as possible to ISO200, etc., all the way up to making ISO102,400 look as close as possible to ISO 51,200. Once this was done and checked I then went back and compared the results two full ISO stops difference and then three full stops difference and tweaked further. Finally, I rechecked my settings and results over a period of days to satisfy myself that I could not optimise them further. It is worth noting that ISO 102,400 and above are the most difficult ISO ranges to make look ‘good’. Hence, they have the highest amount of A.I Noise Reduction in the preset. Even with this optimised pre-set for ISO 102,400, I strongly encourage you to avoid this ISO and the ultra-extreme H1 and H2 ISO settings at all costs. In real, practical terms, I recommend setting a virtual ceiling of ISO 25,600. Exceed 25,600, and fine details begin to get lost. At ISO 51,200, fine detail and texture continue to disappear, although it’s arguable if this will be visible in well-exposed real-world captures. In actual, practical, day use, I try not to exceed ISO 12,800 with the EOS R1 and prefer to shoot at ISO 400 as my baseline. I will happily go to ISO 25,600 before I start worrying too much about noise, with ISO 51,200 being my absolute ceiling. It is worth noting that all of the above is contingent upon a well-exposed RAW file. If you underexpose your file the results will likely be quite different.
I used two high-end displays to visually analyze the RAW files: the BenQ SW272U, which I reviewed HERE, and an Eizo Colour Edge CG2700X. Both displays are high-end Adobe RGB, 4K, and were optimally calibrated to D6500K with a setting of 80 candelas, which is appropriate for the light levels in my viewing studio. I utilised two different monitors as I discovered that different displays render slightly differently, and it was necessary to optimise and average across the different monitors. It should be noted that if you are using a laptop screen, you are at a very significant disadvantage in rendering colour and analysing noise. In fact, making any sort of colour-critical decisions on a laptop display is a terrible idea. If you do not own a high-quality photographic display and care about your images, this should be your next purchase.
Noise Reduction and ETTR: When setting the A.I Noise Reduction Slider I deliberately erred on the side of caution and was very intentionally cautious and judicious in the amount being applied. The primary reason for this is I did not want overly aggressive noise reduction in these pre-sets. Since exposing to the right (ETTR) is optimal in the field (without clipping the highlights), tweaking the exposure down in Lightroom during post-production results in lower levels of noise than under-exposing or even exposing ‘meter as read’. In other words, the presets are optimised for RAW files that were optimally exposed in the field. If you are applying these presets to an under-exposed photograph that you are ‘brightening’ considerably in Lightroom, you may well need to apply additional noise reduction. Thus, the presets will work optimally when you have exposed optimally in the field.
Camera Profiles: Adobe encountered difficulties building camera-specific profiles for Canon models (including the EOS 1DX MK3 and R series cameras) due to the switch to the new CR3 file format. Adobe has since resolved this issue and resumed offering camera-specific profiles. For these presets for the Canon EOS R1, I used the standard default Adobe Colour profile. I recommend not getting too hung up on Camera profiles, as changing profiles may improve the look of specific files in certain situations, but once you start adjusting the processing dials in Lightroom, all bets are off as to which may give a better result. Since ‘Adobe Colour’ is the default, it made sense to use this as the baseline for the Noise Reduction presets.
Sharpening Amount: Unlike the legacy Noise Reduction presets, NONE of the A.I NR presets include any Sharpening above the default setting of 40. Historically, it was necessary to add sharpening to counter the digital smoothing of the legacy NR sliders. This is because sharpening and noise reduction are interactive and affect each other (that is why they appear together in the Detail panel of Lightroom). In testing the new A.I NR I found that there is no longer a need to apply any sharpening to counter the digital smoothing caused by the A.I NR. The ‘RAW Details’ preservation, which is selected by default, performs sufficiently well. Note: You will still need to add additional capture sharpening to your file. The amount of capture sharpening you will need to apply will vary depending on the quality of your lens, the sharpness of the capture and the atmospheric conditions at the time of capture.
Canon EOS R1 Comments: With the ISO-specific Adaptive A.I noise reduction pre-sets applied between ISO 100 and ISO 3200, there is no appreciable difference in noise in real-world RAW files – they are close enough to be considered identical at 100% magnification. By ISO 6400, only the tiniest minute surface texture, discernible at 400% or more magnification, is just starting to disappear (You would never ever notice this in real-world captures and have to really look for it at extreme magnification). At 100% there is no discernible difference between ISO 3200 and ISO 6400. By ISO 12,800, ultra-fine surface textures are just starting to disappear from the RAW file when viewed at 200% or more on-screen (again, you will never notice this in real-world captures). At ISO 25,600, the finest surface textures disappear, and ultra-minute fine detail also starts to disappear. Fine hairs are still visible and look good, but the finest ultra-minute detail is now obscured. Again, you will not notice this in real-world RAW captures (You really have to look for it in a test image at 200% or more magnification). Nevertheless, my recommendation is that ISO 25,600 is a realistic, workable limit. Above ISO 25,600, both texture and fine detail continue to disappear as the ISO increases. ISO 51,200 has a noticeable loss in ultra-fine detail compared to ISO 25,600. At ISO 51,200 the finest surface textures are gone. The smallest fine hairs are no longer visible and are lost in the increased grain structure (which remains organic). Toward the top end at ISO 102,400 we have lost most surface texture and most fine hair detail. ISO 102,400 is an absolute last resort and is to be avoided at all costs. I strongly recommend you leave ISO 102,400 disabled and set your absolute ceiling at ISO 51,200 with a realistic limit of ISO 25,600. The presets do their best to make ISO 102,400 look as good as possible, but in reality, there is no helping ISO 102,400 and above.
Lightroom A.I Noise Reduction Note: The AI NR in Lightroom does a significantly better job than the traditional manual legacy sliders. Whilst the manual legacy sliders provide a great starting point from which to assess a file, the correct application of the A.I NR does improve things considerably. You can see this in the screenshot below, where colour bleeding is evident in this extremely high ISO file with the legacy sliders, but the comparison image shows almost no colour bleeding whatsoever with the A.I NR applied.
Observations with A.I Noise Reduction and EOS R1: When adjusting the A.I NR slider, it is easiest to see apparent noise in the most saturated reds, purples and blues in the X-Rite colour checker chart. Generally, the darker colours show more obvious luminance noise compared to the lighter colours. The cyans, greens and yellows, for example, typically show less noise for the same given ISO. Thus optimally setting the A.I NR slider is a bit of a balancing act, depending on colour preference or bias. For these presets, I have optimised across an average without giving preference to one colour over another. These differences would never be seen in a real-world RAW file and are only apparent on close observation of the colour checker at magnification of 100% or greater.
Raw Details: It is also worth noting that Lightroom A.I NR does an outstanding job of preserving fine textural details. It actually does a much better job than the legacy NR sliders because it attempts to preserve ‘RAW Details’. By default, ‘RAW Details’ is ticked when you apply A.I NR and cannot be unticked. The A.I NR cannot recover details it doesn’t see however and small fine details that are lost in the noise before applying A.I NR will not be restored (and no amount of sharpening will recover them). However, the good news is that the A.I NR does a truly exceptional job of preserving the details it can see.
Demonstrable Visual Results: In case you are wondering why I have not dotted this long post with visual examples comparing various ISO’s pre and post-ISO specific noise preset, it is because the images, once converted to jpeg and resized for the web, are not representative of the RAW file results. Conversion to jpeg and downsizing to something suitable for the web has a very significant effect on the visual noise in an image. Downsizing removes visible noise, which significantly distorts the visual results. However, I have included a copy of all the RAW files I photographed of the X-Rite Colour Checker in the creation of these presets from ISO 50 to ISO 409,600 so you can visually see the differences yourself. Just import the RAW files into Lightroom, apply the presets and do a before/after comparison. You may need to zoom in to 200%, 400% or even 800% to see differences. For those who still want to see a visual example: The below screen grab shows an indicative before and after left/right comparison of ISO 25,600 at 100% with the new A.I Noise Reduction preset applied. Just note: the results are distorted by the downsizing and conversion to JPEG.
Conclusion: Creating these A.I ISO-specific noise reduction presets for the Canon EOS R1 was a worthwhile investment in time and energy. It has been very educational (although time-consuming), and It should considerably speed up any workflow for someone that is shooting with this camera, as the presets can be applied on import (see warning below). As they are ISO specific, Lightroom will then apply them correctly to each different ISO file you import. Since significant time and effort went into optimising these presets, you will not have to worry about whether you are setting your noise reduction optimally. Just make sure you expose optimally in the field, apply the preset on import into Lightroom, and you can then focus on processing your photograph. Just remember, you still need to apply an appropriate level of capture sharpening for your RAW file. Happy processing!
Warning: A warning if you are going to apply these new presets on import: A.I Denoise is extremely processor-intensive. Even on a very fast computer, it can take upward of five seconds per image. If you are importing from a big shoot of say 4000 photographs, for example, this will send your computer’s CPU into overdrive (as well as your power bill) and could take a very long time to process! In this example, that’s 20,000 seconds or 333.333 minutes or 5.55 hours! Instead of applying to all your photographs on import, I suggest you apply the preset only to those photographs you wish to process after import. If you are a user of our legacy NR presets then you can continue to apply these on import as a ‘starting point’ and then apply the new A.I Preset to any photograph you actually want to process. When you do this, the old legacy NR will be turned off automatically for you.
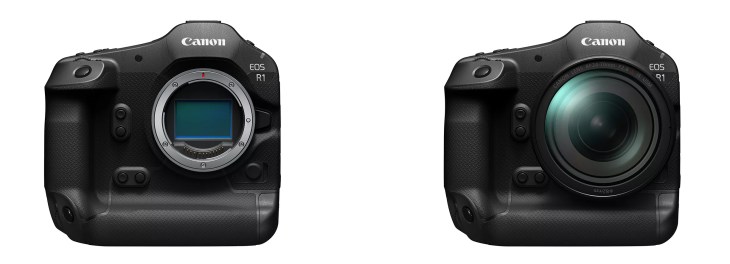
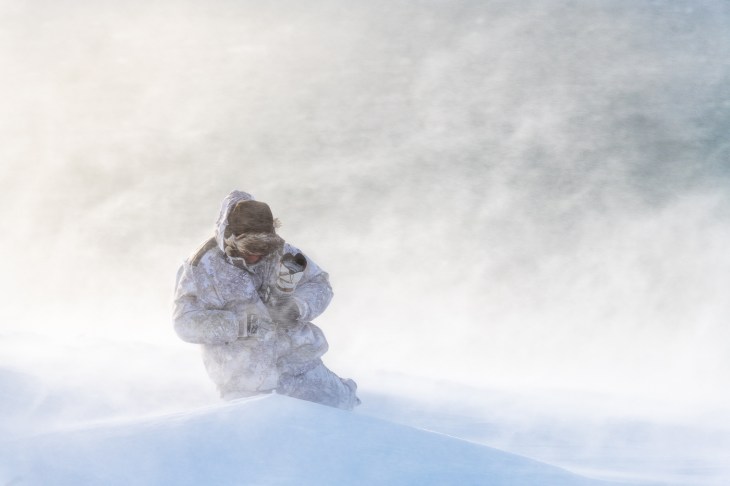
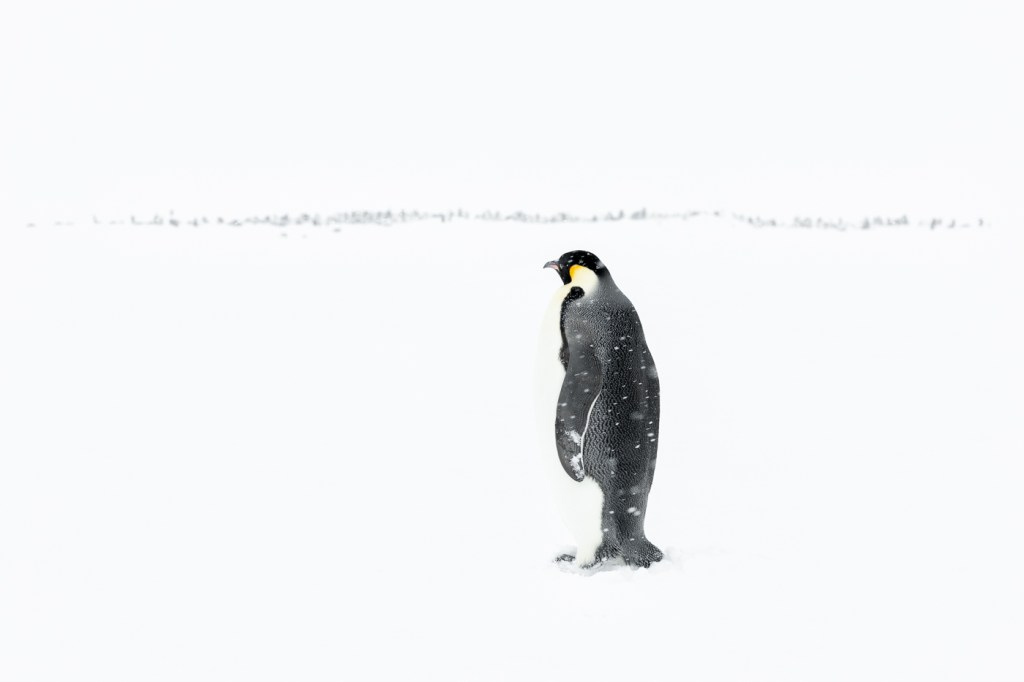
For the past eight months, I’ve been working extensively with two of Canon’s EOS R1’s—Canon’s long-awaited flagship mirrorless body—in some of the harshest and most remote environments on the planet. From the snow-blasted cliffs of Hornstrandir to the sea ice of Svalbard, the windswept Arctic Circle island of Grimsey, to the frozen sea ice deep in the Weddel sea region of Antarctica, the R1 has been at my side through thick and thin, shooting everything from high-speed Arctic foxes to cliff-dancing puffins, charging walrus bulls, stoic polar bears in whiteout conditions and majestic Emperor Penguins.
This isn’t a review based on lab tests or YouTube comparisons. This is the perspective of a full-time working wildlife and nature photographer who relies on his gear not only to create imagery but to function flawlessly in environments where failure is not an option.
Initial Expectations – When Canon announced the EOS R1, the bar and expectations were set sky-high. The promise was of a no-compromise, professional mirrorless body designed to finally go toe-to-toe with the competition in the high-speed, high-performance segment, but with Canon’s colour science, ergonomics, and reliability.
After moving to the EOS R5 MKII for lighter-weight expeditions, I found myself constantly pushing against its limitations—buffer depth, tracking inconsistencies, and durability being the most significant. The EOS R3 helped bridge that gap, but I still longed for a body that felt as bulletproof as the 1DX Mark III, with the speed and accuracy needed for unpredictable Arctic wildlife and landscapes. The EOS R1 promised that convergence. It was a long wait – And, in short, it was worth it.
In the Hand – From the first time I picked it up, the R1 felt like an old friend. The ergonomics are classic Canon—refined, intuitive, and completely muscle-memory driven for anyone coming from the 1D or R-series. The integrated vertical grip is beautifully balanced. The magnesium alloy body is solid but not excessively heavy, and most importantly, every button is exactly where it should be—even when wearing thick gloves in -40°C temperatures.
The R1 has survived rain, snow, salt spray, sub-zero wind chill, and even a minor fall onto sea ice without missing a beat. It’s weather-sealed to a degree that gave me absolute confidence in the field—something I can’t say for all mirrorless systems.
Autofocus – A New Benchmark – If there’s one area where the R1 has fundamentally changed how I work in the field, it’s autofocus. Simply put, the AF system in this camera is astonishing. I can lock onto an Arctic fox sprinting across a windswept snowfield at 40km/h and trust the R1 to not only find the eye, but to maintain critical focus through erratic movements—even when the subject disappears briefly behind foreground grasses or snowdrifts.
The deep-learning-based subject recognition has expanded dramatically. Eye tracking works almost flawlessly on mammals and birds, even in backlit or low-contrast conditions. The system now recognises a broader set of body shapes and head angles. In real-world terms, this means fewer missed frames, more keepers, and less need to second-guess the AF system. I’ve used the R1 to track puffins flying straight at me in gusting winds, razorbills launching from cliff edges, and polar bears moving through layers of blowing snow. In all these scenarios, the camera performed like a seasoned field partner—silent, responsive, and ruthlessly efficient.
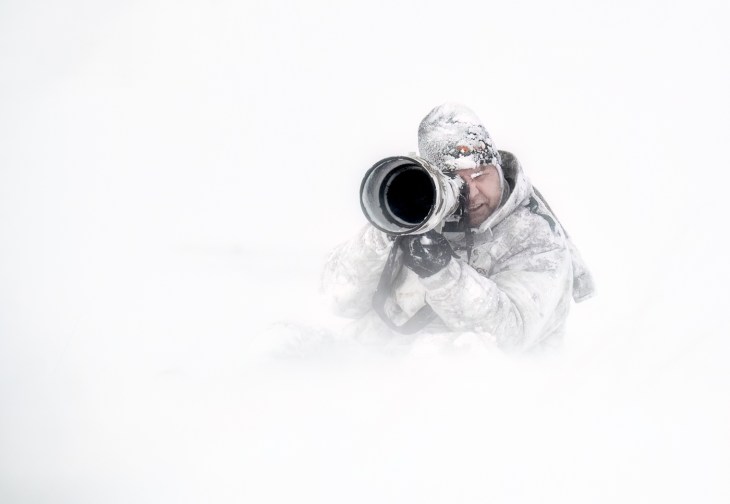
There is still room for improvement, though. When shooting wildlife in falling snow with the Canon EOS R1, one of the more frustrating quirks that has emerged is the camera’s occasional difficulty in ignoring snowflakes (big or small) that pass between the subject and the lens. While the R1’s autofocus system is astonishingly fast and sticky in many conditions, its subject detection algorithms can sometimes momentarily latch onto a bright, high-contrast snowflake, especially in backlit or low-contrast scenes where the subject blends into the background (regardless of case setting). This can cause brief focus hunting or a shift away from the intended target—particularly problematic when photographing fast-moving animals like Arctic foxes or polar bears in a blizzard, where every fraction of a second counts. In heavy snowfall, the effect can compound, forcing the photographer to adjust AF case sensitivity, reduce tracking responsiveness, or switch to a smaller AF zone to help the camera “tunnel vision” on the subject. It’s not an insurmountable flaw, but in the right (or wrong) conditions, it’s enough to cost you the critical sharp frame.
The R1, as incredible as it is, cannot, as yet, ignore falling snow with the same ruthless efficiency that the 1DXMK2 and 3 could. The R1 will stubbornly grab falling snow in lieu of the wildlife to the point that it has, on occasion, forced me to switch to manual focus as in the video above. Falling snow is quite honestly the current Achilles heel of the EOS R1.
Frame Rate, Buffer, and Workflow – The EOS R1’s blackout-free electronic shutter and lightning-fast readout speed make it a dream for tracking fast action. I often shoot at 40fps in full RAW, which feels like wielding a high-speed cinema camera with stills precision. 40fps might seem excessive to some, but when you are searching for that perfect wing or paw position it is frequently the difference between getting the shot or missing it.
Critically, the buffer performance has improved dramatically over previous models. Even at full 40fps in RAW, I can shoot long sequences without any slowdown. This has been essential for capturing behaviour sequences—foxes leaping, puffins mid-flight, walruses rearing up from the surf—where timing and rhythm are everything.
Canon’s RAW format has continually proven to be the perfect balance between file size and post-processing flexibility. I’ve had no issues pushing shadows, recovering highlights, or making large exhibition prints from these files. My Lightroom workflow has remained fluid even when dealing with thousands of frames per day.
Image Quality – Resolution-wise, the R1 hits a sweet spot. At 24 megapixels, it provides the detail and dynamic range necessary for large-format fine art prints without ballooning file sizes. Colour rendering is signature Canon—neutral, nuanced, and skin tones (or fur tones, in my case) are beautifully rendered. The sensor’s performance in low light is game-changing. I’ve comfortably shot Arctic foxes in fading twilight and seabirds at ISO 25,600 with minimal noise and excellent detail retention.
I frequently shoot in high-contrast snow conditions, and the R1 allows me to retain texture in both highlights and shadows, giving more flexibility in post and fewer blown exposures in the field.
Electronic Viewfinder and LCD – One of the biggest shifts from DSLRs to mirrorless was learning to trust the EVF. On the R1, Canon has finally nailed it. The EVF is large, crisp, and incredibly responsive, with no perceptible lag even at high frame rates. Exposure and colour previews are accurate enough that I’ve stopped chimping almost entirely—I can make confident exposure decisions without pulling my eye from the viewfinder.
The rear LCD is sharp and usable even in bright daylight. I especially appreciate the ability to zoom quickly for focus checking, something essential when reviewing sharpness on Arctic fox whiskers or avian feathers in the field. I admit though, with my vision not what it used to be close up (I am 51) I almost never use the LCD screen anymore and prefer the EVF.
Silent Shooting and Minimal Disturbance – For wildlife photography—especially with sensitive species—the ability to shoot silently and discreetly is priceless. The R1’s electronic shutter is truly silent, allowing me to photograph close-range birds and mammals without introducing sound that might alter their behaviour.
Battery Life and Power Management – Battery life is excellent (although not as good as the Nikon Z9). Using the LP-E19 battery, I routinely get 4000+ frames per charge, even in cold conditions. With power-saving settings enabled and the EVF auto-switching intelligently, I rarely have to change batteries during a full shooting session. I carry three batteries for redundancy, but rarely needed more than one and a half per day—even when shooting thousands of images in a 14-hour Arctic summer day.
Lenses and Native Support – The R1’s performance is complemented by Canon’s growing lineup of RF glass. The RF 400mm f2.8 has been a mainstay for my Grimsey Island bird photography, while the RF 600mm f/4 remains my go-to lens for polar bear and fox work. I always keep an RF 70-200 or 100-500 handy on a second body for those close encounters.
The IBIS (in-body image stabilization) combined with RF lens IS gives handheld stability that’s frankly absurd. I’ve made sharp images at 1/20th of a second with the 600mm handheld—something that would have been impossible just a few years ago.
Lens performance is consistent across the board, and the EOS R1 brings out the best in these optics. I’ve seen a noticeable improvement in AF speed and accuracy compared to using these same lenses on the R5 or R3.
Video Capabilities – While I am a stills photographer first, the R1’s video features have not gone unnoticed. I’ve used the R1 to capture atmospheric B-roll—snow swirling across fox tracks, slow-motion footage of terns hovering in a gale—which has integrated beautifully into my expedition film work.
Durability and Trust – Ultimately, the most important quality in a camera for me is trust. I need to know that it will work in blowing snow, freezing wind, salt spray, and rough handling. The EOS R1 has proven itself beyond doubt. During one Svalbard expedition, I shot for more than six hours in -30°C with intermittent snow squalls and howling wind. The camera remained responsive, the battery held strong, and the sensor never failed to deliver. Another day, I took a spill on sea ice with the R1 slung at my side. It came away with a cosmetic scuff—and nothing more. That kind of reliability builds confidence. And confidence allows creativity.
What Could Be Improved – No camera is perfect. Here are a few areas where I think Canon could continue to evolve:
• Custom Mode Settings: More flexibility in assigning custom button layouts per mode would be helpful. Specifically, the ability to assign pre-capture to a multi-function button.
• Pricing: The R1 is a serious investment. While justified for professionals, it’s less accessible for serious enthusiasts.
•The Auto Focus algorithms need to do better with falling snow.
But these are quibbles, not deal-breakers. Canon has clearly built this camera with professionals in mind, and it shows.
Conclusion – After eight months of intense field use, I can say with complete confidence that the Canon EOS R1 is the most capable and reliable camera I’ve ever used. It is also the most complicated in terms of customising the set-up. Whilst not necessarily a bad thing (as it allows you to set up the camera to your personal preferences and shooting style), it does mean a step learning curve.
Arctic Fox 2020
The camera allows me to focus on my craft rather than my gear. It adapts to the unpredictable rhythm of wildlife. It empowers me to create in silence and solitude. It endures what I endure—and then some. Whether lying prone on frozen tundra waiting for a fox to approach, hanging off a cliff edge as puffins rocket past in golden light, or tracking a walrus bull charging through ice-laden surf, the R1 has delivered—frame after frame, moment after moment. It doesn’t get in the way. It just works. And when you’re working on the edge of the world, that’s everything.
Canon Australia has this afternoon reposted the new firmware update for the Canon EOS R1.
This firmware (Version 1.1.2) includes fixes for the following issues identified in Version 1.1.0: 1. Fixes an issue where video could not be recorded correctly when using a memory card larger than 2TB with the [Pre-recording] setting enabled. 2. Fixes an issue where the camera failed to operate properly after updating to Firmware Version 1.1.0 if the still photo shooting/movie recording switch function was set to [Silent shutter function switching] or [Disable].
This firmware also incorporates the following changes introduced in Firmware Version 1.1.0: 1. Improves security features. A password must be set initially. •Adds the ability to review the history of any changes made to the password, network information, or other settings. *For more information, please refer to the ‘Setting a Password’ section in the Advanced User Guide on cam.start.canon. 2. Enables firmware updates to be performed when the camera is connected to the internet and new firmware is made available on Canon servers. 3. Adds [Viewfinder Priority] mode, which activates the viewfinder when a user is detected by the rear sensor. 4. Adds the ability to automatically detect Flicker at 100 or 120 Hz during Live View display. 5. Adds the ability to register focus position as a presets on the CR-A100 Camera Remote Application. This ability makes it easier to focus on subjects at the intended distance when the application is used with Robotic Camera System CR-S700R. 6. Adds the ability to select [Panning Assist]. When users pan with compatible lenses, image stabilization and subject blur correction are applied during exposure. 7. Adds the ability to select [Case Special] to expand Servo AF characteristics which is effective for subjects located behind a net in sporting events, such as badminton or volleyball. 8. Adds support for the Software Development Assistance Kit (EDSDK/CCAPI). 9. Adds a function that simultaneously protects images when they are rated. 10. Adds the ability to use up to 8TB of CFexpress cards. Note – Cards larger than 8TB require low-level formatting by the camera. – Cards larger than 8TB are treated as 8TB cards. – Cards larger than 2TB cannot be used for firmware updating. 11. Adds to lower the image capture frame rate to help prevent overheating when connected to CR-A100 in extended remote shooting. 12. When transferring images with voice memos via FTP, the transfer order priority has now changed with voice memo (Wav) file being sent first followed by image file. If a voice memo is added to an image queued for transfer, the image and voice memo are now sent last. 13. Adds the ability to set the number of shots captured in pre-continuous shooting mode. 14. Adds the ability to set [Airplane mode] to shooting button customization. 15. Adds the ability to enable [Exposure Simulation] when a flash unit is attached. 16. Improved AF tracking during video capture for subjects that are difficult to focus on. 17. Fixes an issue in which Err70 may occur when enlarging an image after shooting with [Blackout-Free Display] set to “On” and [Servo 1st image priority/One-Shot AF release priority] set to “Release priority”. 18. Fixes an issue in which Err70 may occur during Bluetooth communication due to interference from other Bluetooth devices. 19. Fixes an issue in which Err70 may occur when repeatedly shooting in the “High-speed continuous shooting +” mode. 20. Fixes an issue in which Err70 may occur immediately after startup when shooting with the electronic shutter. 21. Fixes an issue in which Err70 may occur during video recording in “FHD239.8P/200.0P”. 22. Fixes an issue in which Error 70 may occur while filming in video mode with frame rate set to “50.00P” and [Movie Digital IS] set to “On” or “Enhanced”. 23. Fixes an issue in which Err70 may occur during shooting when both [Pre-recording] and [Auto send] to image.canon are set to “Enable”. 24. Fixes an issue in which the camera may stop functioning properly when [Image Review] is set to “Off” and the monitor entered low brightness mode after pre-continuous shooting. 25. Fixes an issue in which video recording may not be possible when using Remote Live View shooting in EOS Utility while outputting via HDMI. 26. Fixes an issue in which large RAW image files may not be transferred via Camera Connect. 27. Fixes an issue in which the camera may not connect to Wi-Fi 7-compatible routers.
If you are considering updating to the latest firmware, I recommend waiting at least two weeks in case any further issues are detected. Unless you have an urgent need for password protection, its always prudent to wait a bit on firmware updates.