Many wildlife photographers of are likely already aware of the increasingly absurd regulations being imposed on all visitors to Svalbard, particularly surrounding the ‘so-called’ protection of polar bears. One of the most contentious of these mandates is the requirement to maintain a minimum distance of 500 meters from a polar bear—no matter the circumstance. That includes viewing from the safety of an expedition vessel and even when a bear voluntarily approaches. Photographers, wildlife enthusiasts, and nature lovers are being pushed further and further away, forced to retreat at the exact moment nature becomes intimate and magical. These new regulations are not designed to protect Polar Bears – they are designed to stop Polar Bear watching in Svalbard.

The new law (Legislative Decree 65 2023–2024), passed in mid-2024, reads:
It is prohibited to unnecessarily disturb, lure, or pursue polar bears.No one may travel or stay closer than 300 meters to a polar bear. From March 1 to June 30, no one may travel or stay closer than 500 meters to a polar bear. Anyone who spots a polar bear closer than the distance limit must move away so that the legal distance is maintained.
Yet on the 20th of April this year, 2025, I witnessed something that throws the entire justification for these restrictions into serious question. I documented an utterly disgraceful scene involving so-called “researchers / scientists” from the Norwegian Polar Institute, who, under the banner of science, mercilessly harassed and stressed a wild polar bear with their helicopter. This wasn’t a misunderstanding or a necessary intervention. This was a prolonged, high-speed chase that left a majestic animal panicked, exhausted, stressed and visibly terrified.

We had been observing this particular bear from a respectful distance aboard our expedition vessel—more than 3 kilometres away—as it rested peacefully on the ice and slowly ambled across the frozen landscape. It was calm, undisturbed, and behaving entirely naturally. We observed the bear for more than four hours, keeping our distance and respecting the environment and the bear. Then came the helicopter.
Flying in at a low altitude and high speed, the chopper panicked the bear almost immediately. It leapt up and began running at full speed, clearly terrified by the sudden roar and presence of the aircraft. What followed was not a quick dart-and-release operation. Instead, the helicopter pursued the bear relentlessly for more than thirty minutes, sweeping down to within mere metres of the fleeing and now highly stressed animal. This was not research—it was a chase. And it was heartbreaking to witness.
Eventually, after the bear was clearly exhausted and had no energy left to continue running, it was darted. Imagine that: terrorising an animal into a state of total exhaustion and stress before sedating it. All in the name of science.
Let’s be crystal clear here: this was harassment, pure and simple. No matter how it’s packaged, this kind of treatment of a wild animal is not only unethical, it is completely out of alignment with the strict rules imposed on everyone else in Svalbard. If a group of photographers or tourists had behaved this way—approaching a bear at such a close range, causing it to flee in fear, disturbing its natural behavior—we’d be vilified. Fined. Possibly even banned. And yet when it’s a helicopter marked with the insignia of a research organization, this behavior is suddenly justifiable?

I want to be clear at this point. I am not against the science of Polar Bears. I am against the invasive and highly stressful nature in which this science is currently being carried out by the Norwegian Polar Institute. They, and the governor of Svalbard are responsible.
We cannot stand by and allow this kind of hypocrisy to go unchecked. The rules in Svalbard must be applied consistently, regardless of whether the person breaking them wears a lab coat or carries a camera. If it’s unacceptable for an expedition ship to remain stationary while a curious bear approaches, how can it possibly be acceptable to chase that same bear with a helicopter until it collapses from fear, stress and exhaustion?
This is not an isolated incident. Reports from others who have spent time in the Arctic tell similar stories of “research” being used as a shield for disturbing and unnecessary interference with wildlife. It is high time we start questioning who is truly disturbing the natural order in Svalbard.
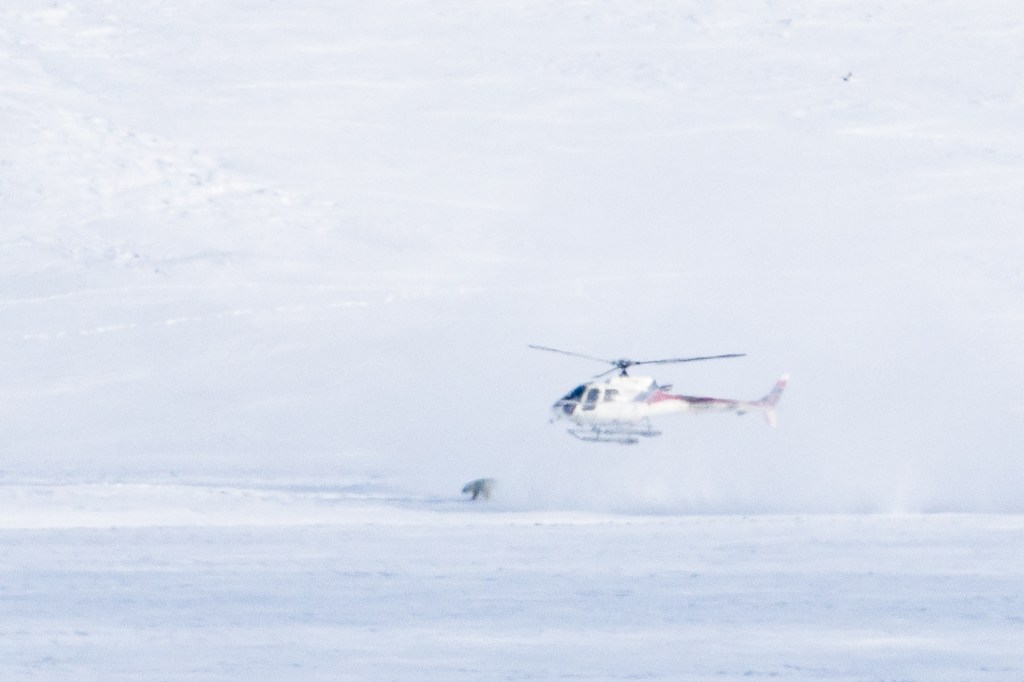
I’ve included above a photograph—a zoomed-in crop from a 600mm lens—that captures the moment this bear, utterly drained and frightened, tried to escape the mechanical predator circling above. It’s not easy to look at, but it is vital that this image be seen. I urge you to share it widely. Send it to the Governor of Svalbard. Send it to the Norwegian Environmental Agency and Norwegian Polar institute. Send it to every institution responsible for wildlife regulation and oversight in the Arctic – This needs to stop.
The polar bear is not just a symbol of the Arctic—it is an apex species already under tremendous pressure from a rapidly warming world. The very least we can do is treat it with the respect and dignity it deserves. And that means holding everyone—scientists, tourists, guides, and yes, photographers—to the same standard of ethical behavior.
The world is watching. Let’s make sure Svalbard does better.
Addendum: Through a mutual friend, Morten Jørgensen (author or Polar Bears on the Edge), Nikita Ovsyanikov, (Dr. of Bio. Sci., Polar bear specialist), has reached out with the following statement.
“This is a very powerful message in this record of the violence against the bear done by polar bear scientists in Svalbard. And this evidence should be published widely in all possible media, in all possible ways. Science is doing its cynical business, jeopardizing polar bears in this way to “answer the question of how global warming is affecting polar bears “. These scientists are driving polar bears to extinction. What they are doing is an ecological crime, nothing else!
Considering the legal aspects of this event, and of this invasive methodology in general, the following qualification should be applied:
Due to its de facto impact on animals, this application of such an invasive methodology, should be interpreted as a violation of the law. There are laws intended to protect animals from cruelty, and this is intentional cruel treatment of an animal. There are laws protecting endangered animals, and this intentional treatment has a strong negative impact on and endangered and protected animal.
This harassment of animals and violation of humanitarian and conservation principles must be stopped. Protection of animals from cruelty and protection of endangered species from negative impacts that reduce their survival capacity (evidence is numerous, but continuously denied by the scientists more interested in continuing their business) should be made real and effective.”
Nikita Ovsyanikov, Dr. of Bio. Sci., Polar bear specialist, Ethologist and conservationist.
Dr. Nikita Ovsyanikov is widely regarded as the most experienced Polar Bear scientist in the world with decades of experience.
How can you help? Please sign the petition HERE.
This article was also published by Peta Pixel and has been sent to the authorities and Governor of Svalbard. To date, no response has been received.