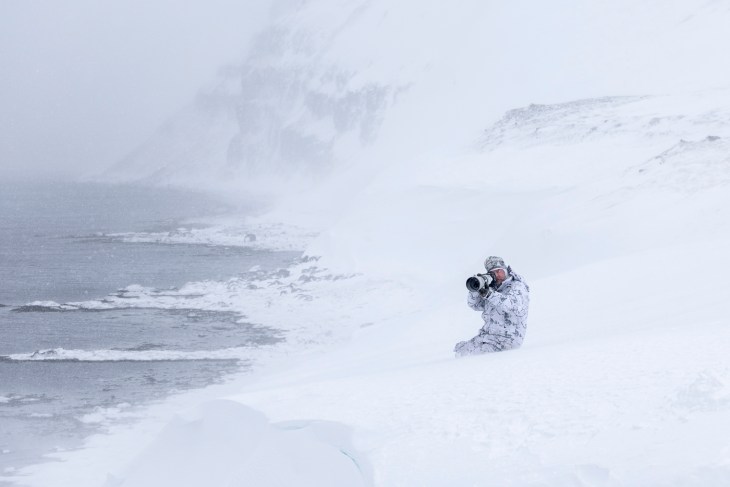
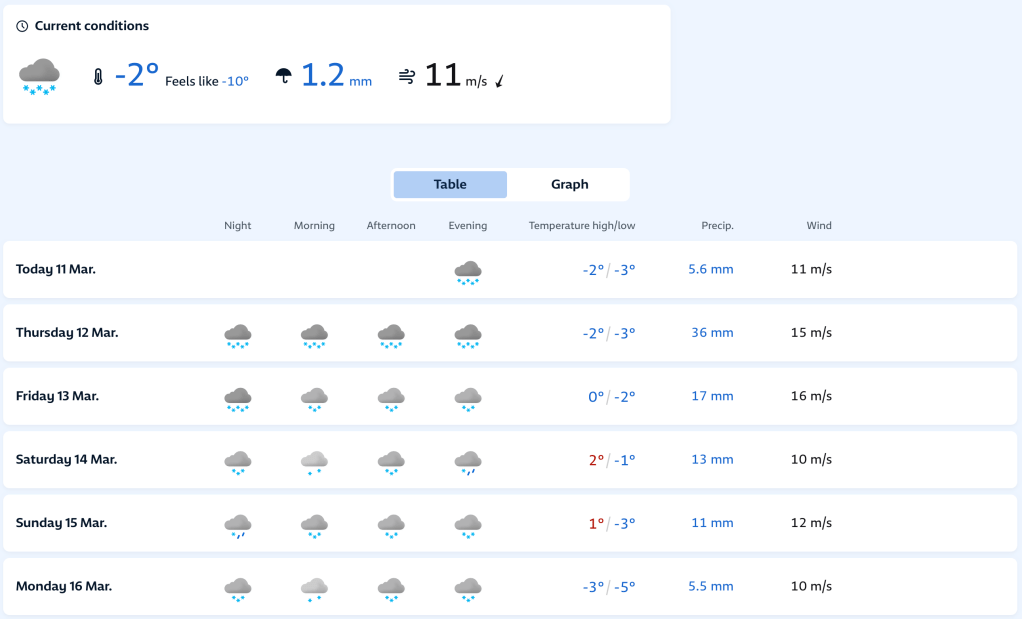
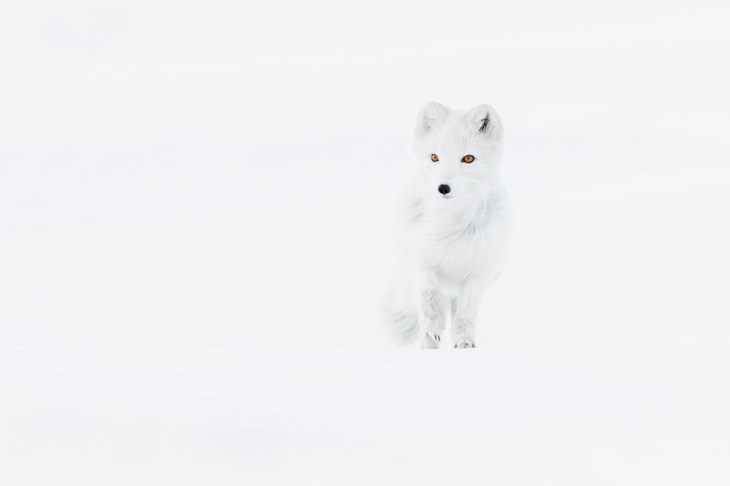
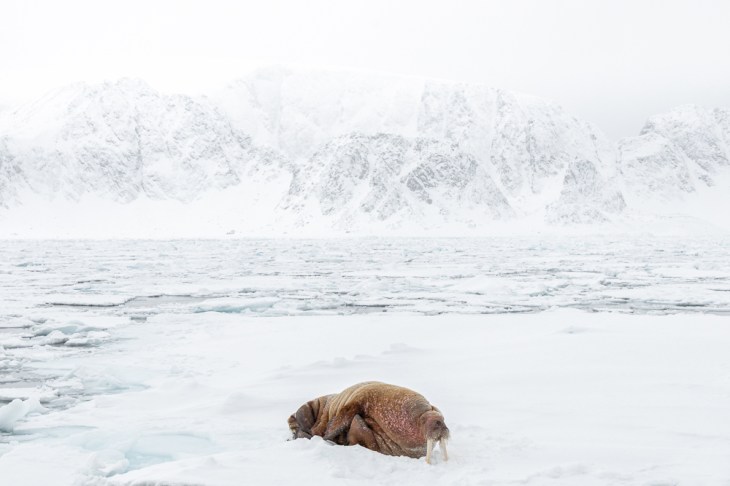
In March of 2026, I ran my annual Winter workshop to Kviar in the Hornstrandir Nature Reserve in far northwestern Iceland to find and photograph Arctic foxes. This is a workshop I pioneered and have been running for more than ten years now. This year, our workshop was scheduled to run from the 7th of March until the 12th of March. However, the weather in early March this year in Iceland was erratic and wildly variable, and we ended up being delayed a day in Isafjord due to strong winds that made the boat crossing and landing at the beach at the cabin impossible. This one-day delay did not dampen our spirits, and early the following morning, we were safely on our way to our cabin in the Nature Reserve. As it turned out, the one-day delay would really pay off in terms of the conditions we would have for the duration of the trip.
With strong winds creating a large shore break that made landing at the cabin difficult, we decided to land a little down the coast at a small sheltered spit area, which necessitated a roughly 1km hike to our cabin. Thankfully, we were able to land our luggage at the cabin so it was only ourselves and camera gear that we had to carry. This is only the 2nd time in over a decade of travelling to this location that I have been unable to land directly at the cabin. The strong winds the day before had whipped the ocean waves up, and the breakers on the beach meant it was unsafe to land a zodiac with people. On arrival at the cabin, the foxes that live in the area were already curious and could be seen and photographed close to the house.
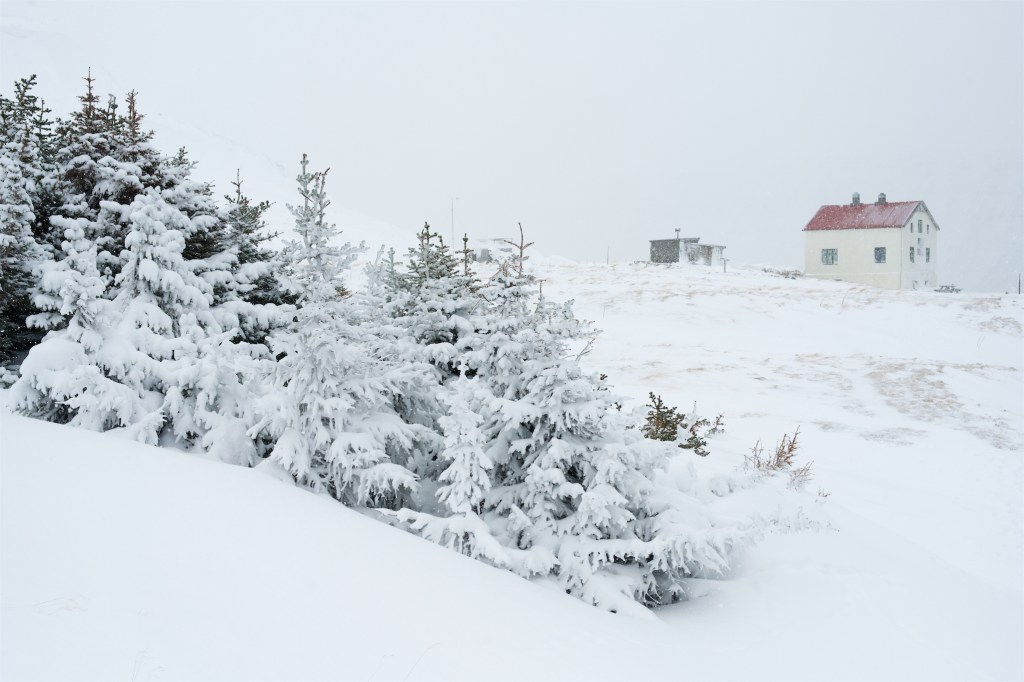
Our workshop accommodation was a cozy but rugged haven where we enjoyed a great atmosphere after a day out in the cold, photographing Arctic Foxes. The house was originally built in 1921. In 1948 (just 27 years later), the last inhabitants left this isolated arctic peninsula for a better life. The cabin was abandoned for many years and has recently been restored. Although no one lives here permanently, the cabin was a great getaway and the perfect place to accommodate us whilst we searched for and photographed wild Arctic Foxes. Curious Arctic Foxes frequently stopped past the cabin to investigate. We often photographed them from right outside the cabin.
Thank you to Jerry Weimar, who participated in this year’s trip, for the landscape photograph above. The cabin includes a bathroom, toilet, and hot shower. Bunk-bed accommodation with duvets provided, a full kitchen (chef to prepare meals and clean), and Hydronic and log-fire heating. There is power for laptop battery charging (generator provided) and an outdoor sauna.
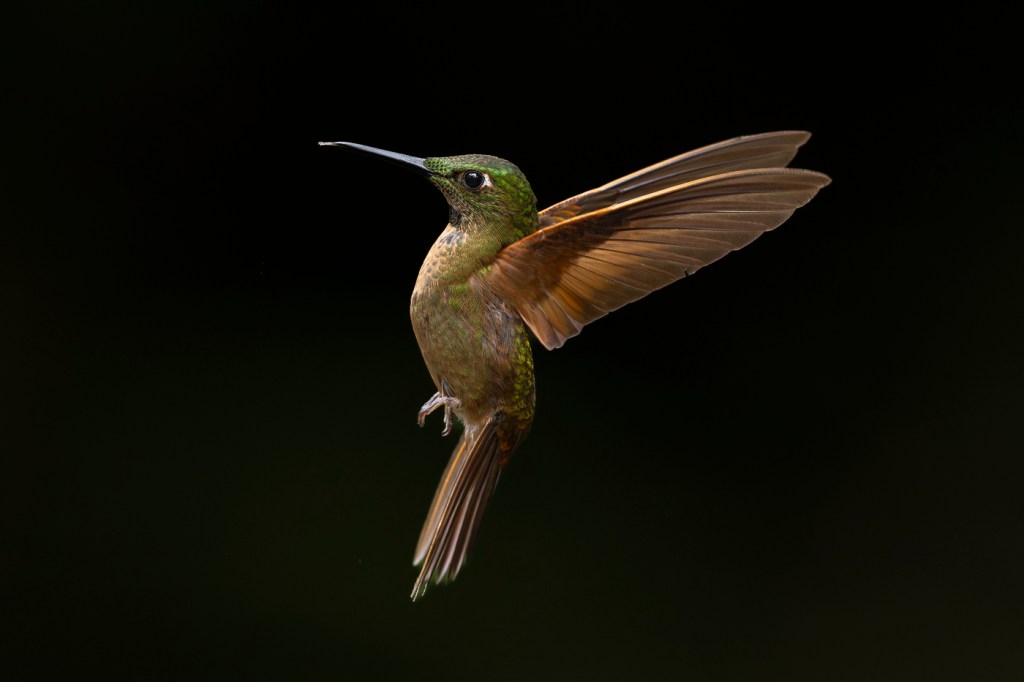
Over the course of the workshop, we photographed four different blue-morph foxes, including three first-year cubs that I had photographed last year, a few days after they came out of the den (Read the Trip Report). This was one of the few opportunities I have had over the years to photograph multiple foxes together, and although the fight looks serious, it’s mostly play between siblings and no harm, no foul.
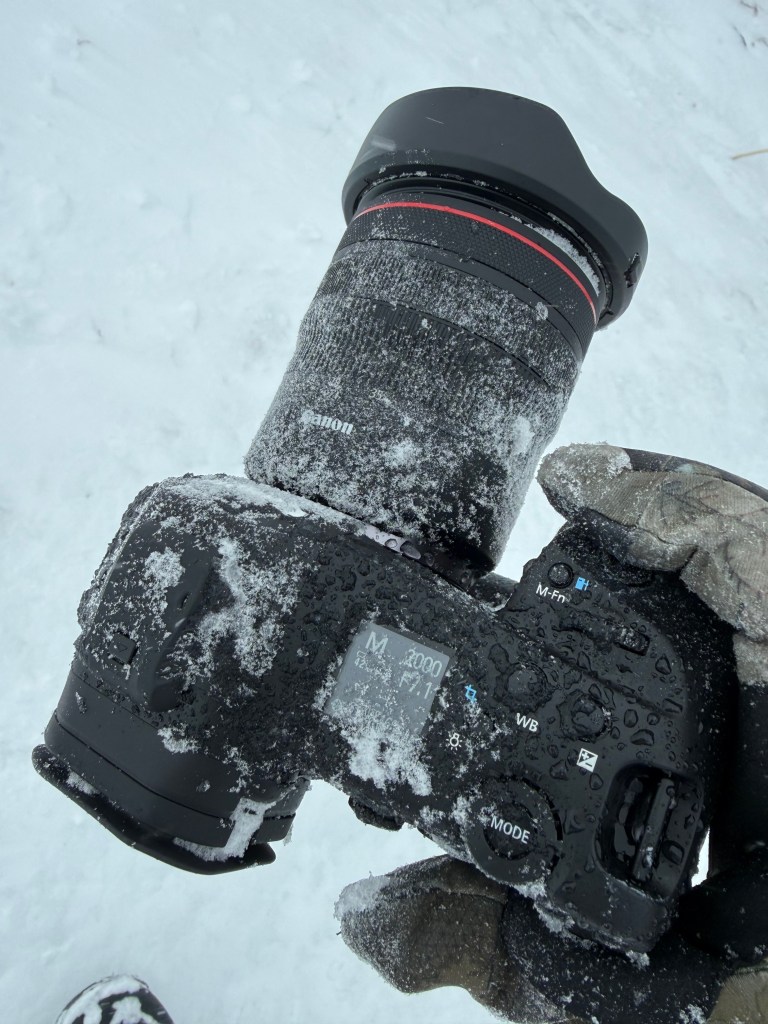
The weather on our second trip also continued its wild variation. We began with good snow cover on our first day, which melted during warm-front rain in the evening, only to be replaced the following day with non-stop snow that continued right up until our departure. This non-stop snow made for absolutely superb, albeit challenging conditions to photograph the Arctic Foxes.
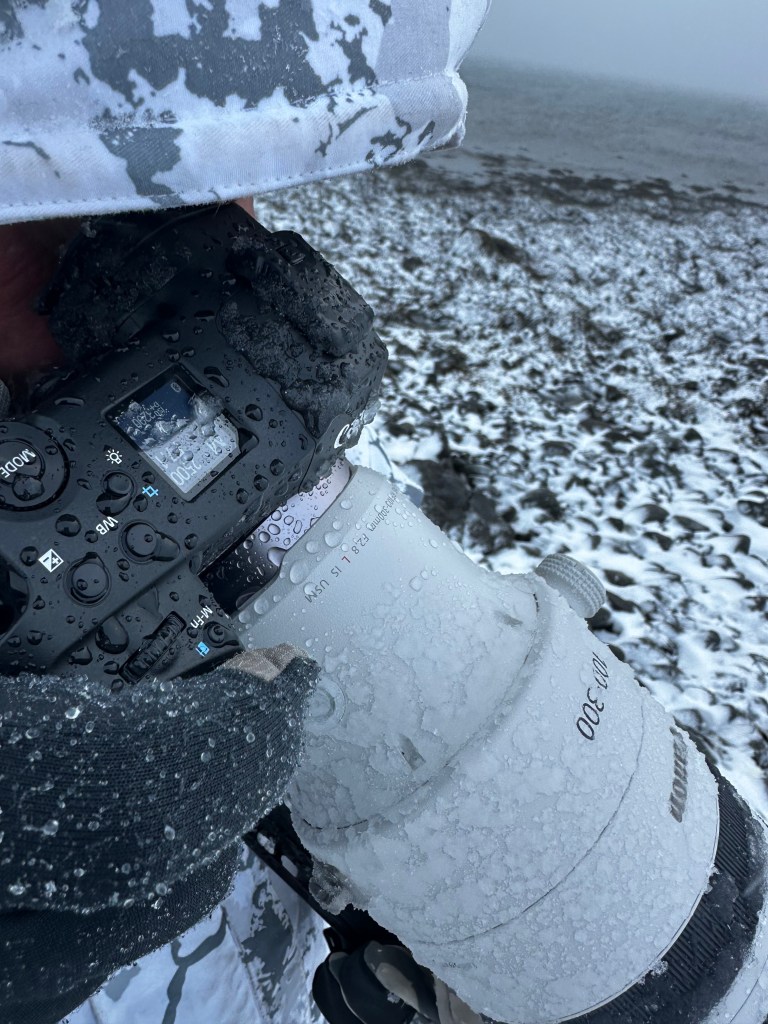
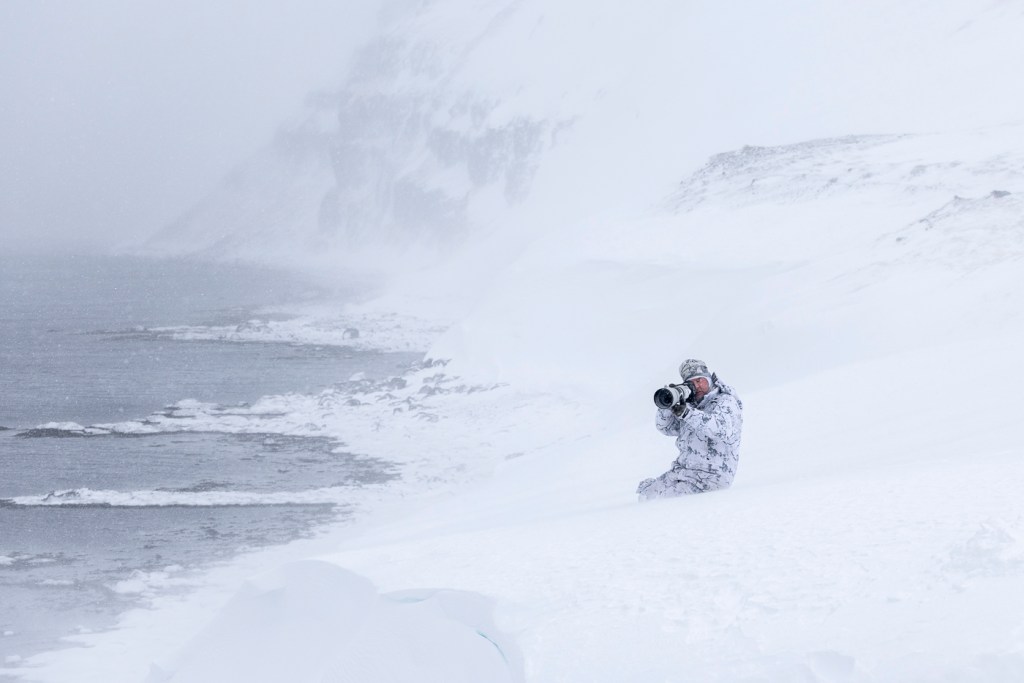
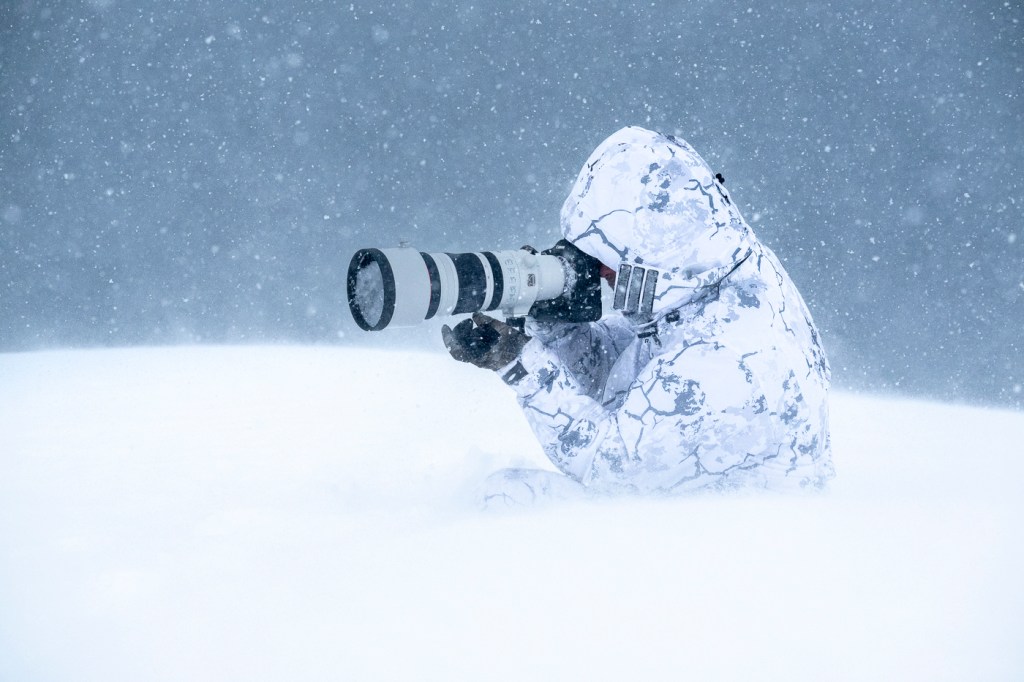
Days three and four, we had continual, intensified snowfall and strong winds, making for incredibly dramatic photography. These are my absolute favourite conditions in which to photograph wildlife in this part of Iceland. The flying snow can make photography a little more difficult, but the results are absolutely worth the effort, and everyone made incredible photographs over the course of the trip.
On our scheduled day of departure, Iceland threw another of its winter weather curveballs at us, stranding us an extra day out at our cabin. This turned out to be a blessing, making up for our lost day at the beginning and providing us with more wonderful photographs in the dramatic winter snow conditions. Although it would have been possible to land at the beach on our scheduled departure day, the wind in the channel would have made the crossing impossible.
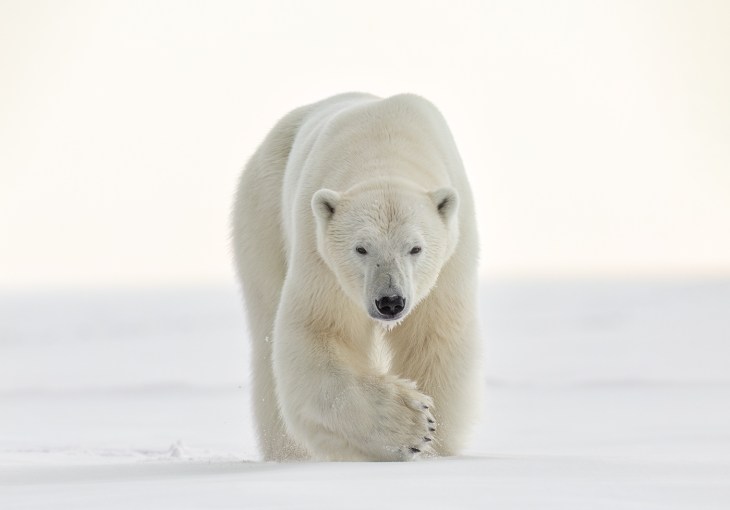
The Hornstrandir Nature reserve continues to serve up both an incredible experience and a continual opportunity to create powerful, evocative photographs of the Arctic fox. In my many years as a specialist polar photographer, I have yet to find or encounter a location that offers more reliable and better encounters in a winter setting.
We are returning again in February next year, 2027, to photograph these amazing Arctic survivors and will take a small group of just five photographers with us. To reach this unique location, you will first fly to Keflavik International Airport in Iceland, followed by an internal flight to Isafjordur, the official starting point of the workshop. From here, we will take a privately chartered boat to Hornstrandir. This trip also offers a unique perspective of the dramatic coastline, characterised by towering cliffs, deep fjords, and pristine natural beauty. If you would like to join us, please get in touch as places are extremely limited. Reserve your spot on this expedition and return with a portfolio of extraordinary images that few have had the privilege of capturing.
Introduction: There is no such thing as the perfect cold-weather boot for photography, as much depends on your needs and the prevailing temperature and conditions you are working in. Likewise, there is no perfect camera bag and no perfect cold-weather gloves. Such things simply do not exist, as different temperatures, shoots, and conditions (and personal tolerances) necessitate different boots, bags, and gloves for optimal performance and comfort. This article (the first of several – Gloves and Bags to come) includes the boots I have found that offer the best performance for a given temperature and condition range based on my experience shooting and working in cold weather climates over the last 25+ years. There are many more boots I have tried over the years that I have ultimately been dissatisfied with. The following represents the best I have tried in cold environments, where I photograph most of the time. You can also listen to Podcast 144, which has a deep dive on this topic.
Transparency: For the sake of transparency, you will not find affiliate links here. The internet is awash with websites that tell you, ‘we have reviewed X products, and these are the best‘. Such websites and reviews are nothing more than thinly veiled attempts to advertise products and make money through affiliate links. I have no interest in selling boots, bags, or gloves under the table to make extra money. What you will find here are my straightforward recommendations based on my experience – nothing more.
How We Experience Cold: It is important to note that we all experience cold differently. For me personally, my feet are the most important part of my body to keep warm. When I get cold feet, my entire body gets cold, and that’s a very uncomfortable experience. Your tolerance for the cold may very well be different to mine, and you should keep that in mind when making any buying decision. Another important point is that Nature photographers (I include landscape and wildlife in that genre) are typically not all that active in the field. We may hike to a location that requires some degree of activewear, but we often spend a long time waiting outdoors for wildlife or the right light. Thus, the choice of footwear is critical to our comfort level in the field. Many products from active-wear companies are simply inappropriate, in my experience, for cold-weather photography because they do not account for the significant time photographers spend inactive and just sitting or standing around in the field.
Battery Heaters: All of the boots below can, of course, be paired with battery-heated socks or insoles to extend their temperature range. Personally, I find battery-heated socks and insoles a real nuisance. The batteries rarely last a full day of fieldwork and require daily charging (I have tried a few different brands over the years). Battery-heated socks and insoles that are ‘app-controlled’ or ‘remote-controlled’ are even more of a nuisance in the field. Have you ever tried to get your phone out of your jacket in -25ºC during a blizzard, remove your gloves, open an app and to try to turn up your socks or insoles? Clearly, the designers of these products have not. Likewise, reviews that espouse the virtues of heated socks and insoles rarely actually review them in any sort of real-world situation where you are likely to actually want or need them. Wearing them around the house to review them like most YouTube reviews? A total joke. At this point, I feel I just don’t need or want anything else in my life that requires daily charging or requires me to open an app to make an adjustment. Chemical toe warmers are a far easier (and cheaper) option if you want to extend the temperature range of any of these boots. You can purchase either a full chemical sole warmer or just a toe warmer and they reliably last 8-10 hours provided they have not passed their used by date.
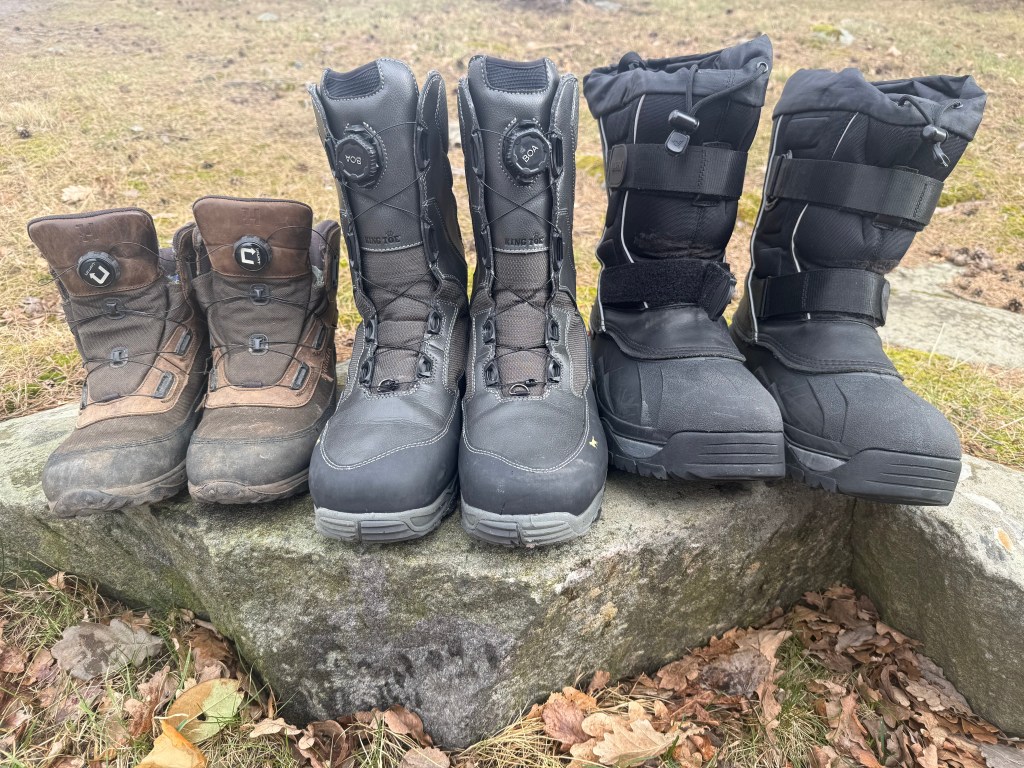
My Cold Weather Experience: Over the last 25+ years, I have tried nearly as many boots for cold-weather photography as I have gloves and camera bags. It has been a never-ending search for the right product that fits the genre of Polar photography I love so dearly. With more than 100 expeditions to the Arctic and Antarctic under my belt, these are my top four boots, based on my own experience with cold-weather photography.
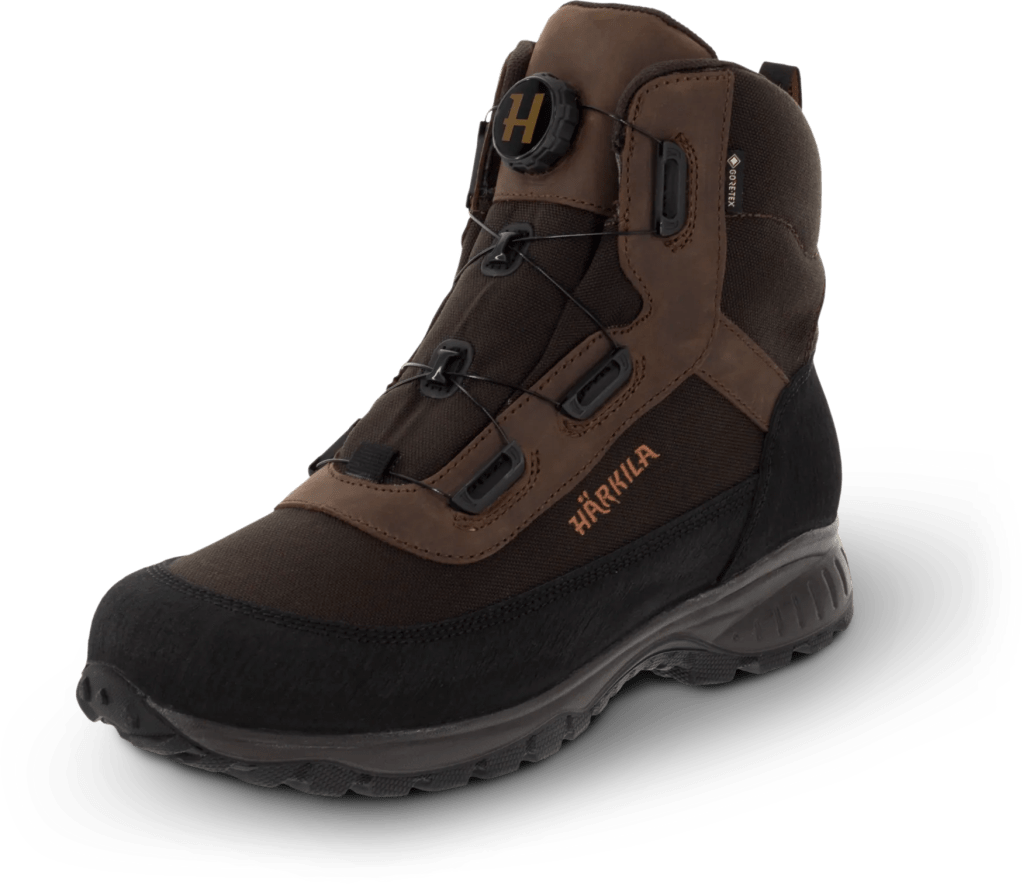
Most hiking boots on the market today fall into this temperature category. It is therefore the most contested for ‘best boot’ and the category in which most people will buy boots. After years of trying different boots from many manufacturers, I have found that the Härkila ATAAMIK GTX boots are my go-to hiking boots for any sort of photography where temperatures may vary from +20º Celsius to 0º Celsius. I use them daily in Sweden when I am walking through the forest, and I have probably walked and hiked more than 500km in my current pair, and they are still going strong. They are dam near indestructible, extremely comfortable and pretty much waterproof. I have walked through ankle-deep water with them on many occasions, and my socks and feet have never gotten wet. They also offer excellent ankle support. My feet feel warm and protected inside these boots down to temperatures at or just below 0º Celsius. They have a super easy twist wire-lacing system, which means they are quick and easy to put on and take off. I have used these boots in Iceland, Mongolia, Sweden, Africa, Australia, Chile, Argentina and Finland and have no hesitation in recommending them to anyone looking for a warm hiking boot for photography.
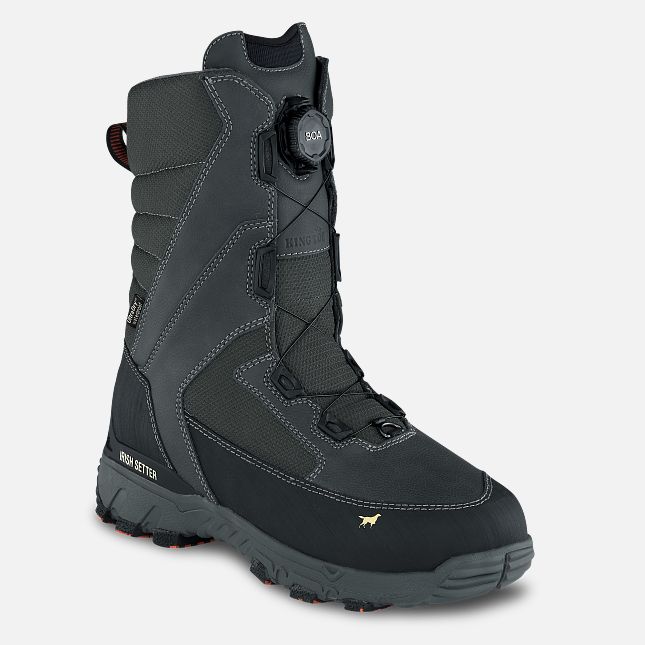
When temperatures drop below 0º Celsius, the Irish Setter IceTrek are my boot of choice. These boots are incredibly warm and durable, offering outstanding ankle support and an uncanny ability to keep snow out when the going gets deep. They are a taller boot than the Härkilas that comes well up the leg, which helps keep out water and snow. I like to wear my base wool-layer pants with wool socks tucked into my boots, then my outer layers on top. Like the Härkilas, these boots use a wire-lace system, so they are extremely quick to take on and off. The boots are marketed and sold as waterproof and, in my experience to date, are exactly that. I have used these boots getting on and off zodiacs in Iceland in Winter and never got wet socks or feet. I have also used these boots in temperatures as low as -38 °C in Winter in western Mongolia while hiking for Snow Leopards. In these extreme temperatures, I did get cold toes when standing around for long periods, so I recommend these boots for temperatures down to -25º Celsius. These boots are built with 1600 grams of Primaloft insulation, so they are suitable for temperatures much colder than the Härkilas. At -25º Celsius, I have no hesitation in recommending these boots for standing around in a non-active state, and if you are active, you can take them into even colder temperatures. I find my feet don’t sweat much in these boots, but I still remove the insoles at the end of the day as a precaution to dry out any residual moisture from sweating. I have used these boots in Winter in Iceland, Mongolia, Sweden, Svalbard, Greenland and Finland and have no hesitation in recommending them to anyone looking for a warm boot suitable for photography in temperatures down to -25º Celsius (and below if you are active). I like them so much, I will often pair them with chemical toe warmers for use below -25º Celsius.
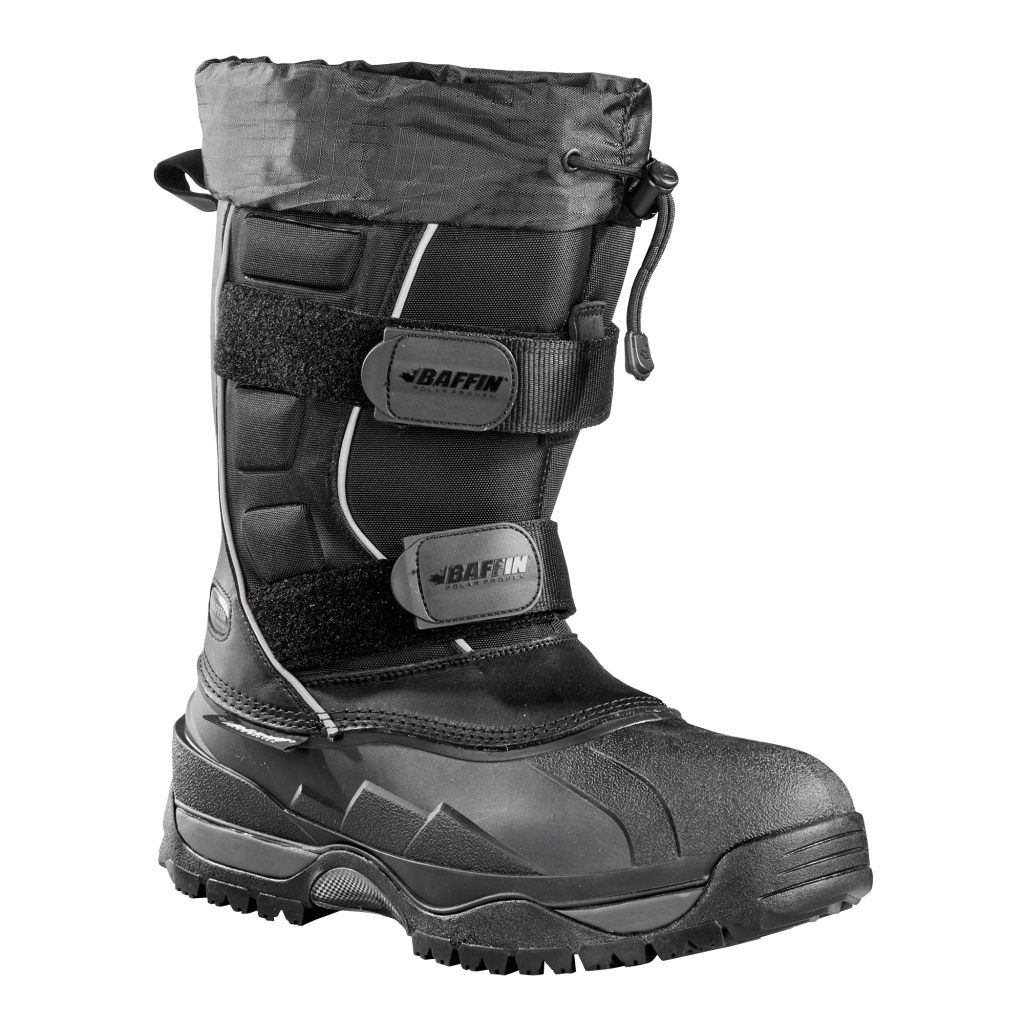
When temperatures really plummet, I reach for the Baffin Eiger boots. These boots are suitable for extreme cold, including temperatures below -25º Celsius, and I have personally used them in temperatures as low as -52º Celsius on Ellesmere Island in Winter. At temperatures above -25º Celsius, my feet just sweat in these boots to the point that I end up with wet socks, so I only reach for them when it gets really cold outside. I tend to sweat through my feet, so I always need to remove the inner liner at the end of every day and dry them thoroughly. Failure to do so always results in frozen toes the next day, as residual moisture freezes, ensuring a cold and uncomfortable experience. The Baffin Eiger boots are not waterproof (though the soles are) and are not suitable for getting on and off zodiacs. But then, in the sort of temperatures you are likely to be wearing these boots, you are unlikely to encounter running water. The marketing material on Baffin’s website says these boots are tested down to -60º C. Whilst I have never experienced a temperature this low, I can tell you that at -52º Celsius on Ellesmere Island in winter, I needed a chemical toe warmer inside these boots to keep my toes from getting cold. The Eigars are quick and easy to put on and take off thanks to the velcro straps, but they do not offer very good ankle support (especially compared to the Härkilas and Irish Setters). I have weak ankles and a tendency to roll them if I am not careful, so I always tread a little more cautiously in these boots than in the other two. They are also not as effective at keeping out snow in deep conditions as the Irish Setter IceTrek boots (despite the inbuilt snow gaiter), but they are warm. It can also be difficult to pull your outer-layer pants over the top of these boots because they are so wide at the opening. I have used these boots in Winter in Iceland, Mongolia, Greenland, Svalbard, Finland and Canada (Ellesmere Island in -52ºC) and have no hesitation in recommending them to anyone looking for a warm boot for photography in the most extreme cold weather.
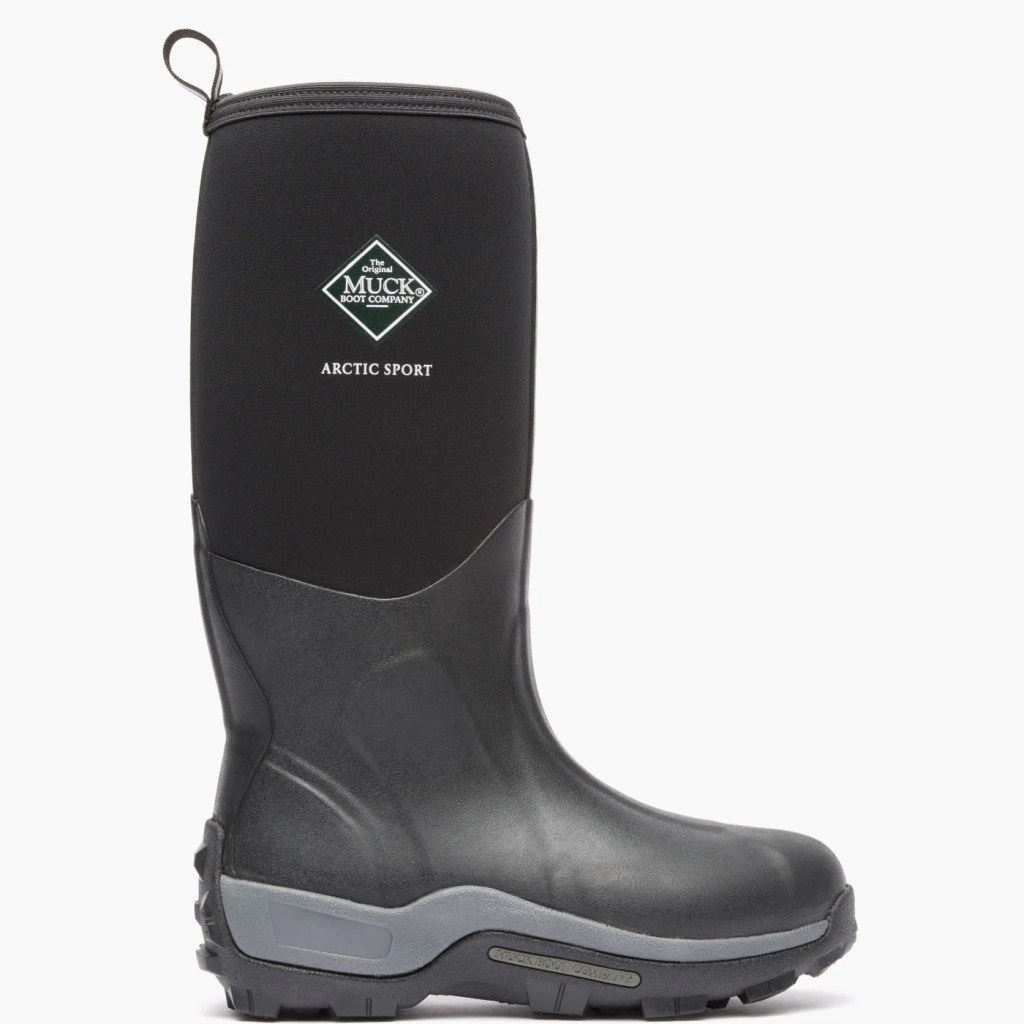
If I know I am going to be working in extremely wet weather, walking through a lot of water, or getting on and off zodiacs frequently, then my boot of choice is the Arctic Sport Muck Boot. These boots are waterproof right up to the very top and are warm in temperatures down to about -10º Celsius. Muck Boots do not specify a temperature range for these boots, but in my experience, they are warm above -10ºC. I do tend to sweat in them quite significantly, so I have to be careful to dry them at the end of the day. These boots are not as easy to take on and off as the others, but what you lose in time spent doing so, you gain in waterproofing. They offer reasonable ankle support (better than the Baffins, but not as good as the Härkilas or Irish Setters). They can be a bit tight around the calves, and if you have larger lower legs you may want to opt for the ‘wide version’. These are an ideal boot for a summer expedition to Antarctica, where temperatures will hover around 0º Celsius, but you will be stepping in and out of water a lot with shore landings. They are also ideal for photographers working in boggy, wet environments or in the Arctic in Summer, especially if you are working in and around water. The only shortcoming I have experienced is that they tend to develop leaks around the seals after heavy use and thus need replacing from time to time (I have been through about half a dozen pairs over the years). They are exceptionally easy to keep clean, however, requiring nothing more than a hosing off and little to no maintenance.
Boot Considerations: When assessing the suitability of a boot for my type of photography, I consider comfort and warmth for the intended purpose, ease of getting on and off, and long-term durability amongst the most important factors. The ability to withstand water (depending on the intended use) and to keep out snow also plays a major role in my decision-making. Lastly, manufacturer support also plays a role in addressing potential issues. I do not consider price when assessing the qualities of boots for cold-weather photography since it’s folly to try to save a few bucks at the expense of cold toes.
Conclusion: Ultimately, the choice of boot is a personal one based on your needs, preferences, and tolerances for the environment in which you work. There are many more boots on the market that I have not used or tested, and they may or may not deliver great results, depending on your personal needs. There are other boots I have tested that I feel fail to live up to their claims, so I won’t name, review or recommend them. The above are products I will stand behind as offering superb performance in their temperature range for cold-weather photography. If you are interested, I dive deeper into this topic and discuss each of these boots in more detail in Episode 144 of my Wild Nature Photography Podcast.
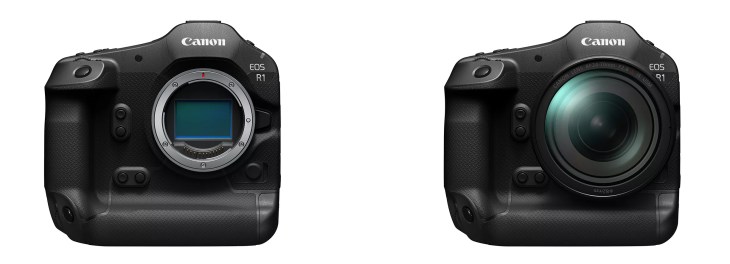
We are well into the first quarter of 2026, and to date I have been in Australia, Mongolia (for Pallas Cat and Snow Leopard), the UAE (United Arab Emirates for the incredible Xposure festival), Colombia (for Birds), and Iceland (for two Arctic Fox trips and a private landscape trip) and in a couple of weeks I will be in Svalbard, north of Norway for both a private Snow Scooter trip and a 10-day boat charter. That’s six countries in just three months, more than 60,000 RAW captures with my two Canon EOS R1s, and a lot of time in airports in transit around the world. And that got me thinking… With all the photography I have already done this year, what do I want to see next from Canon?
Pre-Capture: First and foremost, I want a firmware update to bind pre-capture to a single custom button on the EOSR1. I wrote extensively about this feature request recently HERE, so I won’t belabour the point further. I have subsequently written to Canon Australia and am hopeful we will see this feature via firmware soon. I feel somewhat blessed that we at least have RAW pre-capture, and are not limited to jpeg, as is currently the case with Nikon. As an aside, Sony already allows pre-capture binding (as does the Canon EOS R6 MK3).
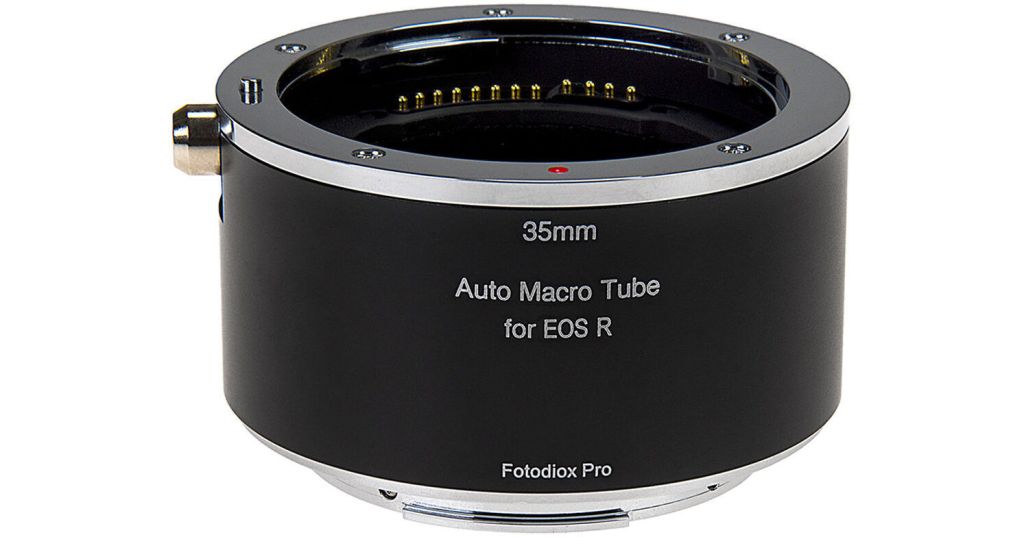
RF Extension Tubes: Currently, the RF lens lineup has some gaps that I would very much like to see Canon fill. These include an RF extension tube or a series of tubes. Canon used to make EF extension tubes, and these are extremely useful for closing the close focus distance on subjects in the field. I still own an EF extension tube, but unfortunately, these cannot be adapted to RF glass. There are a number of aftermarket options available, with mixed reviews, but nothing from Canon currently. Extension tubes are most commonly used for Macro work, but they are also a really useful tool for wildlife photographers who want to capture tight headshots of small subjects or small details.
Mega Pixels: 24 is enough for what I do and provides incredible high-ISO performance to boot in the EOS R1. I have no hesitation in shooting the EOS R1 at ISO 12,800 or even ISO 25,600. That said, I would gladly trade more pixels (anything over 24) for even better ISO performance, but I fear we are reaching the limit of physics at this point, and further improvements in ISO performance in the future are likely to be mostly computational. I know others want more pixels for cropping power – I am just not amongst them. If you need more than 24 megapixels, buy an EOS R5 MK2.
Canon Camera Connect App: I would like to see significant improvements in this App that make it more reliable and stable in connection and much faster to use in the field. Currently, connecting to the camera is too slow to be a viable method of camera control for wildlife (most of the time). The app also frustratingly drops its connection on occasion and can be problematic with reconnection. If the application were faster to connect and more reliable, it would turn any smartphone into a fantastic control screen for any Polecam or camera trap system.
Auto Focus: The autofocus in the EOS R1 is the best I have ever used and the camera tracks subjects better than all previous Canon cameras. Its ability to track and stay on the subject’s eye is phenomenal. However, it cannot ‘stay on target’ as well as the EOS 1DX MK2 or MK3 could in heavy snowfall, and has a nasty, annoying habit of grabbing snowflakes in front of the subject. Even tweaking the AF sensitivity settings in the AF menu cannot overcome this issue. This is an issue I have seen repeated on the Nikon Z9 and Sony A1 and A1 MK2 cameras. In general, the AF on these cameras is so ‘tweaked’ and sensitive that falling snow causes continual interference. On my previous 1DX MK3, I could not track the subject’s eye (the camera did not have eye tracking), but I could keep the focus points on the subject, and the camera would successfully ignore falling snow. This could be addressed in firmware with a ‘snow setting’. If we can have a special ‘net’ setting to avoid the net in soccer goals (for photographers shooting from behind the net), we can have a snowfall setting, please, Canon.
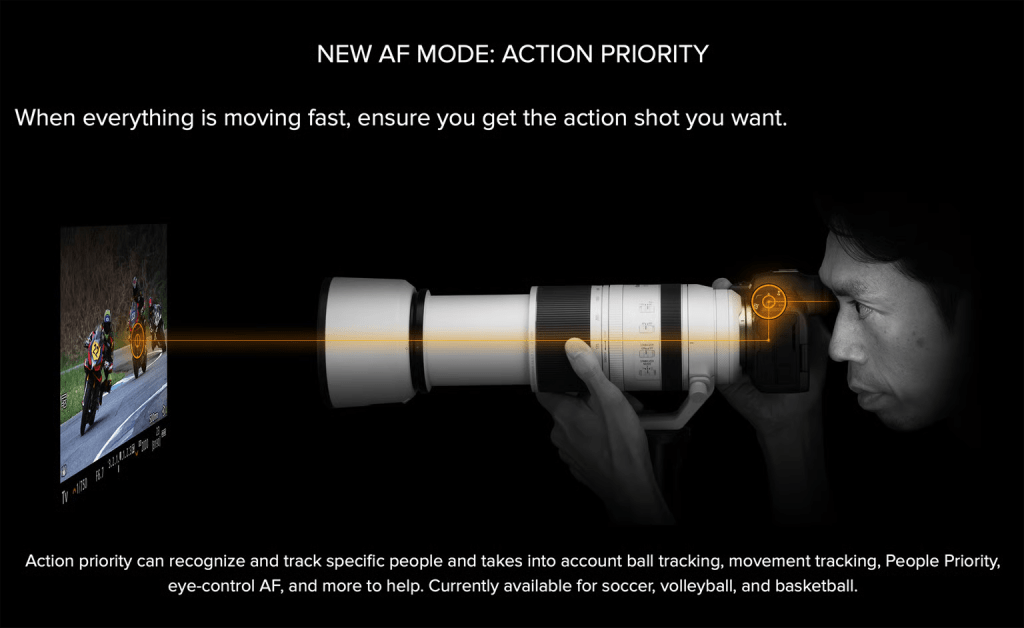
Action Priority: Canon has teased us with the initial offering of ‘Action Priority’ for select sports. Further down the line, special focus cases for different wildlife could be a real boon with this technology.
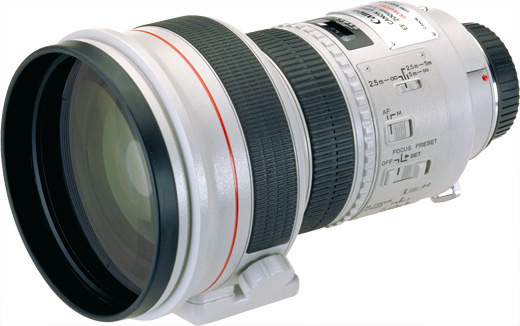
Telephoto Lenses: Over the years, Canon has made both f1.8 and f2.0 EF 200mm lenses. With the RF system, it should be possible (in theory) to make a 200mm lens even faster than f1.8 (or another at f1.8). Such a lens would be the background ‘obliterator’ and an awesome tool in the arsenal of any wildlife photographer whose subject distance can be controlled relatively easily. Penguins, for example, would be the ideal subject for such a lens. Portrait and Wedding photographers would also have strong arguement to employ such a lens. Lenses such as this are highly specialised, but offer creative options not otherwise available. Lenses such as this also tend to be showpieces of what is possible by a manufacturer, but do serve a real functional purpose for creatives.
Super Telephoto Lenses: The much-rumoured 300-600mm RF lens is certainly on my wish list and would complement Canon’s excellent RF 100-300mm F2.8L IS USM lens. I would also love an RF 600mm f4 with a built-in 1.4 or 1.7 teleconverter. The addition of a built-in teleconverter makes a huge difference in the field when you have a subject like a Polar Bear slowly approaching from a distance. Those few seconds saved by flicking in a built-in teleconverter vs having to unscrew the lens and screw in a converter can often mean the difference between getting the shot and missing the best moment. I would also appreciate an 800mm f6.3 DO lens that is small and lightweight for hiking (like Nikon offers), yet still offers incredible reach with a reasonably fast aperture. Such a lens would be fantastic for hard-to-reach targets, such as Snow Leopards or small birds.
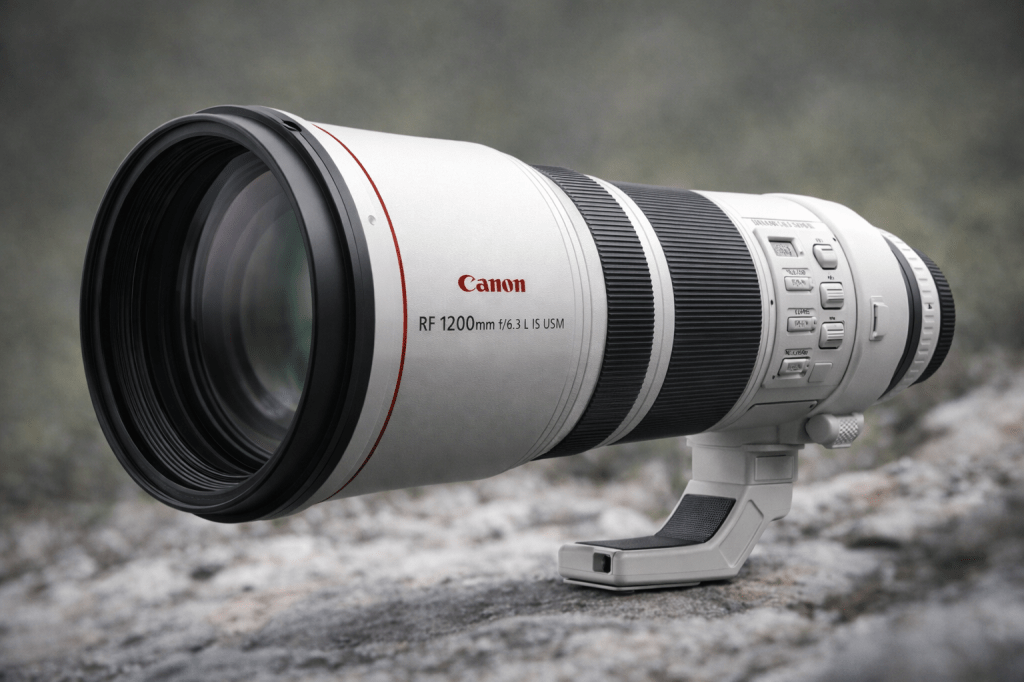
Ridiculous Super Telephoto Lenses: Ok, it’s a long shot Hail Mary, but an RF 1200mm f6.3 or f7.1 (Canon used to make an EF 1200mm f5.6) would be wonderful for bragging rights and really small birds. At this focal length, heat haze and air pollution are a real and present danger, so such a lens would be most useful for small birds and other similarly small critters. I can definitely see a use for this lens from the floating hide. The likelihood of such a lens is extremely low, as it would be very expensive to produce and very few would be sold. But Canon would sell at least one!
Tilt Shift Lenses: Canon has made really excellent EF TSE lenses over the years. The 17mm, 24mm, 50mm, and 90mm are all outstanding. I have owned the 17mm, 24mm and 90mm in recent times. All can be adapted to RF mount with the Canon adapter. RF versions have long been rumoured with talk of auto-focus capability. I am not sure I need an AF TSE lens, but I would really like a 20mm TSE in the RF mount. 20mm is my favourite focal length for wide-angle landscape work, and the addition of tilt and shift adds a lot of creative control.
It is still early in 2026 and Canon has not as yet made all its announcements for the year. With luck, we may see some of the above later this year. Let me know what you would like to see from Canon next?
By popular demand, we have decided to offer another Svalbard Spring Light expedition in April next year. The expedition will run from the 7th to the 15th of April, 2027 and include nine nights / ten days. Early April is one of the very best times to visit Svalbard. At this time of year, the sun is still low in the sky, and the landscape is bathed in golden light.
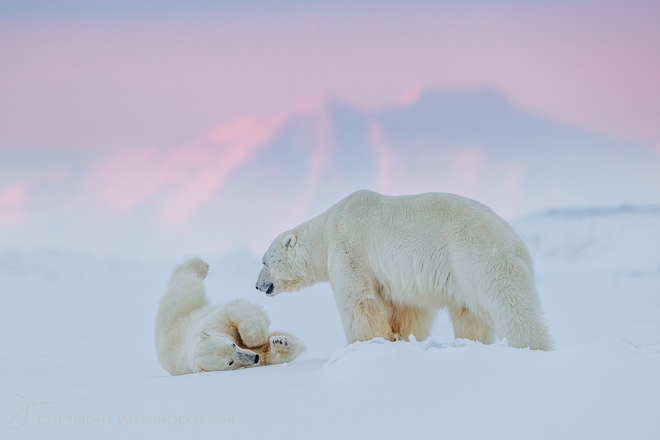
This early Spring expedition to the archipelago of Svalbard is for keen and passionate wildlife and landscape photographers who want to capture evocative and powerful photographs of Arctic wildlife (including Polar Bears, Arctic Fox, Reindeer, Walrus and more) and dramatic ice and snow-draped landscapes in golden light.
Svalbard is one of the best places in the world to photograph Arctic wildlife and landscapes, and at this time of the year, the sun will be extremely low in the sky, casting a golden glow across the landscape. We have a small group size and personal, one-on-one tuition for the duration of the workshop. There will also be many landscape opportunities during this workshop, although our primary focus is always on polar bears when possible.
The landscape in and around the Svalbard archipelago is stunning and primordial. Glacier-scarred mountains dominate the landscape and will be a significant subject for our cameras during the expedition. The landscape opportunities are, therefore, as varied and important as the wildlife encounters.
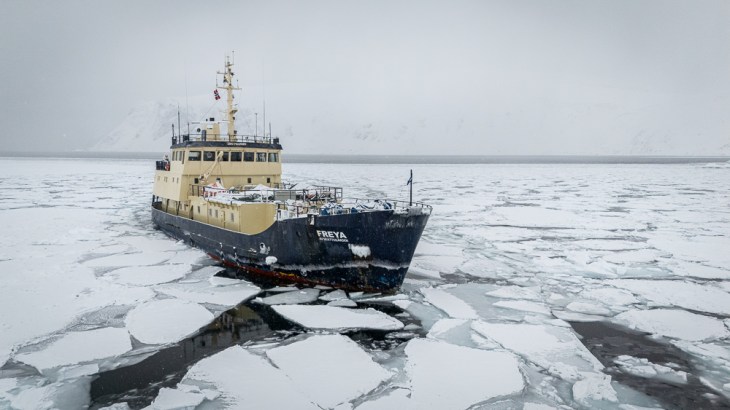
We will use the ice-hardened expedition ship M.S Freya, enabling us to navigate deep into the pack ice, searching for and photographing Polar Bears, landscapes and other wildlife. M.S Feya is regarded as one of the best ships in the Arctic for Photography. Our expedition ship is also equipped with sufficient zodiacs (2 x Zodiac MKV models) and crew for all photographers to be shooting simultaneously, with plenty of room to spare for camera equipment – So bring what you need!
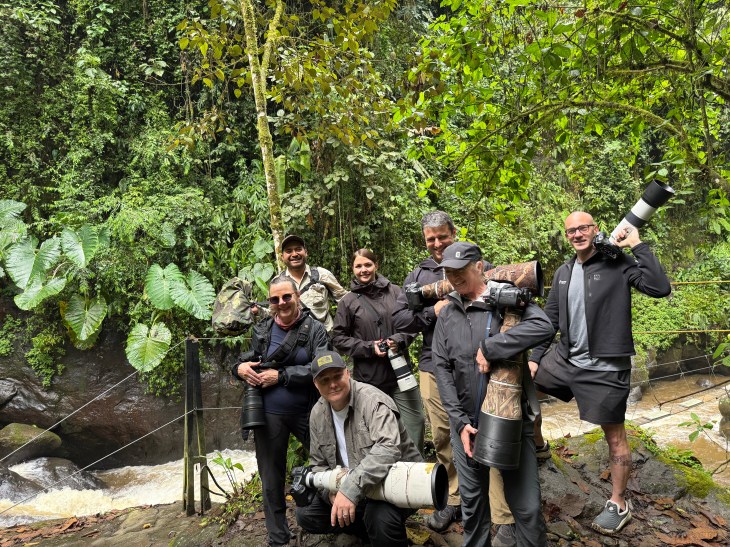
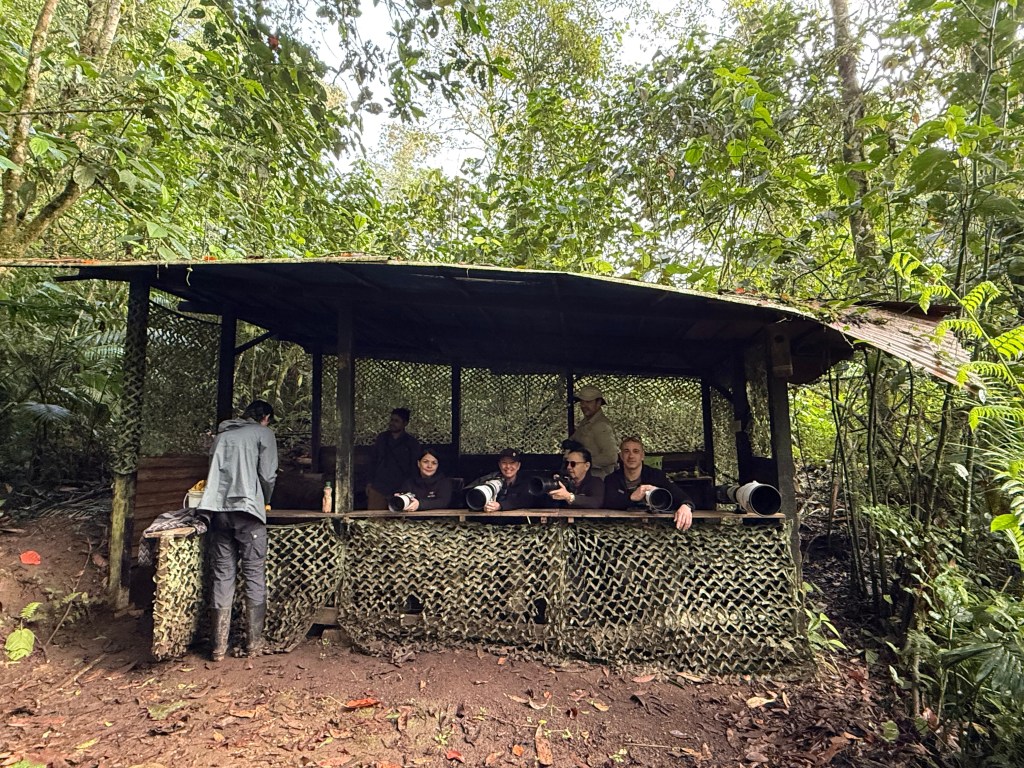
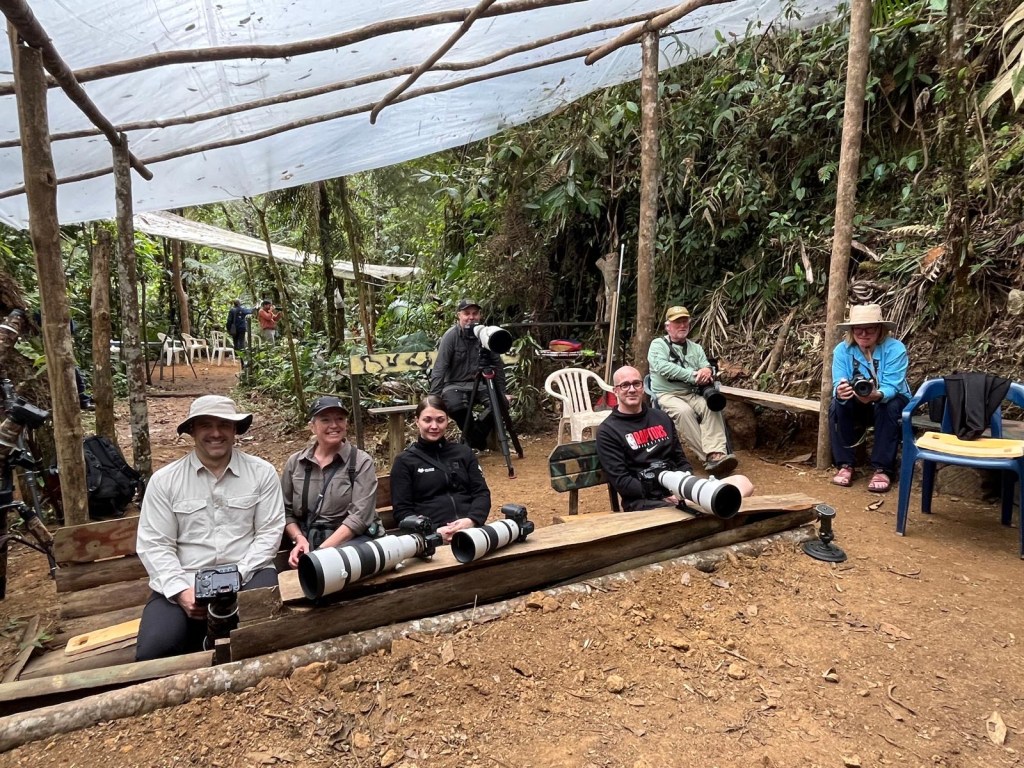
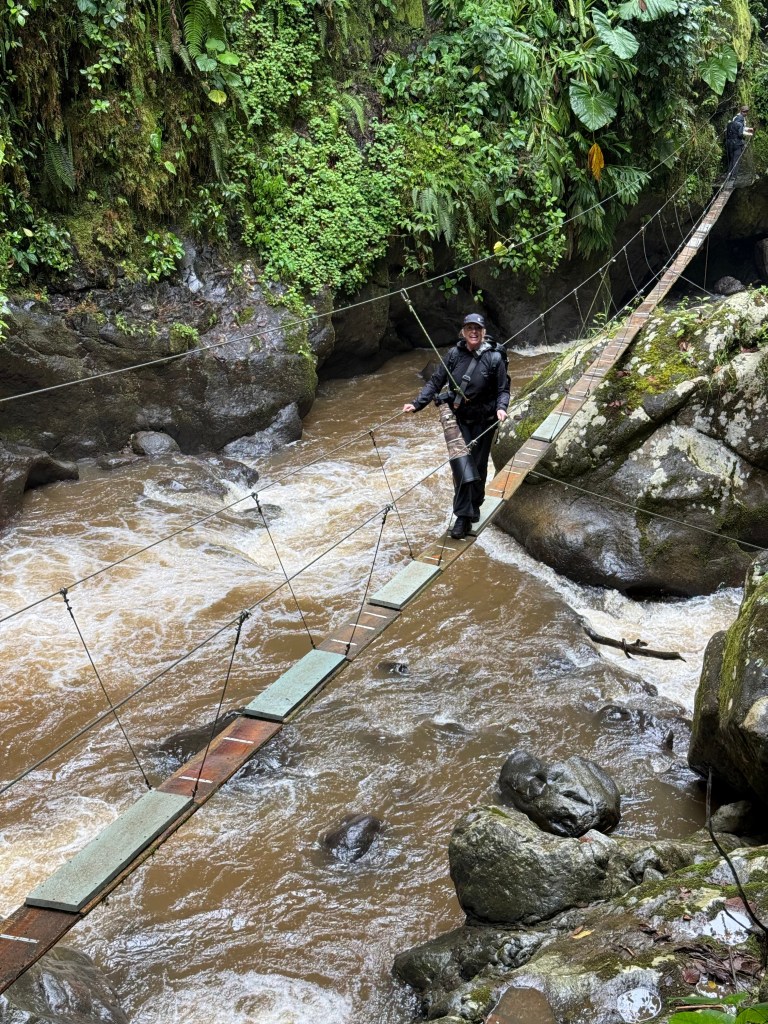
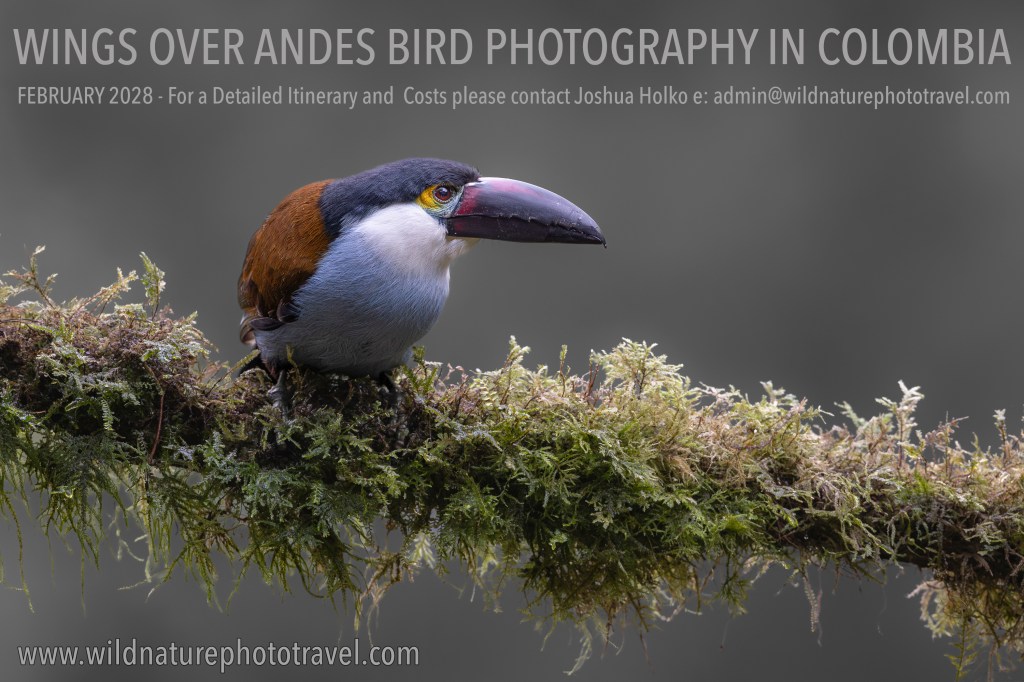
In February of 2026, I ran an all-new Wild Nature Photo Travel 14-day workshop for birds in the Andes Mountain range of Colombia. This intensive bird photography workshop ran from February 10th until February 24th, 2026 and took us across a vast region of the Colombian Andes. We began in the city of Cali on the 10th and finished in the city of Medellin on the 24th of February. Like my Pallas Cat of Eastern Mongolia Report, this trip report will be a little different to the norm and includes a number of behind-the-scenes photographs from the field. Due to my heavy travel schedule, I will come back later in the year and update this post with additional still photographs from the trip as time permits.
Colombia is renowned as one of the best countries on earth for birds, boasting more than 1,950 species, which accounts for almost 20% of the world’s total. This remarkable diversity is due to its tropical climate and varied elevation changes thanks to the Andes and its location between the Pacific and Caribbean coasts. Devout birders have long sought out Colombia as a hot birding destination, but it is only in recent years that photographers have started to seriously get in on the action. This was our first workshop in Colombia, but as you will read below, it most definitely will not be our last.
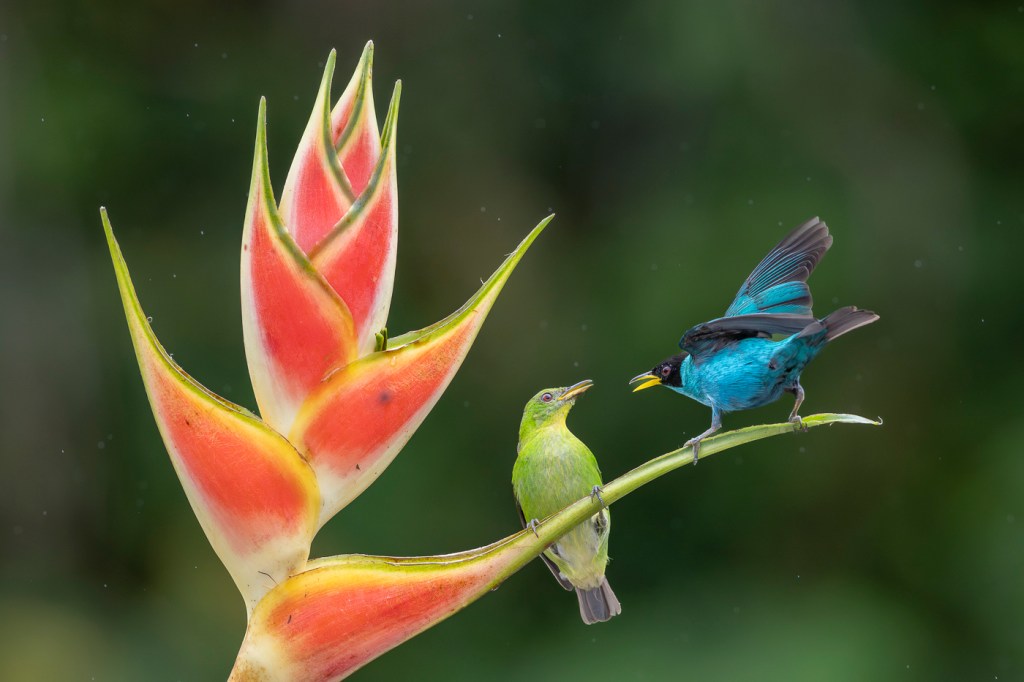
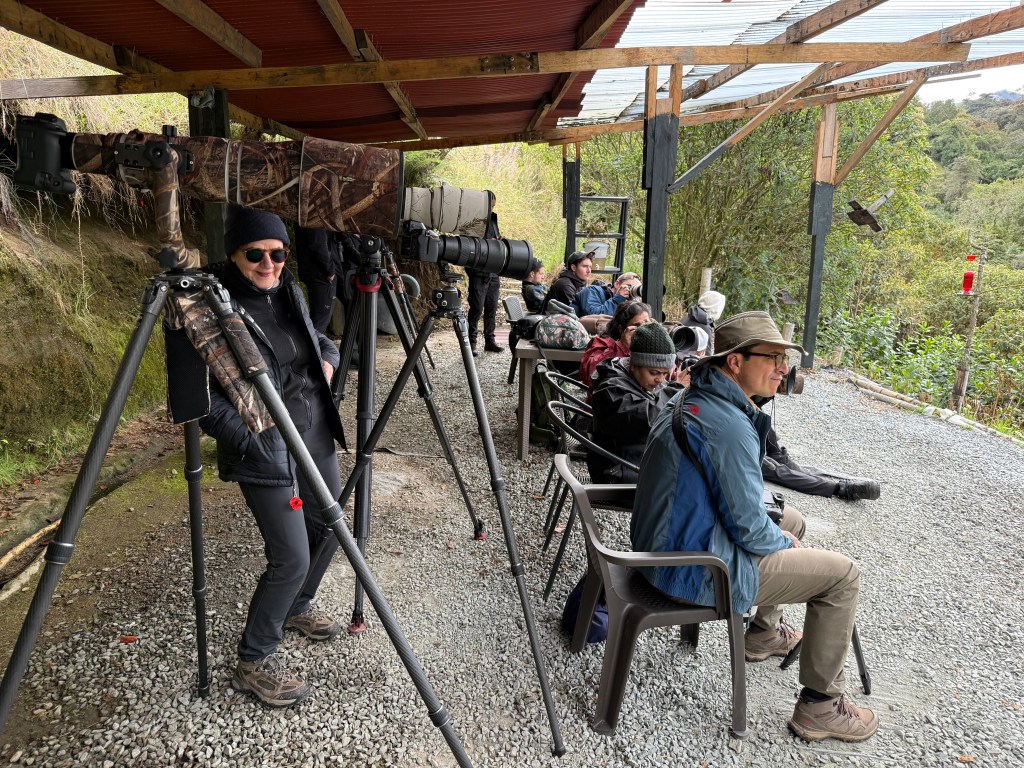
The KM 18 and San Antonio Cloud Forest areas offer an excellent introduction to bird photography in the Colombian Andes and were our first stops. Within an hour of our accommodation, we found some of Colombia’s best bird feeder setups, each with unique perches and various birds. This area of the western Andes boasts well-preserved habitats for those who enjoy photographing in natural environments. At feeder sites, this workshop targeted species such as the endemics Multicoloured Tanager and Colombian Chachalaca, as well as near-endemics like Scrub, Flame-rumped, Golden-naped, Saffron-crowned, and Rufous-throated Tanagers. In terms of hummingbirds, over 20 species frequent the feeders, including Blue-headed Sapphire, Purple-throated Woodstar, Long-tailed Sylph, Black-throated Mango, Green Hermit, Booted Rackettail, and many more. This was intensive bird photography of many incredible species, offering opportunities from wide-angle to super telephoto.
Our workshop then ascended to the central Andean range, visiting the world-renowned Rio Blanco and Tinamu Reserves near Manizales. Here, we had excellent chances for photographing antpittas, tanagers, and hummingbirds at the feeders, along with many other cloud forest and mountain birds.
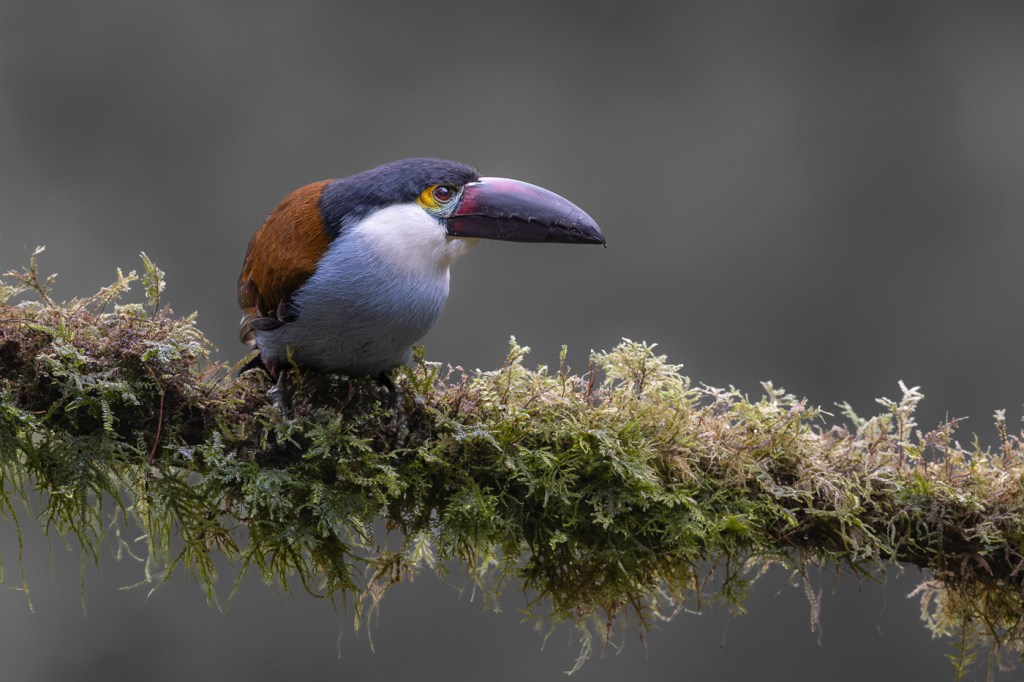
After further ascending, we focused on species adapted to high elevations in Los Nevados National Park, with the beautiful Nevado del Ruiz as a backdrop. We spent a day at Hacienda EL Bosque, where the stars of the show are Grey-breasted Mountain-Toucan and Crescent-faced Antpitta. We also visited El Color de Mi Reves, one of the newer sites in the area. We then headed to the quaint village of Jardin to experience the Andean Cock-of-the-rock lek, where it is common to have more than ten individuals posing for the cameras. Although it was incredible to see this amazing bird, the photography was difficult in the dark forest.
Our accommodation for this workshop included a range of high-quality resort-style accommodations with either shared or private rooms, depending on participant preference. In general, we avoided large hotels and instead focused on smaller, boutique-style accommodations close to our shooting locations. We had meals either at our accommodation or on location, where breakfast and lunch were often provided.
Over the course of the 14-day workshop, we observed and/or photographed more than 200 species! (Our final total for the trip was a whopping 204!) This was an absolutely fantastic result that exceeded expectations for all participants. With 204 species observed over 14 days, we saw on average 14.57 new species every day or more than one species every waking hour! Prior the trip I had not thought we would crack 150 species so exceeding 200 was a complete surprise. A complete list of species is included below by clicking on the download link.
Many of the locations we visited throughout this workshop were specifically set up for birders and bird photographers with individual local guides who specialised in each location. Feeder stations were set up for Hummingbirds at most of the locations we visited, as well as suitably appointed shooting locations for larger species. We photographed far too many species to list them all in the report one by one, but each presented its own opportunities and challenges. The antpittas, in particular, are a real challenge in the dark jungle forests of Colombia. Other species, such as the hummingbirds, present different opportunities and challenges. I frequently struggled with backgrounds in several locations in the dark forest, but was always able to find an angle that worked for me.
This was an intensive workshop with early starts (often around 5:30am) and full days of photography. We based ourselves in multiple locations in order to give ourselves the best possible opportunities for different species. Over the course of the 14-day workshop, we stayed in four different locations, plus one night at each end of the trip (in Cali and Medellin). The included map below illustrates our main target locations.
In equipment terms, big glass was the order of the trip, and I predominantly shot the RF 600mm f4L IS on the EOS R1; occasionally switching out to the RF 100-300mm f2.8L IS for larger, closer subjects. I did miss my RF 400mm f2.8L IS on several occasions, but the thought of schlepping a third ‘big-white’ through the airports deterred me from packing it. I did use my RF 1.4 TC on several occasions on the 600mm for an effective focal length of 840mm and lamented leaving the RF 2X TC at home for some of the very small, distant birds. I took my Sachtler Carbon tripod and ACE fluid head and used these at every single location to help support the 600mm lens. In hindsight, I would pack the 400mm f2.8L IS in lieu of the 100-300mm f2.8 as I generally have a preference for more (rather than less) telephoto compression.
Other than the small snippet of video above, I shot at 100FPS on the Canon EOS R1; I focused (pardon the pun) entirely on stills for the duration of the workshop. My own personal shot count for the trip was well over 30,000 RAW captures (Canon EOS R1 with pre-capture on High Speed + at 40 FPS!), and culling and editing are going to take quite some time. Many of the participants were well north of my own shot count! Pre-capture proved decisive on this workshop and enabled me to capture images of Hummingbirds that would have otherwise been impossible. Likewise, the auto focus system on the EOS R1 proved up to the task and consistently nailed focus on the fast-moving birds. Just as an aside, I am currently in the market for new CF Express Type B cards V4 – if anyone has a recommendation please let me know.
In terms of additional equipment I did not take with me: I will on the next trip pack both a small silver reflector to throw some additional light on the small hummingbirds in overcast conditions, and a small portable backdrop I can set up for the more difficult forest birds. It is certainly possible to use flash at many locations, but I generally prefer natural light photography. I may pack a small modelling light for the very dark forest birds.
The Andes (which runs the spine of South America) is a significant mountain range by global standards, and during the workshop, we ascended to a maximum altitude of 4125 metres (13,460 feet) in pursuit of the Buffy Helmetcrested Hummingbird (amongst other species). The Buffy Helmetcrested Hummingbird is specialised in high-altitude ecosystems, endemic to Colombia and found only in one very small part of Colombia. These small hummingbirds are characterised by a prominent crest and facial plumes that make them unique and highly sought after by birders (and very photogenic). This was a species I did not personally photograph, but very much enjoyed seeing in the wild as it flitted around the high-altitude flowers and plants.
We also photographed six different species of Antipa, a whopping 41 different Hummingbird species, five species of Woodpecker, Hawks, Kites, and so many more different species over the fourteen days we were in the field. For the full list, please check out the e-bird PDF linked above.
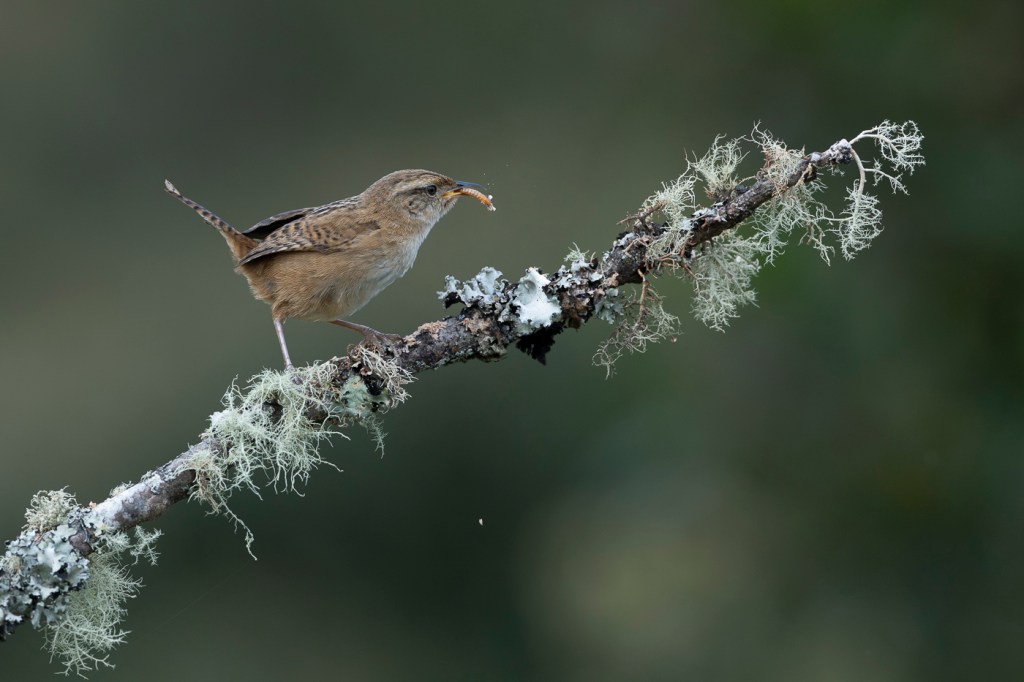
Personally, I most enjoyed the Tanigers, Hummingbirds, Toucans and Wrens. All of which we had multiple opportunities to photograph throughout the trip. The swordbill and Long-Tailed Nymph Hummingbirds proved a favourite amongst all of the group for their incredible bill and tail. In terms of the one that got away, it was for me the aptly-named ‘group’ dubbed ‘Bumblebee Hummingbird’. A tiny Hummingbird about an inch long that had amazing character and reminded me very much of the fat dragon with small wings from the film How to Train Your Dragon. This is a species I will try and capture on the next trip with the 600mm lens and 2x Teleconverter.
Temperatures varied considerably throughout the trip, depending on our location. High in the Andes mountains, temperatures were in the low single digits Celsius on several occasions, necessitating warmer layers and even a hat and gloves on occasion. Whereas lower lying areas saw temperatures in the high 20’s and low 30’s Celsius, where it was light shirts, hats and sunscreen. Although we had some rain on ocassion (as expected in the cloud forest areas) we were never prevented from photographing. In fact, the cloud and mist often added to the experience and photographs. The small raindrops on the Hummingbirds added a wonderful additional element on several occasions. Rain will always draw me out to photograph wildlife. The additional element of water always adds a more evocative and emotive feel to a photograph.
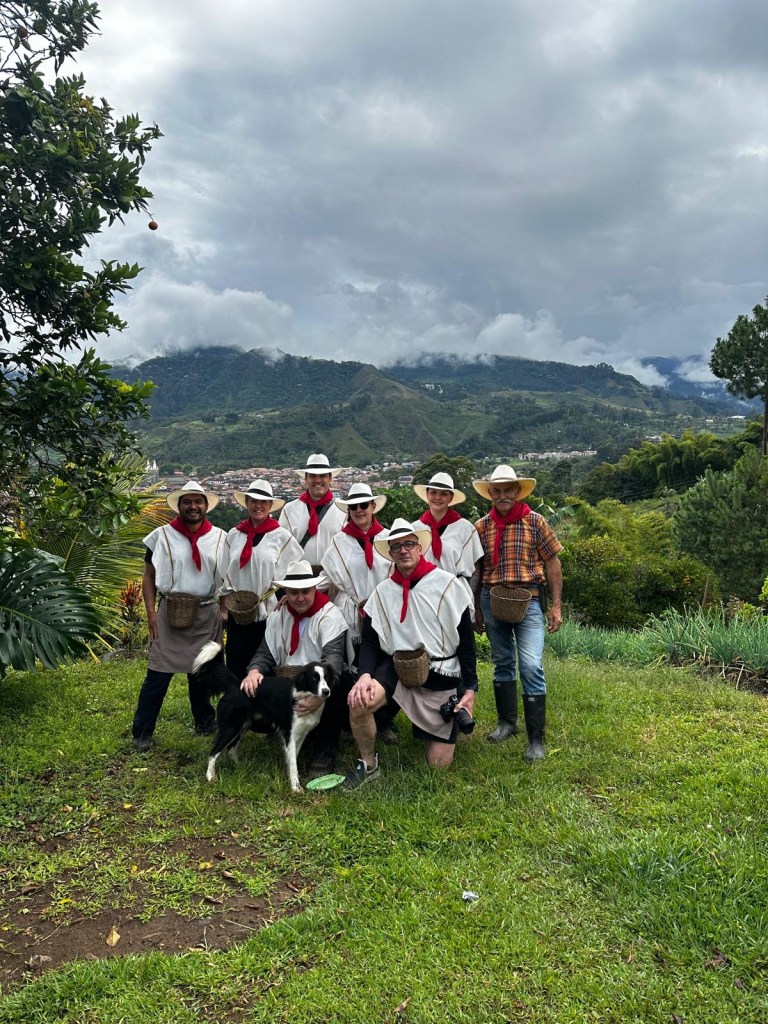
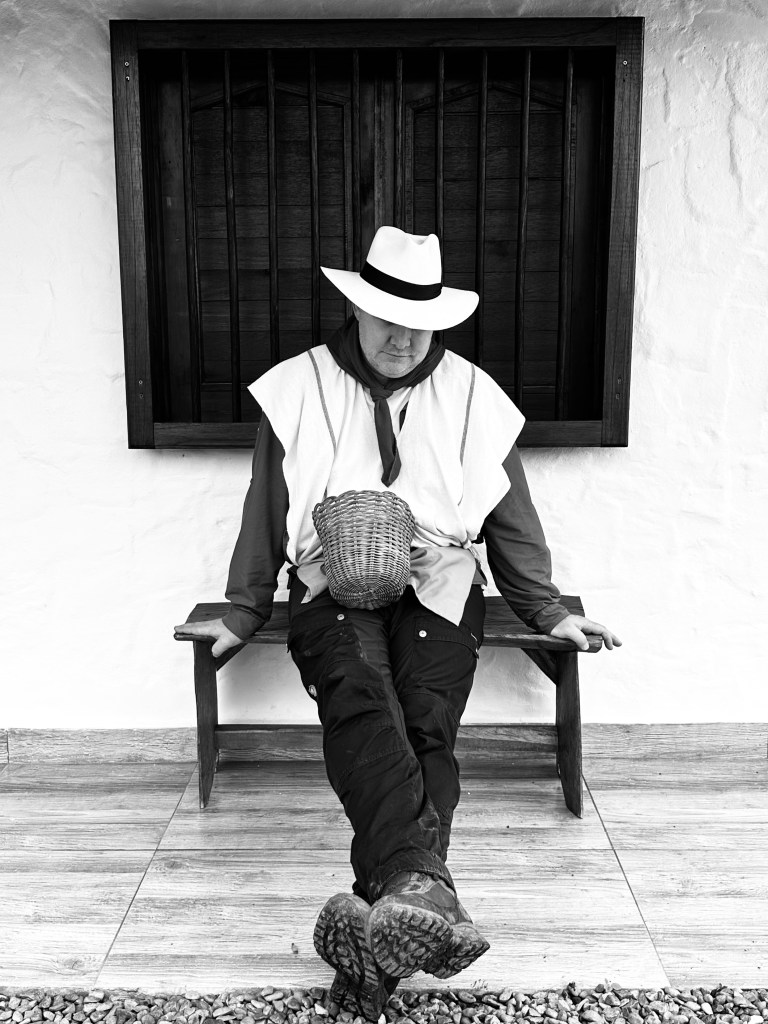
On our last day of travel back to Medellin, we made a wonderful three-hour stop at a small bespoke coffee plantation for a deep dive behind-the-scenes tour on all things coffee. The tour took us from the initial planting and cultivation to the finished product. And of course, an opportunity to pick some berries and an extensive tasting! This was a little added bonus for the group that was thoroughly enjoyed and a wonderful way to wrap up our workshop. On our return to Medellin, we farewelled over dinner before our onward flights the following day.
My sincere thanks to all of the participants who took part in this workshop and who placed their trust and faith in my company, Wild Nature Photo Travel to organise first class logistics and shooting locations. My thanks and heartfelt gratitude also to Jose and John, who provided us with brilliant first-class local guiding and driving throughout our trip – thank you. Jose, in particular, deserves special credit for his seemingly endless knowledge of birds and ability to identify a species even from the vaguest of descriptions. Credit to my partner Susanne Ribberheim for the portrait above.
In February of 2028, I will be offering this workshop again for a small group of just six photographers. This workshop is for passionate and keen photographers who want to undertake a deep immersion in bird photography at one of the best places on earth, with the highest number of species. Full details are on my website at www.jholko.com/workshops. Some places are already spoken for so please do not delay to avoid disappointment.
Travelling on this bird photography workshop to Colombia is about far more than simply adding species to a list. It is about immersing yourself in one of the most biodiverse countries on Earth with purpose, patience, and photographic intent. Colombia is a kaleidoscope of colour and sound, home to an astonishing variety of hummingbirds, tanagers, toucans, antpittas and endemic species found nowhere else. This is a workshop where you will develop your ability to read the light, improve composition, and storytelling. This is about going beyond opportunistic snapshots and moving toward crafting powerful, considered images that truly reflect the vibrancy and intimacy of these birds in their environment. Please contact me for further details.